What’s Inside
- Start with a Ruthless Purge and the “One-In, One-Out” Rule
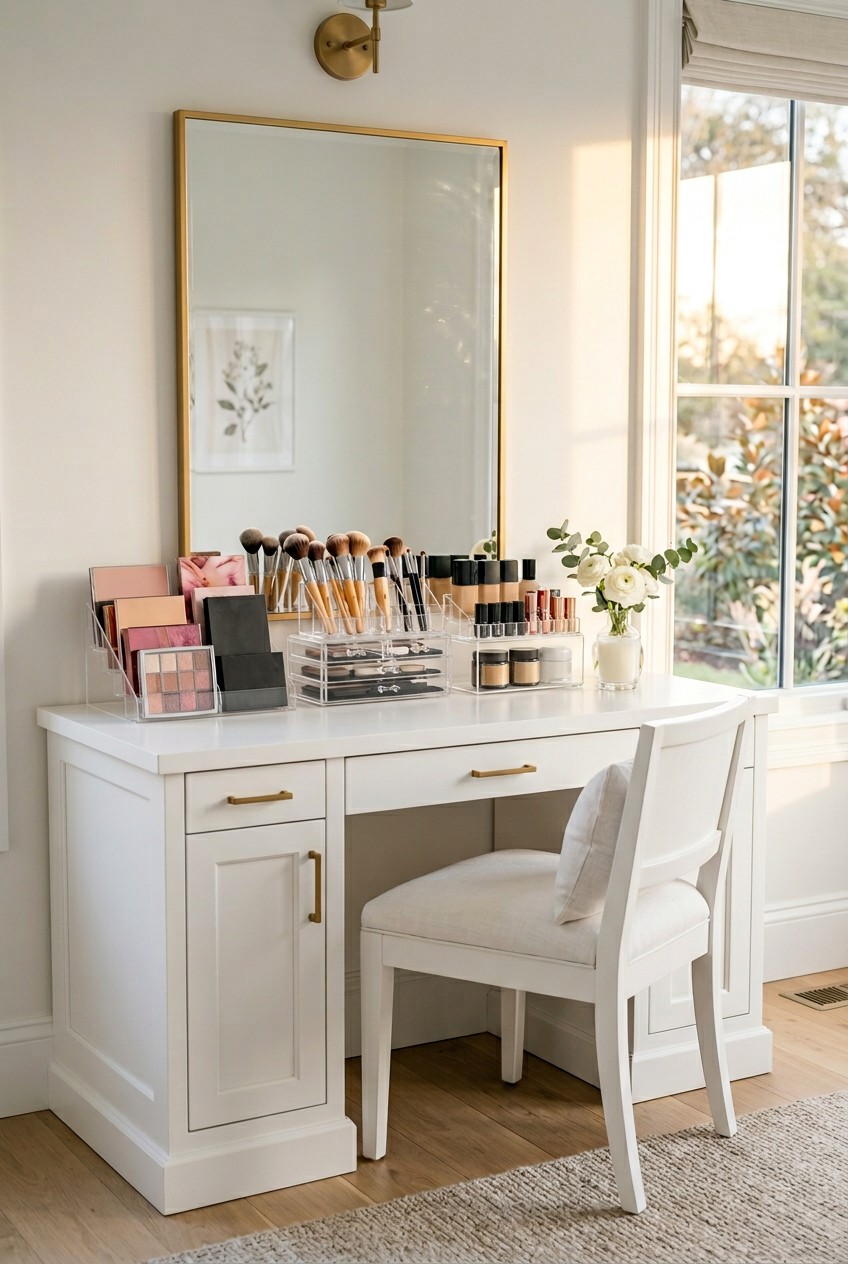
- Invest in Clear, Stackable Acrylic Organizers for Visibility
- Customize Drawer Interiors with Adjustable Dividers
- Create a Magnetic Board for Your Makeup Organization DIY
- Repurpose Spice Racks for Tiered Organization
- Upcycle Jars and Candle Holders for Brush Storage
- Maximize Vertical Space with Tiered Caddies and Wall Mounts
- Categorize and Label Everything for Efficiency
- Leverage IKEA’s Versatility for Budget-Friendly Solutions
- Repurpose Ice Cube Trays for Small Product Organization
- Utilize Over-the-Door Shoe Organizers for Bulkier Items
- Store Daily Essentials on a Tray, Others in Drawers
- DIY Sushi Mat Brush Roll for Travel or Compact Storage
- Prevent Product Deterioration by Avoiding Heat and Humidity
- Implement Monthly Maintenance for Your Makeup Organization DIY
Last Tuesday at Whole Foods, I caught my reflection in the dairy case and gasped. I had a thick smear of beige foundation across my white linen collar. My morning routine had become a disaster zone. The sticky, beige sludge of a leaked $40 NARS foundation bottle had coated my entire bathroom drawer. I was digging through a ceramic bowl of crusty mascaras just to find one clean brush. It was a nightmare. If you want to master your makeup organization DIY, stop treating your bathroom counter like a dumping ground. I tried shoving everything into random aesthetic baskets for months before figuring it out. It doesn’t work. You need a system that makes sense for how you get ready. I’m going to share the exact strategies, specific products, and hard lessons I’ve learned while overhauling my vanity. Grab a coffee. We’ve got a lot of sorting to do.
1. Start with a Ruthless Purge and the “One-In, One-Out” Rule

Before you think about buying cute bins, you’ve got to declutter. I’m serious. Last month, I was standing in my bathroom smelling a bottle of liquid foundation. It smelled like old crayons and sour milk. Disgusting. Professional organizers constantly preach the “one-in, one-out” rule. I finally listened. You need to assess your entire collection and toss the expired junk. Mascara only lasts 3 to 4 months. Liquid eyeliner is the same. Liquid foundation maxes out at 6 months. This ruthless purging is a huge 2026 trend because holding onto old makeup is just asking for bacterial acne. I learned this the hard way after breaking out along my jawline for weeks. It wasn’t my diet. It was a crusty tube of MAC Studio Fix Fluid ($42.00 for 1 oz) that I bought two years ago. I threw it in the trash. The feeling of tossing old, separated makeup is freeing. You don’t need five half-empty bottles of concealer. You just don’t. Grab a black garbage bag and start tossing. If you haven’t worn that bright blue eyeshadow since last Halloween, it’s time to say goodbye. Keeping your collection small ensures your products actually work safely.
2. Invest in Clear, Stackable Acrylic Organizers for Visibility

Clear acrylic remains a massive trend for 2026, and for good reason. It looks sleek and lets you see what you own. The biggest mistake you can make is hiding your expensive palettes in dark, opaque boxes. Out of sight means out of mind. You’ll end up buying duplicates of things you already have. I recommend Muji high-quality, stackable acrylic cases. A 3-drawer unit costs around $35 USD, and their smaller 2-drawer units are about $21 USD. The heavy, thick plastic feels premium. It makes a satisfying, solid clicking sound when you close the drawers. If you don’t have a Muji nearby, The Container Store offers various Luxe Acrylic organizers. Their prices range from $16.49 to $24.74 for multi-drawer units. I swear by stacking three of the 2-drawer units on top of each other. It creates a beautiful, custom tower on my vanity. You can see the exact shade of every single MAC lipstick through the clear plastic. Skip the cheap, flimsy plastic bins from the dollar store. They crack easily and look cloudy after a few weeks. Spend the extra twenty bucks. It’s worth it for the durability and the clean aesthetic.
3. Customize Drawer Interiors with Adjustable Dividers

If you just throw your makeup into a drawer, it’ll turn into a chaotic soup of rolling eyeliners and shattered powders. You’ve got to maximize your drawer space by creating custom compartments. I tried using tiny cardboard boxes for a while, but they looked terrible and slid around every time I opened the drawer. Now, I use adjustable drawer dividers. The OXO Good Grips 8-pack expanding dividers (which stretch from 12.2 to 21.4 inches) are brilliant. They cost around $22.99 at Target. They have foam pads on the ends so they grip the inside of your drawer tightly. No more scraping sounds of lipsticks rolling to the back. If you want a cheaper route, use DIY foam core board. Buy a sheet of 3/16-inch thick foam board from a craft store for about $4.00. Use an X-Acto knife to cut 1.5-inch high strips to fit your specific drawer dimensions. You can create the exact size compartments you need for chunky bronzer compacts or skinny lip pencils. I cut tiny 1-inch squares for my single eyeshadows. It takes about an hour of measuring and cutting, but the custom fit is satisfying.

4 Pack Laundry Pods Container
Honestly, 4 Pack Laundry Pods Container surprised me — sturdier than it looks in the photos, and over 473 buyers gave it 4.5 stars.
4. Create a Magnetic Board for Your Makeup Organization DIY

This is my favorite space-saving hack. If you have zero drawer space, look at your walls. You can build a custom magnetic makeup board for under $20. Go to Home Depot and buy a 10-foot roll of galvanized steel flashing for about $8.48. Then, head to Michaels and grab a decorative 14×16 inch picture frame for around $5.99 on sale. Cut the steel flashing with tin snips to fit inside the frame. Now, here is the crucial part. Don’t use thin magnetic strips on your makeup. I ruined a brand new $54 Anastasia Beverly Hills eyeshadow palette because the weak strip peeled off. The palette crashed onto my tile floor and shattered everywhere. It was a powdery, sparkly disaster. Learned that the hard way. Instead, buy strong ceramic or flexible circle magnets (about $6.00 for a pack of 50). Use a dab of hot glue to attach a magnet to the back of your compacts and palettes. Let the glue dry completely. Then, just stick your makeup right onto the framed steel board. It keeps your most frequently used items visible, off your counter, and looking like a piece of modern art.
5. Repurpose Spice Racks for Tiered Organization

A common mistake is letting small items like nail polish and lip gloss get lost in the back of deep cabinets. You need tiered storage. My secret weapon is the spice aisle. You can transform an inexpensive wire or wooden spice rack into the perfect tiered organizer. I picked up a Brightroom wire spice rack for $9.00 at Target last month. It sits perfectly inside my medicine cabinet. The three tiers allow me to see every single bottle of my Essie nail polishes ($10.00 for 0.46 oz) without having to move anything. If you want a fun weekend project, build a DIY wooden version. Go to the hardware store and buy a 1.5-inch and a 2.5-inch pine board. Cut three stair-step tiers to scale exactly to your cabinet space. I loved smelling the fresh pine wood while cutting these pieces on my patio. Sand the edges smooth and paint it with a high-gloss white enamel to match your bathroom decor. It looks custom and keeps all those tiny, annoying bottles lined up and accessible. You might also like: 20 Brilliant Indian Home Makeover Ideas for Any Style
6. Upcycle Jars and Candle Holders for Brush Storage

Stop throwing away your expensive candle jars. They’re the best containers for storing makeup brushes. I have a slight addiction to Bath & Body Works 3-wick candles ($26.95 for 14.5 oz). When they burn down, I refuse to toss the heavy glass jars. Here’s how you clean them. Use a blow dryer on high heat to melt the residual wax at the bottom. Once it’s liquid, pour it into the trash. Never down the drain. Then, use a paper towel to wipe out the black soot and sticky wax. Wash the jar with Dawn dish soap and hot water. It’ll look brand new. Use these jars to store your makeup brushes, eyeliners, and mascaras fully upright. This prevents the delicate bristles from getting crushed and bent out of shape in a drawer. To keep the brushes standing straight up, fill the bottom two inches of the jar with decorative glass beads. I buy the 16 oz bags of clear glass gems from Dollar Tree for $1.25. The heavy beads give the jar stability so it won’t tip over when you grab a heavy foundation brush. It looks chic on a vanity. You might also like: 15 Inspiring Aesthetic DIY Home Decor You Can Try Today

AMKUFO 6 Pack-Closet-Organizers-and-Storage
If you want something that just works, AMKUFO 6 Pack-Closet-Organizers-and-Storage is a safe bet (52 reviews, 4.5 stars).
7. Maximize Vertical Space with Tiered Caddies and Wall Mounts

Professional organizers emphasize vertical storage. If your counter is cluttered, you aren’t looking up. You need to utilize the empty air space above your sink. I highly recommend the SONGMICS 3-Tier Makeup Organizer. It costs about $25.99 on Amazon. It has a tiny footprint but holds a ton of product. I keep my heavy skincare bottles on the bottom tier and my daily makeup on the top two. If you want your counters completely clear, look into wall-mounted acrylic spice racks. You can screw these directly into the wall next to your mirror. I love the cold, sturdy feel of the metal screws holding the thick acrylic shelves in place. They’re the perfect depth for holding rows of lipsticks and liquid blushes. This is particularly useful in smaller apartment bathrooms to free up valuable counter space. I used to knock my setting spray into the sink every morning because my counter was so crowded. Moving everything up onto the wall solved that annoying problem. You might also like: 15 Gorgeous Organizing Bathroom Home Hacks Ideas Worth Trying This Year
8. Categorize and Label Everything for Efficiency

A massive trend for 2026 is hyper-categorization. You need to organize your makeup strictly by type: eyes, face, lips, and tools. Don’t mix your lip liners with your eyeliners. You’ll grab the wrong one when you’re rushing. I once lined my lips with a waterproof black NYX eyeliner ($9.00 for 0.04 oz) because I was digging through a messy, mixed drawer in the dark. It took twenty minutes and half a bottle of micellar water to scrub it off. Never again. Once you separate everything, you’ve got to label the sections. I use a DYMO LetraTag 100H label maker. It costs $19.99 at Walmart. I print out crisp, black-on-white adhesive labels and stick them to the front lip of my acrylic drawers. When I’m half-asleep at 6 AM, I don’t want to think. I just want to read “Blush” and open the correct drawer. This streamlines your routine and forces you to maintain order. If a drawer says “Concealer,” you won’t casually toss a random lip gloss in there. Labels create strict boundaries for your clutter.
9. Leverage IKEA’s Versatility for Budget-Friendly Solutions

IKEA remains the holy grail for DIY makeup storage. If you have a large collection, you need the IKEA Alex drawer units. They’re iconic for a reason. Prices vary, but they generally run $89.99 for the 5-drawer unit. I remember hauling those heavy, flat-pack cardboard boxes up three flights of stairs to my old apartment. Building them is a pain, but the result is unmatched. The drawers are wide and shallow, which is the dimension you want for makeup. Deep drawers just create black holes where products go to die. To organize the inside of the Alex drawers, I use the IKEA GODMORGON box with compartments. It costs $19.99 and fits perfectly inside. The smoky, semi-transparent plastic looks high-end. It has specific little square sections that perfectly hold chunky lipsticks, setting powders, and beauty sponges. You can mix and match different IKEA inserts to create a custom vanity setup for under $150. It’s the most cost-effective way to store a massive makeup haul without looking like a hoarder.

HomePekite Laundry Pods Storage Container
A dependable everyday pick — HomePekite Laundry Pods Storage Container pulls in 15 ratings at 4.5 stars. Not flashy, just solid.
10. Repurpose Ice Cube Trays for Small Product Organization

This is a surprising tip, but it works flawlessly for tiny items. I used to have tiny MAC single eyeshadows ($19.00 for 0.04 oz) floating around the bottom of my drawers. They would get stuck in the back corners, covered in loose powder, and I’d forget I owned them. Now, I use a silicone ice cube tray. I bought a Room Essentials silicone tray for $3.00 at Target. The flexible silicone is amazing because it doesn’t rattle or slide around in the drawer. Each little square compartment is the perfect size for an individual eyeshadow pot, a sample-sized perfume vial, or a pair of single false eyelashes. The individual compartments keep small items separated and easily visible. You just open the drawer and look down at a perfect grid of your smallest products. It prevents them from getting lost and keeps the packaging from getting scratched up. Plus, if a powder shatters, the mess is contained to one tiny little silicone square instead of ruining the whole drawer.
11. Utilize Over-the-Door Shoe Organizers for Bulkier Items

If you have a tiny bathroom with zero cabinet space, use the back of your door. An over-the-door shoe organizer is a lifesaver for bulky beauty items. I bought the MISSLO over-the-door shoe storage organizer with 24 mesh pockets for $16.99 on Amazon. I love the crinkly sound of the breathable mesh pockets. Don’t buy the ones with solid plastic pockets; they trap moisture and get gross. I use this organizer for my largest, most awkward items. It perfectly holds my massive Morphe eyeshadow palettes ($27.00 for 35 pans), my heavy bottles of body lotion, and even my hot hair tools once they cool down. Each pocket is deep enough that nothing falls out when you swing the door open. This frees up so much drawer and counter space. It’s brilliant if you share a bathroom with a roommate or a partner. You can claim the back of the door for your bulky items and leave the tiny vanity drawers for your daily essentials.
12. Store Daily Essentials on a Tray, Others in Drawers

One of the biggest mistakes people make is keeping their entire makeup collection on the bathroom counter. It creates visual clutter and makes wiping down the sink a chore. Expert organizers advise keeping only your most-used, absolute daily products visible. I keep my everyday foundation, my favorite tube of mascara, and my daily brushes on a small, decorative tray. I use the Threshold Marble Vanity Tray, which I found for $24.99 at Target. The heavy, cool marble looks elegant. Everything else—the bright red lipsticks, the glitter palettes, the heavy contour creams—goes into the drawers. I used to clutter my counter so badly that I couldn’t find a safe spot to put down my hot flat iron. I ended up burning the edge of a plastic comb. Now, my counter is 90% empty space. The tray acts as a physical boundary. If the tray is full, nothing else is allowed on the counter. It forces you to put things away immediately after you use them.

Rubbermaid Configurations Deluxe Custom Closet Kit 4-8 Ft.
Rubbermaid Configurations Deluxe Custom Closet Kit 4-8 Ft. Adjustable has been one of the most consistently praised picks in this category. 81 reviewers averaged 4.5/5.
13. DIY Sushi Mat Brush Roll for Travel or Compact Storage

If you travel frequently, or just want a compact way to store your brushes, try this DIY. Repurpose a bamboo sushi mat into a rolling brush organizer. I bought a Helen’s Asian Kitchen Bamboo Sushi Mat for $4.50 at Kroger in the international aisle. I also bought a yard of 1/4-inch black elastic for $2.99 from a craft store. You weave the elastic in and out of the bamboo slats, creating little loops of varying sizes. Slip your makeup brushes into the loops. The smooth, cool bamboo sticks protect the delicate bristles from getting smashed. When you’re done, roll the mat up and tie it closed with a piece of ribbon. It’s satisfying to roll up. This protects your expensive brushes and keeps them clean when you throw them into a dirty suitcase. It’s so much better than those bulky leather brush cups that take up half your luggage space. Plus, it costs less than ten dollars to make.
14. Prevent Product Deterioration by Avoiding Heat and Humidity

This is a critical mistake that almost everyone makes. Don’t store your expensive makeup directly on your bathroom counter near the shower. Bathrooms are humid, hot environments. Expert aesthetician Valerie Barnett advises storing makeup in a dark, dry, and cool place to preserve the formula and prevent mold. I learned this lesson the hard way. I left a brand new tube of Charlotte Tilbury Matte Revolution lipstick ($35.00 for 0.12 oz) on my bathroom counter during a week of taking intensely hot, steamy showers. The heat melted the lipstick inside the tube. When I opened it, it had an awful oily separation and the bullet snapped right off at the base. I was furious. Now, I keep all my cream products and lipsticks in my lower bathroom cabinets. Hot air rises, so the lower cabinets stay cooler and drier than the upper medicine cabinets. If you have the space, keeping your makeup vanity in your bedroom rather than the bathroom is the best way to protect your investment.
15. Implement Monthly Maintenance for Your Makeup Organization DIY

You can buy all the acrylic organizers in the world, but if you don’t maintain the system, it’ll turn back into a disaster zone in two weeks. To ensure your makeup organization DIY lasts, you’ve got to schedule a strict monthly maintenance routine. I set a reminder on my phone for the first Sunday of every month. I grab a tub of Clorox Disinfecting Wipes ($5.49 for a 75-count at Costco) and get to work. I love the sharp, clean lemon scent of the wipes cutting through the greasy foundation residue on my acrylic drawers. I wipe down every single surface. I check the bottom of the drawers for any expired products I might have missed. I sharpen all my dull lip pencils. Most importantly, I return any “wandering” items to their designated spots. It’s easy to accidentally leave a blush in the eyeshadow drawer when you’re rushing. This proactive approach, highly recommended by professional organizers, prevents the clutter from accumulating again. I usually snack on some Trader Joe’s peanut butter pretzels while I do this. It takes about twenty minutes, and it resets my entire space for the month ahead.
Honestly, taking control of your vanity space changes how you start your entire day. You won’t be stressed out, digging for a clean blending brush while running ten minutes late. I’ve tried almost every storage hack on the internet, and these specific methods are the ones that hold up to daily life. Stop buying makeup you can’t see, and start treating your collection with a little respect. If you found these tips helpful, I’d love it if you saved this post. Pin it to your favorite bathroom organization board so you can reference all the exact measurements and product names during your next Target run. Now, go grab a trash bag and start tossing those expired mascaras. You’ve got this.

Galasily 3 Pack Laundry Detergent Dispenser Container with
If you want something that just works, Galasily 3 Pack Laundry Detergent Dispenser Container with Tray is a safe bet (114 reviews, 4.5 stars).
Frequently Asked Questions
How often should I purge my makeup collection?
You should assess your collection every 3 to 6 months. Mascaras and liquid eyeliners expire in 3-4 months, while liquid foundations last about 6 months. Tossing old makeup prevents bacterial growth and keeps your skin clear.
What is the best way to store makeup brushes?
Store your brushes upright in heavy glass containers, like repurposed candle jars. Fill the bottom two inches with decorative glass beads to keep the brushes standing straight. This protects the bristles from getting crushed in drawers.
Is it bad to store makeup in the bathroom?
Yes, storing makeup on a bathroom counter exposes it to high heat and humidity from showers, which can melt products and cause mold. It’s best to store makeup in a cool, dry place like lower cabinets or a bedroom vanity.
How can I organize makeup in shallow drawers?
Use adjustable drawer dividers or cut custom strips of foam core board to create precise compartments. Silicone ice cube trays are also perfect for holding tiny items like single eyeshadows and preventing them from rolling around.
