What’s Inside
- 1. Transform Thrifted Lamps with Textured Paint
- 2. Sculpt Personalized Clay Planters
- 3. Arm Knit a Chunky Blanket Without Needles
- 4. Install Fluted Wall Panels for Instant Texture
- 5. Create a Smart Hydroponic Garden
- 6. Craft Pleated Lampshades from Rice Paper
- 7. Design an Emotional Gallery Wall
- 8. Paint Furniture in Bold Colors
- 9. Upgrade Baseboards for Instant Character
- 10. Hang Statement Mirrors Strategically
- 11. Replace Peel-and-Stick Backsplashes with Limewash
- 12. Mount Digital Art Panels
- 13. Sew Custom Linen Curtains
- 14. Add Wooden Beams for Subtle Texture
- 15. Create Aesthetic DIY Home Decor Vignettes
Last month I spent $600 on a single “designer” throw pillow before realizing I could make better-looking DIY home decor myself for under $20. That overpriced cushion now sits in my donation pile, while my handmade pieces get compliments every time someone walks through my door. If you’re tired of cookie-cutter decor that drains your wallet, these 15 projects will help you create a home that actually feels like yours.
1. Transform Thrifted Lamps with Textured Paint

I picked up three ugly brass lamps from Goodwill last spring for $4 each, and honestly, they looked terrible. But here’s my secret: mix 1 tablespoon of baking soda into 8 ounces of latex paint for an instant textured finish that mimics those expensive limewash walls everyone loves.
The key is priming shiny surfaces first with cabinet enamel. Most people skip this step and wonder why their paint peels off after two weeks. I learned this the hard way after my first attempt flaked off like sunburned skin. Once primed, stipple the baking soda mixture on with a stiff brush in random patterns.
This whole project costs under $15 per lamp, and the result looks like something from a boutique home store. I personally swear by Benjamin Moore’s Chantilly Lace mixed with baking soda for that perfect matte white finish. The texture catches light differently throughout the day, adding depth that flat paint just can’t match.
2. Sculpt Personalized Clay Planters

Air-dry clay changed how I think about planters completely. I use Crayola Model Magic (about $10 for 5 pounds) to sculpt 4-6 inch personalized pots with faces, geometric patterns, or whatever mood strikes me. My kitchen windowsill now has a family of little character planters that make me smile every morning.
Here’s what nobody tells you: if you need extra durability, bake your finished pieces at 200°F for an hour. Then seal everything with Mod Podge to make them water-resistant. This handmade approach creates authentic, story-driven pieces instead of mass-produced junk from big box stores.
I made wall hooks this way too. Just press a bent wire into the back before the clay dries, bake it, and you’ve got custom hooks for under $3 each. My daughter helped me make hers shaped like clouds, and they’re way sturdier than I expected. The imperfections make them charming rather than cheap-looking.
3. Arm Knit a Chunky Blanket Without Needles

I’ll be honest: my first chunky knit blanket looked like a toddler made it. The stitches were so oversized and sloppy that it resembled a fishing net more than cozy decor. Then I learned the proper technique, and now I’ve made six of these as gifts.
Use 10-15 pounds of arm knit wool yarn like Lion Brand Wool-Ease Thick & Quick (around $15 per skein). Cast on 28-32 stitches for a proper 50×60 inch throw. Fewer stitches create that sloppy look I mentioned. Warm neutrals work best for a soft minimalism trend, which I totally agree with after trying a bright purple one that clashed with everything.
The whole process takes about 45 minutes once you get the rhythm down. Your arms will be tired, but it’s weirdly meditative. I made mine in oatmeal and cream tones, and it’s become the most-used blanket in my living room. Just don’t wash it in hot water unless you want a doll-sized version.

Durmmur 2 Pack Hat Racks for Baseball Caps
A dependable everyday pick — Durmmur 2 Pack Hat Racks for Baseball Caps pulls in 109 ratings at 4.5 stars. Not flashy, just solid.
4. Install Fluted Wall Panels for Instant Texture

Peel-and-stick fluted panels were my gateway into textured walls. I used Art3d 12×12 inch PVC sheets (about $25 for a 4-pack) on one 8×10 foot accent wall in my bedroom, and the depth it added is incredible. The vertical grooves catch shadows beautifully.
Here’s the common mistake: people try to cover entire small rooms with these panels and it becomes overwhelming fast. Stick to one accent wall, and use construction adhesive along with the peel-and-stick backing for panels that won’t fall off in humid bathrooms.
Sand the edges where panels meet for seamless joints. I didn’t do this initially and you could see every single seam line. The trend extends this treatment to ceilings for added depth, which I’m planning to try in my hallway next month. It’s way easier than I expected and costs a fraction of hiring someone.
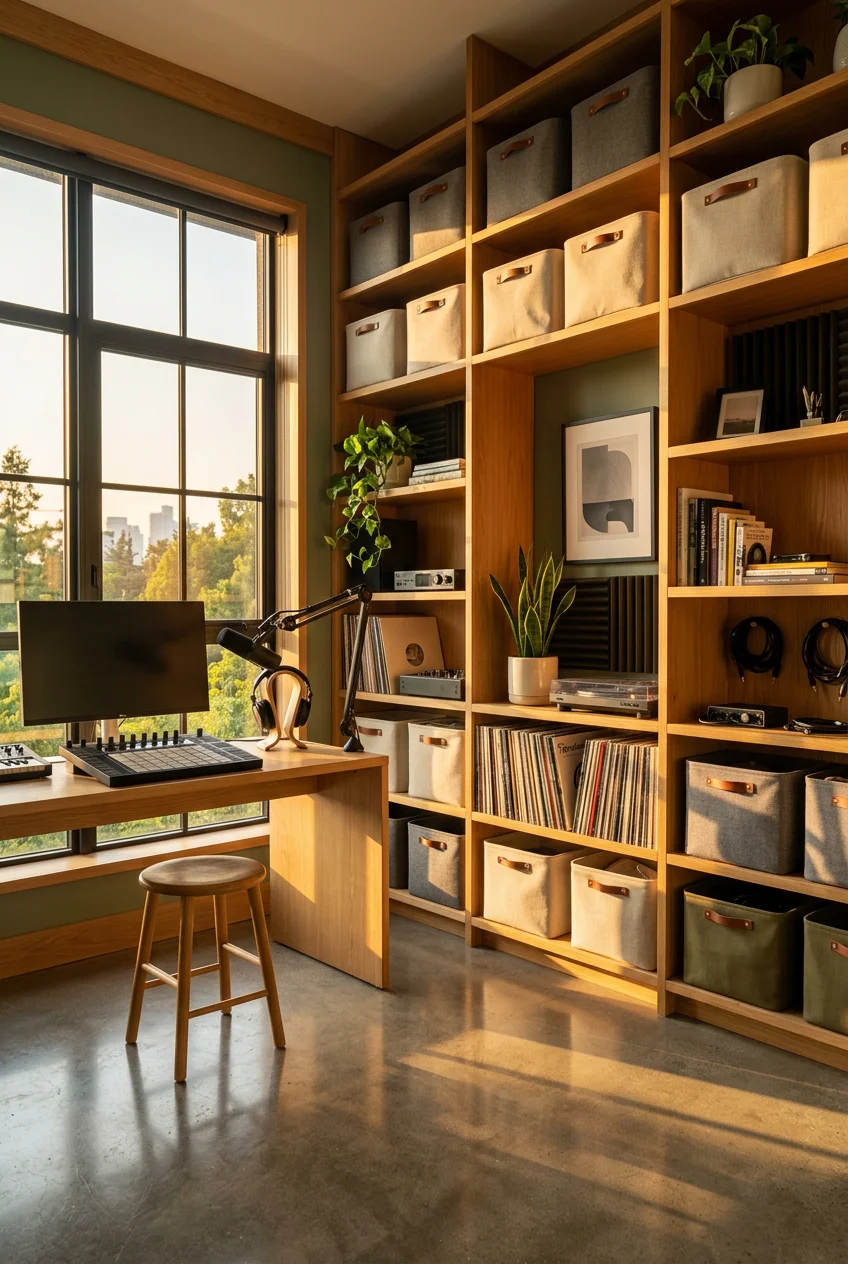
5. Create a Smart Hydroponic Garden

My AeroGarden Harvest ($150 with a 12×12 inch footprint) sits on my kitchen wall growing basil and microgreens under timed LEDs. I know this seems pricey for a DIY list, but hear me out: it’s plug-and-play aesthetic decor that also feeds you.
The lesser-known tip that sold me? You can program it via app for color-changing lights that match current trends. I set mine to shift to lime green hues during dinner parties, and guests always ask about it. It’s functional art that happens to grow food.
Fresh herbs cost me about $6 every week at the grocery store before this. The AeroGarden paid for itself in six months, plus my apartment smells amazing. The only downside is the pump makes a slight humming noise, but I honestly don’t notice it anymore. It fits perfectly into that wellness-focused design movement everyone’s talking about.
6. Craft Pleated Lampshades from Rice Paper

I made pleated lampshades last fall using 2 yards of rice paper ($5 per roll) and half a yard of fabric ribbon. Cut 3-inch strips, pleat them accordion-style, and glue to a $10 thrift store frame. The result looks like those $80 shades from boutique lighting stores.
Farmhouse designers love this technique for layered lighting in warm minimalism schemes. The rice paper diffuses light softly without that harsh overhead glare I hate. Here’s the pro tip nobody mentions: avoid hot glue on paper because it yellows over time. I use fabric glue instead, which stays clear and flexible.
My bedroom now has three of these at different heights, and the pleats create beautiful shadow patterns on the ceiling at night. The whole project took me about an hour per shade once I got the pleating rhythm down. They’re delicate, so don’t put them anywhere kids or pets might knock them over.

ukeetap Extra Large Expandable Silverware Organizer
Honestly, ukeetap Extra Large Expandable Silverware Organizer surprised me — sturdier than it looks in the photos, and over 46 buyers gave it 4.5 stars.
7. Design an Emotional Gallery Wall

Generic “Live Laugh Love” prints make me cringe. I framed 8×10 inch personal photos and travel prints in Nielsen 11×14 inch metal frames ($12 each) arranged in a 4×4 grid with exactly 2 inches between each frame. The spacing matters more than you’d think.
The common error is eyeballing the spacing and ending up with a crooked mess. Measure with painter’s tape first. I spent an entire Saturday repositioning frames before learning this trick. Now I map everything out on the floor before touching the wall.
Current design trends emphasize emotional depth over generic art, and I’m completely on board with this shift. My gallery wall tells the story of a road trip through Montana, complete with ticket stubs and pressed wildflowers between the photos. Guests actually stop and look at it instead of glazing over like they do with mass-produced prints. It cost me under $200 total and feels priceless.
8. Paint Furniture in Bold Colors

I painted a sad beige dresser from Facebook Marketplace in Behr Premium Plus hot pink ($20 for a quart), and it completely changed my bedroom’s energy. Use a foam roller for smooth coverage without brush marks. The transformation took two coats and about three hours total.
Colorists recommend mixing bold shades with warm neutrals for mood-boosting rooms. I paired my pink dresser with cream walls and natural wood accents, which keeps it from looking like a teenager’s room. The key is testing undertones on cardboard first to avoid clashing.
My first attempt at this technique resulted in a dresser that fought with my wall color because I didn’t test. I had to repaint it, wasting a weekend. Now I always buy sample sizes first. The bold color makes me genuinely happy every time I walk into the room, which sounds cheesy but it’s true. It’s way better than boring neutrals everywhere.
9. Upgrade Baseboards for Instant Character

Replacing baseboards sounds intimidating, but it’s honestly one of the easiest ways to add character without demolition. I used 5.25-inch colonial-style MDF trim from EverTrue pine (about $2.50 per foot) cut at 45-degree miters and nailed every 16 inches.
This fits perfectly into current wellness-focused cohesion tweaks. Taller baseboards make ceilings look higher and rooms feel more finished. The mistake everyone makes? Not caulking the joints. Those visible gaps ruin the whole effect and make it look amateur.
I did my entire living room in one weekend for under $150 including the miter saw rental from Home Depot. My contractor friend told me I saved at least $800 by doing it myself. The hardest part was getting the corners perfect, but even my imperfect attempts look way better than the sad 2-inch baseboards that were there before. It’s a game changer for rental upgrades too since you can take them with you.

HuggieGems Metal 4 Pack Magnetic Spice Storage Rack
Honestly, HuggieGems Metal 4 Pack Magnetic Spice Storage Rack Organizer for Refr surprised me — sturdier than it looks in the photos, and over 145 buyers gave it 4.5 stars.
10. Hang Statement Mirrors Strategically

I hung a Pottery Barn 30-inch round convex mirror ($200) at exactly eye level, about 5-6 feet up, angled 10 degrees outward. This trend amplifies light in small rooms, and they’re absolutely right. My dark hallway looks twice as bright now.
Here’s the surprising tip: pair statement mirrors with terracotta tiles below for grounded warmth. I have a small terracotta plant stand underneath mine, and the combination creates this cohesive moment that feels intentional rather than random. The convex shape adds dimension that flat mirrors can’t match.
Most people hang mirrors too high or perfectly flat against the wall. That slight outward angle reflects more light and creates visual interest. I use two heavy-duty picture hangers rated for 50 pounds each because the last thing I need is a shattered mirror and seven years of bad luck. It’s worth investing in proper hardware.
11. Replace Peel-and-Stick Backsplashes with Limewash

I ripped out the horrible faux stone peel-and-stick backsplash in my kitchen last month, and it felt therapeutic. Heat it with a hairdryer and scrape with a 5-in-1 tool. Then I applied Romabio Classico limewash paint ($55 per gallon, diluted 4:1) for that textured look everyone loves.
The texture revival strongly favors limewash over flat walls, and I understand why after living with it. It has depth and movement that changes with the light throughout the day. The peel-and-stick stuff always looked cheap and started peeling at the edges after six months anyway.
Limewash is forgiving for beginners. You literally can’t mess it up because the imperfections add to the character. I used a cross-hatch technique with a chip brush, and the result looks like something from a European farmhouse. It cost me about $30 for my 8-foot backsplash area, and I have enough leftover to do an accent wall in my bathroom.
12. Mount Digital Art Panels

Samsung The Frame 32-inch ($600) was my splurge purchase this year, and I use it to display AI-generated evolving murals like fading waves and abstract landscapes. You can customize everything via app for dynamic display trends, switching art to match your mood or season.
The budget hack? Use it as a virtual window in dim apartments. My bathroom has no natural light, so I mounted one showing a forest scene with dappled sunlight. It tricks your brain into feeling less claustrophobic. Way better than those static frames that look dated after a month.
I’ll admit the price made me hesitate, but the versatility justifies it. I’ve displayed my daughter’s artwork, family photos, famous paintings, and even calming nature scenes for meditation. It’s like having an art gallery that changes daily. The matte screen actually looks like canvas when it’s on, not like a TV, which was my main concern before buying.

Lifewit 6 Pack Clothes Storage Bins with Lids
A dependable everyday pick — Lifewit 6 Pack Clothes Storage Bins with Lids pulls in 1,072 ratings at 4.5 stars. Not flashy, just solid.
13. Sew Custom Linen Curtains

I bought upholstery-weight linen fabric 54 inches wide ($8 per yard) and stitched curtain panels with 2-inch rod-pocket hems using a 4.0 stitch length. The pro tip that saved me? Wash pre-cut fabric to prevent shrinkage. I skipped this on my first set and they ended up 4 inches too short after the first wash.
Layer linen curtains with wool throws for natural material minimalism. I have cream linen panels in my living room paired with a chunky knit throw on the couch, and the texture combination feels expensive and collected. Store-bought curtains in this quality would cost at least $150 per panel.
My panels cost about $35 each for floor-length 96-inch curtains. The sewing took maybe 30 minutes per panel once I figured out how to keep the fabric from shifting. I used lots of pins. The natural wrinkles in linen add to the relaxed aesthetic instead of looking messy, which is perfect for someone like me who hates ironing.
14. Add Wooden Beams for Subtle Texture

I embedded reclaimed 4×6 inch pine beams ($10 per foot) into my bedroom ceiling using L-brackets every 2 feet. This suits bedrooms perfectly, adding that cozy cabin feel without major renovation. The lesser-known trick? Distress them with a wire brush and stain in warm walnut for lived-in appeal.
I didn’t distress my first beam and it looked too new and fake against my vintage furniture. After roughing it up and adding stain, it looked like it had been there for decades. The texture catches shadows beautifully, especially with my bedside lamps creating uplighting.
This project scared me initially because ceiling work feels permanent. But the L-brackets make it totally reversible if you change your mind. I installed three beams running parallel across my 12-foot ceiling, and they add so much character for about $200 total. Way cheaper than coffered ceilings or other ceiling treatments contractors quote at thousands of dollars.
15. Create Aesthetic DIY Home Decor Vignettes

The final tip ties everything together: create intentional vignettes using your DIY pieces. I group my clay planters with thrifted books, my chunky knit blanket draped over a painted chair, and my custom lampshade lighting the whole scene. This layered approach makes everything look cohesive instead of random.
Use the rule of three: group items in odd numbers at varying heights. I learned this from a stylist friend, and it instantly elevated my shelves from cluttered to curated. My favorite vignette includes my textured lamp, a stack of three vintage books, and a small clay planter with trailing pothos.
The beauty of DIY decor is that every piece tells a story about the time you spent making it. When someone asks about my living room, I can share how I made almost everything myself for a fraction of retail prices. That connection to your space creates a home that actually feels like yours instead of a catalog copy. Start with one project that excites you most, and build from there. I promise you’ll get addicted to the creative process like I did.
These 15 projects completely transformed how I think about decorating. I spent years buying things I thought I should have instead of making things I actually wanted. Now my home reflects my personality, my effort, and my style for way less money than shopping at West Elm every weekend. Save this list and tackle one project per month. By this time next year, you’ll have a completely personalized space that makes you genuinely happy to come home to.

AMADA HOMEFURNISHING Floating Shelves
Honestly, AMADA HOMEFURNISHING Floating Shelves surprised me — sturdier than it looks in the photos, and over 114 buyers gave it 4.5 stars.
Frequently Asked Questions
What is the easiest aesthetic DIY home decor project for beginners?
Textured lamp makeovers are perfect for beginners. Mix 1 tablespoon baking soda into 8 ounces of latex paint, prime thrifted lamps with cabinet enamel, then stipple the mixture on with a stiff brush. The whole project costs under $15 and takes about an hour.
How much does it cost to make aesthetic DIY home decor?
Most projects cost $10-50 depending on materials. Clay planters run about $10, chunky knit blankets cost $45-75 for yarn, and textured paint finishes cost under $15. You’ll save 60-80% compared to buying similar items retail from home decor stores.
What materials work best for cozy aesthetic home decor?
Natural materials like linen fabric, wool yarn, air-dry clay, reclaimed wood, and rice paper create the warmest aesthetic. For 2026 trends, mix warm neutrals with textured finishes like limewash paint and fluted panels. Layer different textures for depth and visual interest.
Can renters do aesthetic DIY home decor projects?
Absolutely! Peel-and-stick wall panels, portable hydroponic gardens, DIY lampshades, chunky blankets, and painted thrifted furniture are all renter-friendly. Avoid permanent changes like installing ceiling beams or replacing baseboards unless your landlord approves. Focus on removable and portable projects.