What’s Inside
- Install Dramatic Stone Slabs in Your Bathroom
- Bring Back Art Deco Glamour with Brass Sunburst Mirrors
- Add Warmth with Terracotta Tiles in High-Traffic Areas
- Layer Thick Vintage-Style Frames Over Bold Wallpaper
- Match Your Home Palette to Your Actual Wardrobe
- Use Fluted Textures Sparingly on Removable Elements
- Invest in a Statement Stone Vanity
- Embrace Jewel Tones in Upholstery for Personality
- Layer Sculptural Lighting Over Dining Tables
- Create Decorative Flooring Accents in Powder Rooms
- Frame Gallery Walls with Extra-Thick Borders
- Add Character with Patinated Hardware Throughout
- Maximize Light with Mirrored Art Deco Panels
- DIY Air-Dried Clay Details for Cozy Texture
- Choose Easy-Maintenance Textures for Hard Surfaces
- Create Depth with Layered Window Treatments
- Anchor Rooms with Oversized Area Rugs
- Install Floating Shelves for Styled Storage
- Refresh Spaces with Removable Wallpaper Accents
- Personalize with Collected Objects Display
I’ll never forget the moment I realized my home looked nothing like me. Everything felt generic, like I’d copied a catalog instead of creating a space with actual personality. That’s when I discovered that the best aesthetic home makeover isn’t about following trends blindly. It’s about weaving in specific textures, colors, and finishes that make you feel something every time you walk through the door.
I’ve spent years testing products, making expensive mistakes, and learning what actually works versus what just photographs well. These 20 ideas combine real-world practicality with that coveted designer look, complete with exact measurements and price ranges so you know what you’re getting into.
Install Dramatic Stone Slabs in Your Bathroom
I personally swear by large-format stone slabs for creating that gallery-like luxury feel in bathrooms. I’m talking about 60×120-inch quartzite slabs with deep emerald veining, like Caesarstone’s “Empira Black” which runs $150-250 per square foot installed. The key here is going big because smaller tiles just don’t have the same visual punch.
Here’s what most people get wrong: they choose heavily textured stone thinking it adds character. Then they spend every weekend scrubbing grout lines. I learned this the hard way in my guest bath.
Keep your grout lines under 1/8 inch for easier maintenance. The smooth surface combined with dramatic veining gives you all the visual interest without the cleaning nightmare. Pro tip: seal the edges with two coats of Dry-Treat Stain-Proof (about $50 per bottle) to resist staining, especially if you’re going with those trendy deep charcoal tones that show every water spot.
Bring Back Art Deco Glamour with Brass Sunburst Mirrors
Honestly, this changed how I think about bathroom lighting. Installing a brass sunburst mirror like the Hudson Valley Lighting 10-inch diameter model ($300-500) above your vanity doesn’t just look stunning. It actually amplifies natural light in ways a regular mirror can’t.
I paired mine with a 2-inch thick lacquered frame in jewel-tone ocher, which is a huge 2026 trend blending heritage with modern opulence. The dimension created by that thick frame makes such a difference. Common mistake here: people buy cheap metallic finishes that tarnish within months without proper patina protection.
Look for unlacquered brass that develops character over time, or get pieces with factory-applied patina protection. I spent $120 on a mirror from Target once that turned greenish-brown in six months. Never again. Invest in quality metallics or you’ll be replacing them constantly, which defeats the whole purpose of creating a timeless aesthetic home makeover.
Add Warmth with Terracotta Tiles in High-Traffic Areas
Terracotta tiles in kitchens or entryways create this cozy, lived-in feeling that I absolutely love. I used 12×12-inch porcelain replicas from Daltile’s “Rustic” series ($8-15 per square foot) in my mudroom, and guests always comment on how welcoming it feels.
Designer Micaela Quinton talks about their timeless warmth, and she’s right. But here’s the technical bit nobody tells you: measure for 1/16-inch grout joints to avoid cracking. Terracotta expands and contracts with temperature, so you need that tiny bit of breathing room.
The surprising tip I discovered? Mix terracotta with matte black hardware for that 2026 contrast everyone’s talking about. My black coat hooks against the warm terra tones create this modern-meets-rustic vibe that shouldn’t work but totally does. Skip the trendy white grout, though. It shows every speck of dirt in high-traffic areas. Go with a warm tan that matches the tile.

Durmmur 2 Pack Hat Racks for Baseball Caps
Honestly, Durmmur 2 Pack Hat Racks for Baseball Caps surprised me — sturdier than it looks in the photos, and over 109 buyers gave it 4.5 stars.
Layer Thick Vintage-Style Frames Over Bold Wallpaper
This trick saved my dining room from looking like a chaotic mess. When you hang art over busy patterned wallpaper, you need at least 3-inch wide oak frames to create visual separation. I get mine from Framebridge on Etsy for $50-150 each, and they’re worth every penny.
Emily Henderson recommends this for adding “instant vintage charm and soul,” and I’ve found it prevents your art from getting completely lost in the pattern. The mistake I see constantly? People use thin modern frames that flatten all the visual depth. Your beautiful print just disappears into floral wallpaper.
I learned to choose frames that are slightly darker than the darkest color in your wallpaper. This creates a subtle anchor point for your eye. Also, don’t hang them below 57 inches from the floor, or you’ll create visual overload in the lower half of your room. Trust me on this one.
Match Your Home Palette to Your Actual Wardrobe

This sounds weird until you try it, but matching home textiles to your five most-worn clothing colors creates the most intuitive, comfortable spaces. I did this exercise weekly for a month, scanning my outfits for emerald and charcoal dominance, and suddenly my throw pillow choices made sense.
Emily Henderson advises this for creating those lived-in spaces that feel authentically you, which is a huge 2026 trend. I’m not talking about making your living room look like your closet. I’m talking about using color psychology that already resonates with you.
Common mistake: over-layering more than three textures per wall. I got excited and added velvet curtains, a chunky knit throw, linen pillows, and a jute rug all in my “wardrobe colors.” It looked cluttered instead of curated. Stick to three complementary textures maximum. My current combo is velvet sofa, linen curtains, and a simple cotton rug. Much better.
Use Fluted Textures Sparingly on Removable Elements
I’ll be honest: I almost made a huge mistake with fluted textures. I was about to install permanent fluted wood on my kitchen island when realtor Mac Rogers warned me that buyers hate cleaning them. He was right.
Instead, I got IKEA’s BORGEBY linen curtains with ribbed glass-effect panels ($40-80 per panel) for my living room. All the trendy texture, zero permanent commitment. You get that handmade, dimensional look without the maintenance nightmare of ribbed tile or wood.
For extra personality, I added air-dried clay DIY sculptures under 6 inches tall on my shelves. They cost maybe $15 in materials and give that cozy, handmade 2026 soul everyone’s chasing. Pro tip: keep fluted and ribbed textures on soft furnishings only. Your future self (and any potential home buyers) will thank you for keeping hard finishes smooth and easy to wipe down.

ukeetap Extra Large Expandable Silverware Organizer
Honestly, ukeetap Extra Large Expandable Silverware Organizer surprised me — sturdier than it looks in the photos, and over 46 buyers gave it 4.5 stars.
Invest in a Statement Stone Vanity
My master bath vanity is probably my favorite purchase of the last five years. I went with a 36-inch wide engineered marble top from Silestone’s “Hyde Park” in richly veined white ($800-1,500), and it’s held up beautifully.
Houzz pros always recommend real or engineered stone over laminate for bathrooms, and now I understand why. The depth and variation in natural veining can’t be replicated. Every morning I appreciate that subtle luxury.
Lesser-known tip: seal the edges with two coats of Dry-Treat Stain-Proof ($50 per bottle) to resist staining. This is especially important with 2026’s deep color trends like charcoals and navy blues in bathroom decor. I apply it once a year, takes 20 minutes, and my white marble still looks pristine despite daily makeup and hair product use. Don’t skip this step or you’ll have permanent foundation stains within months.
Embrace Jewel Tones in Upholstery for Personality
Ditching my all-white sofa for Kravet’s emerald velvet on a 72-inch custom piece ($2,000-4,000) was the best design decision I’ve made. Cortney Bishop predicts richer fabrics for personality in 2026, moving away from that sterile all-white trend.
The velvet adds depth and warmth that makes my living room feel like an actual home instead of a staged showroom. But here’s the mistake I almost made: skipping fabric protector. I thought velvet was naturally stain-resistant. Wrong.
Apply Scotchgard ($15 can) immediately after delivery, before anyone sits on it. I waited two weeks, got a wine stain, and learned my lesson. The protected areas have maintained their rich color while that one unprotected spot faded within a year. Reapply every six months if you have kids or pets. The jewel tone trend is gorgeous, but only if you protect your investment properly.
Layer Sculptural Lighting Over Dining Tables

I installed Visual Comfort 24-inch brass orb pendants ($400-700) over my dining table, and the dimension they create is incredible. Good Housekeeping designers highlight sculptural lighting for exactly this reason. It’s functional art.
The trending 2026 approach is layering 2-3 fixtures at 30-inch height from the table surface to avoid harsh shadows. I have two orbs staggered at slightly different heights, and the ambient glow is perfect for dinner parties.
Common error: choosing hardwired fixtures over plug-in options if you’re renting. I made this work in my rental by using a ceiling hook and cord kit ($25 from Home Depot) with plug-in pendants. Gives you that custom look without electrical work. Just make sure your fixtures aren’t so heavy they need professional mounting. My orbs are surprisingly lightweight brass-plated metal, not solid brass, which keeps them rental-friendly.

ULG 1 Pack Over Door Organizer with 5 Large and 10 Mesh
If you want something that just works, ULG 1 Pack Over Door Organizer with 5 Large and 10 Mesh Side Pockets is a safe bet (79 reviews, 4.5 stars).
Create Decorative Flooring Accents in Powder Rooms
My powder room floor gets more compliments than anything else in my house. I used 8×8-inch hand-crafted terracotta inserts from Ann Sacks ($20-40 per tile) in a geometric pattern, and it’s become this soulful focal point.
Pros favor decorative flooring for small spaces because it’s unexpected and memorable. But here’s the surprising tip I learned from a designer friend: align your pattern with the room’s golden ratio (1:1.618 scale) for subconscious harmony.
Sounds complicated, but it just means if your room is 5 feet wide, your pattern repeat should be about 3 feet (5 divided by 1.618). This is a 2026 wellness-focused layout trend that actually makes spaces feel more balanced. I measured my powder room, did the math, and spaced my decorative tiles accordingly. I can’t explain why, but it just feels right when you walk in. Way better than my first attempt where I randomly scattered accent tiles.
Frame Gallery Walls with Extra-Thick Borders
When I finally got my gallery wall right, it was because I switched to 4-inch wide gilded wood frames from Anthropologie’s gallery sets ($100-300 for 3-piece). Emily Henderson emphasizes thick frames for clean lines amid bold patterns, and it’s a 2026 personalization trend I’m fully behind.
My mistake the first time? I hung a mix of thin and thick frames, thinking it looked eclectic. It just looked messy. Consistency in frame width creates cohesion even when your art styles vary wildly.
Also, never hang below 57 inches from the floor to prevent visual overload. I measured this height, marked it with painter’s tape, and used it as my baseline for the entire wall. The result looks professionally curated instead of haphazard. If you have patterned wallpaper behind your gallery wall, those thick frames become even more critical for creating breathing room between busy elements.
Add Character with Patinated Hardware Throughout
Swapping out my shiny chrome cabinet knobs for unlacquered brass from Rejuvenation (1.5-inch size, $20-40 each) added so much tactile depth to my kitchen. Bishop notes this for creating authentic character in 2026 spaces.
The patina develops over time from the oils in your hands, so each piece becomes unique to your home. But here’s the lesser-known tip: apply Renaissance Wax ($15 jar) quarterly to control the patina speed. Without it, my bathroom hardware turned dark brown in three months from moisture exposure.
With the wax, I can manage how quickly the brass ages. Some pieces I let patina faster, others I keep lighter. The variation looks intentional instead of neglected. Common mistake: mixing shiny chrome with unlacquered brass in the same room. Pick one finish family and stick with it. The contrast between polished and patinated brass works beautifully, but chrome and brass together just looks confused.

Lifewit 6 Pack Clothes Storage Bins with Lids
Lifewit 6 Pack Clothes Storage Bins with Lids has been one of the most consistently praised picks in this category. 1,072 reviewers averaged 4.5/5.
Maximize Light with Mirrored Art Deco Panels

I added a 36×48-inch smoked glass panel from Wayfair ($150-300) in my narrow hallway, and it completely changed the space. This is a Houzz trend for adding drama and bouncing light around, which is exactly what my dark corridor needed.
The pro tip that made the biggest difference? Position mirrors at 45-degree angles to expand small spaces by 20% visually. I mounted mine on the wall opposite my living room entrance, angled slightly toward the window. Now natural light reflects down the entire hallway instead of stopping at the doorway.
Common error that ruins the glossy 2026 aesthetic: not cleaning fingerprints immediately. Smoked glass shows every touch, and I learned to keep glass cleaner and a microfiber cloth in my hall closet. Quick wipe-down twice a week keeps it looking intentional and luxurious instead of smudgy and neglected. It’s maintenance, but worth it for the impact.
DIY Air-Dried Clay Details for Cozy Texture
Making 4-6-inch planters with DAS Modeling Clay ($10 for 2.2 lbs pack) became my pandemic hobby, and now they’re all over my shelves. YouTube pros push this for cozy, handmade 2026 vibes, and honestly, it’s therapeutic.
The imperfections make them feel authentic in a way store-bought decor never does. Each one has my fingerprints and wonky edges that I’ve grown to love.
Mistake I made on my first batch: skipping primer before painting with Benjamin Moore Advance ($50 quart). The paint looked chalky and uneven. Now I always prime with two coats, let it cure for 24 hours, then paint. The finish is smooth and professional-looking. These little clay details cost maybe $3 each in materials but add so much personality. I’ve given them as gifts, used them as vases, and clustered three together as a sculptural moment on my coffee table.
Choose Easy-Maintenance Textures for Hard Surfaces
I almost installed ribbed glass shower doors before Mac Rogers talked me out of it. He cited buyer aversion to textured hard finishes, and after seeing my friend’s ribbed shower (which she scrubs weekly to prevent soap scum buildup), I’m glad I listened.
Instead, I went with smooth frosted panels from Kohler ($200-400 per door). They look modern and clean, and I can squeegee them in 30 seconds. The 2026-savvy approach is limiting texture to soft furnishings like 50/50 wool-blend throws ($100-200 from West Elm).
I have texture everywhere in my bedroom: chunky knit blanket, linen duvet, velvet pillows. But my nightstands, floors, and walls are all smooth and easy to dust. This balance gives you that layered, cozy aesthetic without creating cleaning nightmares. Pro tip: if you can’t wipe it down in under a minute, don’t make it a permanent fixture. Save high-maintenance textures for things you can throw in the wash.

JARLINK Over The Door Organizer Storage
If you want something that just works, JARLINK Over The Door Organizer Storage is a safe bet (43 reviews, 4.5 stars).
Create Depth with Layered Window Treatments
My living room windows went from boring to magazine-worthy when I started layering treatments. I combined sheer linen panels ($60-100 per panel from West Elm) with velvet blackout curtains ($150-250 per panel) on a double curtain rod ($40 from Amazon).
The sheers filter harsh afternoon light beautifully during the day, and the velvet adds that luxurious weight and drama for evenings. This layering technique is huge in 2026 for creating dimensional, personalized spaces.
What I learned the hard way: hang your curtain rod 6-8 inches above the window frame and let panels puddle 1-2 inches on the floor. I initially hung mine right at the frame with curtains that just grazed the floor. It made my 8-foot ceilings look like 7-foot ceilings. The higher rod and longer panels create the illusion of height. Also, always get panels that are 2-3 times the width of your window for proper fullness. Skimpy curtains look cheap no matter how expensive the fabric.
Anchor Rooms with Oversized Area Rugs

I used to buy rugs that were too small, and it made every room feel disjointed. Now I follow the rule: all furniture legs should fit on the rug, or at least the front legs of sofas and chairs. This means going bigger than you think you need.
For my 12×14-foot living room, I needed a 9×12-foot rug ($400-800 for quality wool blends from Rugs USA). It felt huge when I unrolled it, but once furniture was arranged, it anchored everything perfectly. The room finally felt cohesive instead of like furniture floating in space.
Pro tip for 2026 aesthetic home makeover projects: choose low-pile rugs (under 0.5 inches) in high-traffic areas. My first living room rug was a gorgeous thick shag that showed every footprint and vacuum line. I replaced it with a flatweave and my stress levels dropped significantly. Beauty and practicality can coexist. Also, always use rug pads ($30-60 from Rug Pad Corner) to prevent slipping and extend your rug’s life.
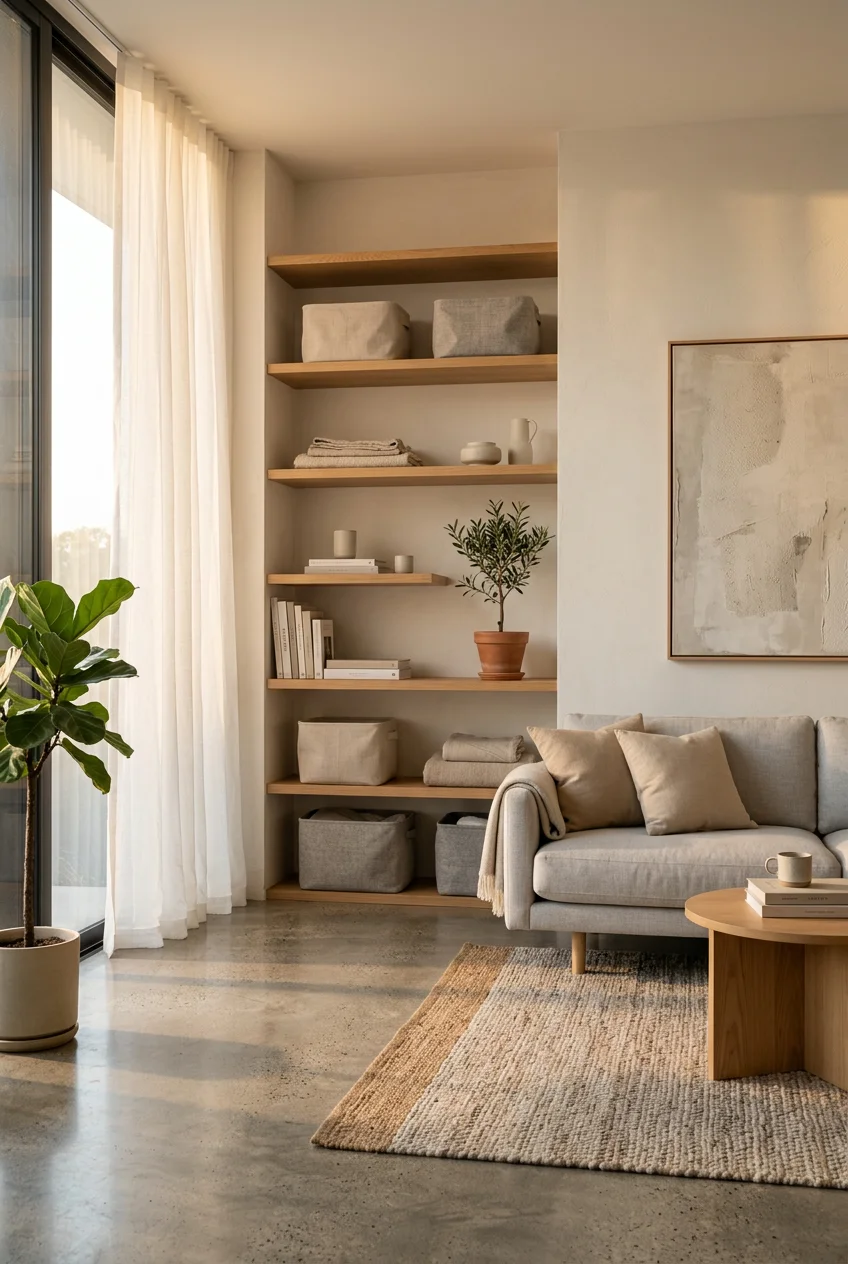
Install Floating Shelves for Styled Storage
Floating shelves transformed my awkward wall spaces into functional design moments. I used 10-inch deep walnut shelves ($50-80 each from Etsy) in my living room, styling them with a mix of books, plants, and those DIY clay pieces I mentioned earlier.
The key is the rule of thirds: one-third books, one-third decorative objects, one-third negative space. I used to cram my shelves full, thinking more was better. It just looked cluttered and stressful.
Now I’m ruthless about editing. Each shelf has maybe 5-7 items maximum, and I leave gaps for visual breathing room. Common mistake: not securing shelves properly. I use heavy-duty wall anchors rated for 50 pounds minimum (even though my shelves hold maybe 15 pounds of stuff). The last thing you want is a shelf collapse at 2 a.m. Install them into studs whenever possible, or use toggle bolts in drywall. This isn’t the place to cut corners on hardware.
Refresh Spaces with Removable Wallpaper Accents
Removable wallpaper saved my rental bathroom from beige boredom. I used a bold geometric pattern from Spoonflower ($30-40 per square yard) on one accent wall, and it completely changed the vibe without losing my security deposit.
The application is easier than traditional wallpaper, but here’s what nobody tells you: you need to smooth it constantly during installation to prevent bubbles. I use a plastic smoother tool ($5 from Home Depot) and work from center to edges in overlapping strokes.
My first attempt had bubbles everywhere because I rushed. I peeled it off (thankfully removable!) and redid it slowly. Perfect results the second time. Pro tip: order an extra yard beyond your measurements. Patterns need matching, and you’ll waste some getting seams aligned. I learned this after coming up six inches short on my first order. Also, remove it slowly when you move out, using a hairdryer to warm the adhesive. Makes it come off in full sheets instead of tiny frustrating pieces.
Personalize with Collected Objects Display
My favorite corner of my home is my collected objects shelf. It’s a mix of vintage brass candlesticks ($15-40 each from estate sales), travel souvenirs, inherited dishes, and random beautiful things I’ve found over years. This is the ultimate 2026 trend: spaces that tell your actual story.
I arrange them on a vintage wooden tray ($25-50 from flea markets) that I can easily move when I want to change things up. The tray creates a boundary so the collection feels intentional instead of random.
What makes this work is editing ruthlessly. I have probably 50 objects I love, but only 12-15 are displayed at any time. I rotate seasonally, which keeps things fresh and prevents that cluttered maximalist look. Common mistake: displaying everything at once because you love it all. Choose your favorites, give them space to shine, and store the rest. You’ll appreciate each piece more when it’s not competing with 40 other things for attention. This is how you create an aesthetic home makeover that actually reflects who you are.
These 20 ideas have genuinely transformed how I think about creating beautiful, livable spaces. Start with one or two that resonate most with your style and budget. I’d personally begin with hardware upgrades and textile changes since they’re relatively affordable and make immediate impact. Save this article for when you’re ready to tackle your next project, and remember that the best spaces evolve slowly with intention rather than overnight with a credit card. Your home should feel like you, not a showroom.
Frequently Asked Questions
What’s the best way to start an aesthetic home makeover on a budget?
Start with textiles and hardware. I always recommend matching throw pillows and curtains to your wardrobe colors first, then upgrading cabinet hardware to unlacquered brass. These changes cost $200-500 total but make huge visual impact without renovations.
Are fluted textures still trending for home makeovers in 2026?
Yes, but only on soft furnishings like curtains or removable decor. Realtors warn against permanent fluted finishes on kitchen islands or shower glass because they’re cleaning nightmares. Stick to ribbed textiles and air-dried clay sculptures for the handmade look.
How do I choose the right stone slab for my bathroom makeover?
Go for large-format slabs (60×120 inches) in dramatic veining like Caesarstone’s Empira Black. Keep grout lines under 1/8 inch for easier cleaning. Budget $150-250 per square foot installed, and always seal edges with two coats of stain-proof treatment.
What’s the biggest mistake people make with aesthetic home makeovers?
Over-texturing hard surfaces. I see people add fluted glass, ribbed tiles, and textured walls together, creating cleaning nightmares. Keep hard finishes smooth and save texture for soft elements like velvet upholstery, wool throws, and linen curtains instead.