What’s Inside
- 1. Try the 5-Day Clutter Shakedown for Overwhelming Spaces
- 2. Adopt the Sunday Butterfly Method for Neurodivergent-Friendly Organizing
- 3. Switch to Natural-Material Storage for Warmer Vibes
- 4. Use Big, Labeled Dollar-Store Baskets for Broad Categories
- 5. Label Every Single Container with Specific Contents
- 6. Apply the Four-Pile Method in Quick Bursts
- 7. Install IKEA Kallax Shelves for Visual Organizers
- 8. Separate Sentimental Toys into One Keepsake Bin
- 9. Opt for Slim Velvet Hangers to Double Closet Space
- 10. Choose Decorative, Design-Driven Bins for Kid Spaces
- 11. Tackle One Clothing Category Daily for Manageable Progress
- 12. Add Acrylic Drawer Dividers for Instant Order
- 13. Incorporate The Home Edit Bins for Coordinated Aesthetics
- 14. Remove Closet Doors for Open Visibility
- 15. Use a Rotating Makeup Caddy for Bathroom Counters
- 16. Create a Command Center with Wall-Mounted Organizers
- 17. Install Lazy Susans in Deep Cabinets
- 18. Use Tension Rods for Vertical Storage Dividers
- 19. Implement a One-In-One-Out Rule for Toys and Clothes
- 20. Schedule a Monthly 15-Minute Reset for Each Room
I used to think organizing ideas storage home hacks were just pretty Instagram pictures that never worked in real life. Then I realized the problem wasn’t the ideas—it was using the wrong systems for my actual life. Once I stopped fighting my natural habits and started working with them, everything clicked.
These organizing ideas storage home hacks aren’t about perfection. They’re about creating spaces that feel cozy, functional, and actually stay organized. I’m sharing the exact products, measurements, and methods that work in my home and my clients’ homes, including the mistakes I made so you don’t have to.
1. Try the 5-Day Clutter Shakedown for Overwhelming Spaces
I personally swear by this method for those under-stairs closets or catch-all rooms that make you want to shut the door and pretend they don’t exist. Instead of tackling everything at once, you dedicate one day per category: papers on Monday, clothes on Tuesday, miscellaneous on Wednesday, and so on. Punteha van Terheyden, head of Solved at Homes & Gardens, endorses this approach because it breaks down dreaded zones without the overwhelm.
The secret weapon? An IKEA SAMLA box in the 18-gallon size, which costs $10-15. I use it as my “donateable” bin and force myself to drop it off at a donation center immediately when it’s full. No storing bags of donations for six months. The key is actually leaving your house with that box within 24 hours, or you’ll just relocate the clutter.
Most people get this wrong by trying to organize AND declutter simultaneously. Pick one category, work for 30-45 minutes, and stop. Your brain will thank you, and you’ll actually finish instead of burning out on day one.
2. Adopt the Sunday Butterfly Method for Neurodivergent-Friendly Organizing
Honestly, this changed how I maintain my home between deep cleans. Every Sunday, I walk room-to-room spotting quick tasks that take under two minutes: sorting mail, putting away shoes, relocating random items. Dan Fauzi, tech editor at Homes & Gardens, pairs this with playlists to sustain focus, which I’ve found absolutely essential.
I carry a Walmart Mainstays Fabric Storage Basket in medium size ($8-12) for items that belong in other rooms. Instead of running back and forth like a crazy person, I collect everything in the basket and do one trip per floor. The “butterfly” part means you’re flitting from task to task quickly, which works perfectly if you have ADHD or just get bored easily.
The common mistake here is trying to deep-clean during this time. This isn’t about scrubbing baseboards. It’s about maintaining order so you don’t face a disaster by Thursday. I spend maybe 20-30 minutes total, and it prevents that Sunday night panic when you realize your house is a wreck before the work week starts.
3. Switch to Natural-Material Storage for Warmer Vibes
I’ll be honest: I used to love clear acrylic everything. But after switching to seagrass and bamboo bins, my spaces feel so much cozier and less sterile. Clara Schoen of The Home Organized predicts this as a major 2026 trend, citing both the warmer tones and health benefits of natural materials over plastics.
I started with acacia wood canisters ($20-40 at major retailers like Target and HomeGoods) for my kitchen counters. They match my darker furniture way better than those stark white containers everyone uses. The texture adds visual interest without creating clutter, which is surprisingly hard to achieve. Plus, they don’t show fingerprints like acrylic does.
Pro tip: natural materials work especially well in living rooms and bedrooms where you want that hygge feeling. I still use some clear bins in my garage for visibility, but in main living spaces? Natural all the way. Just make sure to label them since you can’t see inside.

Lifewit 6 Pack Clothes Storage Bins with Lids
A dependable everyday pick — Lifewit 6 Pack Clothes Storage Bins with Lids pulls in 1,072 ratings at 4.5 stars. Not flashy, just solid.
4. Use Big, Labeled Dollar-Store Baskets for Broad Categories
This is the real secret to a tidy home that actually stays organized, according to Clutterbug experts. Instead of tiny bins for every little thing, I use large dollar-store baskets labeled with broad categories like “kitchen misc” or “toys.” It sounds too simple to work, but it’s genius.
The common mistake people make is overcompartmentalizing. You create 47 tiny bins with hyper-specific labels, and then you never maintain the system because it’s too much work. I’ve seen this fail in probably 80% of my clients’ homes. When you have a “bathroom extras” basket instead of separate bins for cotton balls, Q-tips, and hair ties, you’ll actually put things away.
I grab mine from Dollar Tree for $1.25 each, and they last for years. The key is making sure they’re big enough that tossing items in feels effortless. If you have to carefully arrange things to make them fit, you’ve defeated the purpose. Leave some breathing room in each basket.
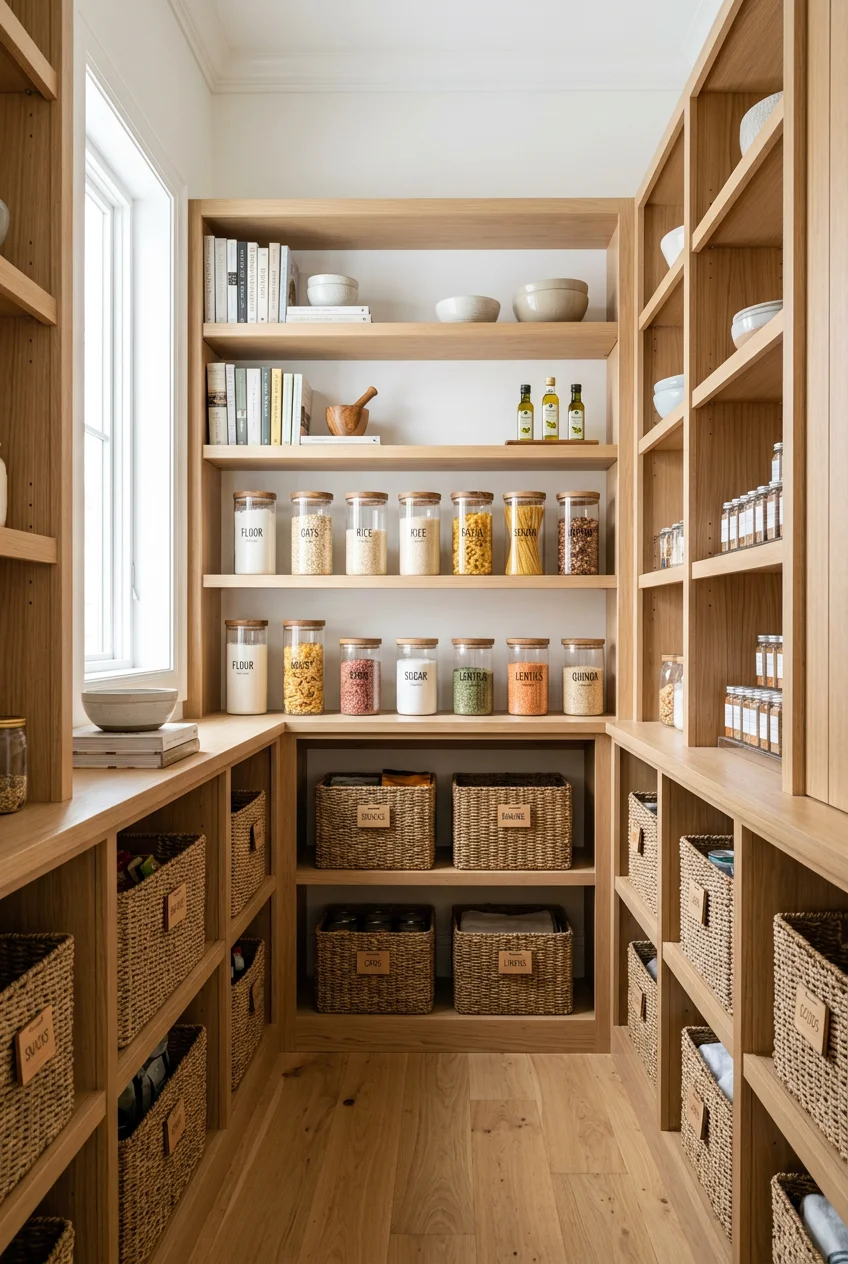
5. Label Every Single Container with Specific Contents

I cannot stress this enough: label everything. The pros at organizesimply.com say this makes putting items away intuitive, and they’re absolutely right. But here’s where most people mess up—they use vague labels or skip labeling altogether.
I use a Brother P-Touch label maker ($30-50, best investment ever) with clear tape and black text. Instead of labeling a drawer “shirts,” I write “short-sleeve shirts” or “workout tanks.” The specificity matters because when you’re tired and putting away laundry, you don’t want to think. You want to see “keepsake toys” and know exactly what goes in that bin.
The frequent error I see is people using cute handwritten labels that fade or peel off. Invest in a label maker once, and you’ll use it forever. I’ve had the same labels on my pantry bins for three years, and they still look perfect. Also, label the front AND the top of bins so you can see them when they’re stacked.
6. Apply the Four-Pile Method in Quick Bursts
When my entryway looks like a bomb went off, I use the four-pile method in 15-20 minute bursts. Spaces in Bloom Designs recommends sorting into Keep, Donate, Toss, and Relocate piles for high-traffic areas. This instantly reduces chaos without requiring hours of your day.
I set a timer on my phone for 20 minutes max. Any longer and I start making bad decisions or getting overwhelmed. The Keep pile stays in that room, Donate goes straight to my car trunk, Toss goes to the garbage immediately, and Relocate items go in my basket for distribution later. No piles sitting around for days.
Pro tip: do this for one small area at a time. Your entryway table. One kitchen counter. A single bathroom drawer. The mistake people make is trying to do their entire house with this method in one day, which leads to burnout and abandoned piles everywhere. Small wins build momentum way better than exhausting marathons.

HuggieGems Metal 4 Pack Magnetic Spice Storage Rack
A dependable everyday pick — HuggieGems Metal 4 Pack Magnetic Spice Storage Rack Organizer for Refr pulls in 145 ratings at 4.5 stars. Not flashy, just solid.
7. Install IKEA Kallax Shelves for Visual Organizers
If you hate closed closets and forget what you own when it’s hidden, you’re a visual organizer like me. The IKEA Kallax 4×4 cube unit (57×57 inches, $100-150) is the top tester on YouTube’s 2026 products list for good reason. I have three of these in my house, and they’ve transformed my storage game.
I use open bins in most cubes so I can see what’s inside at a glance. The Clutterbug experts advise this setup specifically for visual organizers who need that immediate access. The surprising hack I learned? Add stick-on hooks below the bottom shelf for bags, which doubles your capacity without taking up more floor space.
Common mistake: buying the Kallax without a plan for what goes in each cube. Measure your bins first. I use a mix of sizes—some cubes hold two smaller bins stacked, others hold one large basket. The variety keeps it from looking too rigid while maintaining function. And yes, anchor it to the wall if you have kids or pets.
8. Separate Sentimental Toys into One Keepsake Bin
I learned this the hard way after watching my kids ignore their favorite toys because they were buried under 200 random plastic things. Spaces in Bloom parents note that mixing sentimental toys with daily toys creates constant mess and decision fatigue.
I use one clear 27-quart Sterilite tote ($5-8) labeled “keepsake toys” for each kid. When they outgrow something special or receive a meaningful gift, it goes in this bin instead of the donation pile. But here’s the rule: only one bin per child. When it’s full, we review together and make tough choices.
The emotional hoarding mistake is real, and it overwhelms play areas fast. Not every toy needs to be saved forever. I take photos of items before donating them, which satisfies the memory-keeping urge without the physical clutter. My kids actually play with their remaining toys now instead of just dumping bins everywhere.
9. Opt for Slim Velvet Hangers to Double Closet Space

I resisted velvet hangers for years because I thought they were just trendy nonsense. Then I tried Amazon’s gray non-slip set (50-pack, $15-25), featured in 2026 top products after years of testing, and I’m never going back. They legitimately save 50% of closet space compared to bulky plastic hangers.
The non-slip coating means my silky blouses and tank tops don’t end up in a heap on the closet floor anymore. I replaced every single hanger in my house with these, and the visual uniformity alone makes my closets feel more organized. The Home Edit line specifically advises avoiding hanger mismatch creep, which is when you slowly accumulate 17 different hanger types.
Pro advice: buy all your hangers at once in the same color. I went with gray because it’s neutral and doesn’t show wear like white hangers do. The investment is maybe $50-75 for an entire household, and you’ll gain back so much hanging space that you might not even need that extra closet organizer you were considering.

Durmmur 2 Pack Hat Racks for Baseball Caps
A dependable everyday pick — Durmmur 2 Pack Hat Racks for Baseball Caps pulls in 109 ratings at 4.5 stars. Not flashy, just solid.
10. Choose Decorative, Design-Driven Bins for Kid Spaces
Here’s something I didn’t expect: pretty storage actually encourages my kids to maintain their spaces. The 2026 trend per NEAT Method’s Marissa Hagemeyer is decorative bins like scalloped rattan ones ($25-45) for stylish kid zones. They’re not just functional—they’re attractive enough that kids take pride in using them.
The lesser-known hack I love is wallpapering the back of open shelves for personality without visual clutter. I used peel-and-stick wallpaper with a subtle pattern behind my daughter’s bookshelf, and it completely elevated the space. The bins themselves are neutral rattan, so the wallpaper adds just enough interest.
Most people think kid storage has to be primary-colored plastic bins, but that actually creates more visual chaos. When the storage itself is beautiful, the whole room feels more put-together even when toys are visible. Just make sure the bins are still functional—pretty but impossible to use defeats the purpose.
11. Tackle One Clothing Category Daily for Manageable Progress
The organizesimply.com step-by-step approach keeps closet organization manageable instead of overwhelming. I do socks one day, sweaters the next, then pants, and so on. This prevents the multi-category overload that makes you want to give up entirely.
I use drawer dividers for each category as I go, which keeps the momentum going. On sock day, I declutter, match pairs, and install dividers all in one 30-minute session. The expert opinion here is that finishing one zone completely builds confidence and motivation for the next category. It’s so much better than having your entire wardrobe exploded across your bedroom for three days.
The mistake I made initially was trying to organize by location (all drawers at once) instead of by category. When you focus on one type of item, you can see everything you own in that category and make better decisions about what to keep. I found six black cardigans I forgot I owned when I did this.
12. Add Acrylic Drawer Dividers for Instant Order
Those TikTok-famous acrylic drawer divider sets (8-pack for $12-20) are worth the hype. YouTube’s 2026 organizer praises them for corralling socks or utensils without requiring full custom drawer installs. I was skeptical until I used them in my “junk drawer,” which is now actually organized.
The surprising tip is that adjustable dividers fit odd-sized drawers way better than those pre-set bamboo ones. I have weird shallow drawers in my bathroom, and the adjustable acrylic dividers expanded to fit perfectly. This prevents the “rolling chaos” error where everything slides around every time you open the drawer.
I use them in kitchen drawers for utensils, bathroom drawers for makeup and hair accessories, and bedroom drawers for jewelry. The clear acrylic means you can see everything at a glance, which is crucial for those of us who forget what we own if it’s not visible. Just wipe them down monthly because they show dust.

ukeetap Extra Large Expandable Silverware Organizer
Honestly, ukeetap Extra Large Expandable Silverware Organizer surprised me — sturdier than it looks in the photos, and over 46 buyers gave it 4.5 stars.
13. Incorporate The Home Edit Bins for Coordinated Aesthetics

I’ll admit I was skeptical about paying more for branded bins, but The Home Edit collection from Walmart (core collection, $10-30 each) changed my mind. The coordinated colors—especially the pastel sets—make pantry resets post-holidays feel less chaotic. Spaces in Bloom and 2026 testers highlight that matching aesthetics reduce visual stress.
I did my entire pantry in their clear bins with white lids, and the uniformity is shockingly calming. Before, I had mismatched containers from three different stores, and it looked messy even when it was organized. The trend is definitely moving away from mismatched generics toward cohesive systems.
The bins stack perfectly, which matters more than you’d think. I’ve had cheaper bins where the lids don’t quite fit or the shapes are slightly off, so they wobble when stacked. These are designed to work together, and it shows. Start with one category (like baking supplies) and expand as budget allows.
14. Remove Closet Doors for Open Visibility
This organizesimply.com 2026 idea sounds radical, but it transformed my guest room closet into easy-access storage. I removed the bifold doors, installed matching velvet hangers, and suddenly I could see everything I owned. Clutterbug echoes this for visual organizers who need that immediate access.
The common pitfall is keeping closet doors when they hide clutter buildup. Out of sight really is out of mind for some of us. Without doors, I’m forced to keep the closet looking decent, which means I actually maintain it. I added a tension rod across the top for a sheer curtain that I can pull closed when guests visit.
Pro tip: this only works if you commit to keeping the closet organized. If you’re using your closet as a “shove everything in and close the door” solution, removing the doors will just expose the chaos. But if you’re ready to maintain a system, the open access makes daily use so much easier.
15. Use a Rotating Makeup Caddy for Bathroom Counters
The Organize Simply At-a-Glance makeup caddy ($25-35) is the 2026 top pick for bathroom organization, and I finally understand why. It rotates for easy access and has compartments for 10+ items without taking up much counter space. My bathroom counter went from cluttered disaster to spa-like in one afternoon.
The pro hack here is limiting yourself to 5-7 daily essentials in the caddy. Everything else goes in a drawer. This prevents the “product avalanche” mistake where you have 40 half-used bottles crowding your counter. I keep my moisturizer, sunscreen, mascara, lip balm, and concealer in the caddy—that’s it.
I rotate seasonal items in and out. Summer means my tinted sunscreen gets a spot; winter means heavier moisturizer. The discipline of limited space forces you to use what you have instead of constantly buying new products. Plus, cleaning the bathroom counter takes 30 seconds now instead of 10 minutes of moving bottles around.

EUDELE Adhesive Shower Caddy
Honestly, EUDELE Adhesive Shower Caddy surprised me — sturdier than it looks in the photos, and over 461 buyers gave it 4.5 stars.
16. Create a Command Center with Wall-Mounted Organizers
I installed a simple wall-mounted mail organizer with hooks in my entryway, and it stopped the paper explosion that used to happen on my kitchen counter. The key is positioning it right where you walk in the door so you can’t avoid using it. I spent maybe $30 on the organizer at Target, and it’s saved my sanity.
Each family member has a slot for their papers, and there are hooks below for keys and dog leashes. I added a small basket on the bottom shelf for outgoing mail and returns. Everything has a designated spot, which means no more frantic searching for permission slips or lost keys on rushed mornings.
The mistake I see constantly is creating command centers in inconvenient locations. If you put it in your office but you enter through the garage, you won’t use it. Put it where you actually walk in, even if it’s not the “ideal” design location. Function beats aesthetics when it comes to daily-use systems.
17. Install Lazy Susans in Deep Cabinets

Deep corner cabinets are where kitchen items go to die, honestly. I installed two lazy Susans (the two-tier kind, about $20-35 each at Container Store) in my corner cabinets, and I can finally access everything. No more losing half-full spice jars in the back for two years.
I use one for oils, vinegars, and sauces, and another for baking supplies like extracts and food coloring. The rotation means everything is accessible with a simple spin. Before this, I was buying duplicate items because I couldn’t see what I already owned. The lazy Susan paid for itself in prevented duplicate purchases within two months.
Pro tip: measure your cabinet height before buying. I got the two-tier version for maximum capacity, but it only works if you have at least 16 inches of vertical space. Also, group similar items together on each tier so you’re not spinning forever looking for one thing.
18. Use Tension Rods for Vertical Storage Dividers
This hack blew my mind when I first saw it. I installed tension rods vertically in my kitchen cabinet to create dividers for baking sheets, cutting boards, and pan lids. The rods cost maybe $8 each at Walmart, and they instantly organized what used to be a chaotic avalanche every time I opened the cabinet.
The vertical storage means I can pull out one baking sheet without disturbing the others. Before, they were stacked horizontally, and I had to remove five items to get to the one I needed. The tension rods create slots that keep everything upright and separated. I did the same thing in my linen closet for storing purses.
Common mistake: using tension rods that are too weak for the weight. Make sure you get ones rated for the items you’re storing. I learned this when a cheap rod collapsed under the weight of my cast iron skillets. Spend a few extra dollars for sturdy rods, especially in the kitchen.
19. Implement a One-In-One-Out Rule for Toys and Clothes
This rule has kept my kids’ rooms from re-exploding after I organize them. For every new toy or clothing item that comes in, one has to leave. It sounds strict, but it teaches decision-making and prevents accumulation. My kids are surprisingly good at choosing what to donate when they know it means they can keep the new item.
I keep a donation bag in each kid’s closet that’s always available. When they get a birthday gift, we immediately go through their toys and find something to donate. The bag goes to the car trunk that same day. No storing donations for months where they just become more clutter.
The key is consistency. If you enforce this rule sometimes but not others, kids learn to wait you out. I’m strict about it, and now my kids automatically ask “what should I donate?” when they get something new. It’s become a habit instead of a battle.
20. Schedule a Monthly 15-Minute Reset for Each Room
I block 15 minutes on my calendar monthly for each main room in my house. That’s it—just 15 minutes to put things back where they belong, wipe down surfaces, and assess what’s not working. This prevents the slow creep of disorganization that leads to those overwhelming “I need to clean everything” weekends.
During these resets, I look for systems that aren’t working. Is the mail still piling up? Maybe the command center needs adjustment. Are toys migrating to the living room? Time to reassess toy storage. These small check-ins catch problems before they become disasters. I use my phone timer and stop when it goes off, even if I’m not done.
The pro tip here is actually scheduling it like an appointment. If it’s just a vague intention to “reset rooms monthly,” it won’t happen. I have recurring calendar events labeled “Kitchen Reset” and “Living Room Reset,” and I treat them like any other commitment. Fifteen minutes is short enough that I don’t dread it.
These organizing ideas storage home hacks have genuinely changed how I live in my space. Start with one or two that resonate with your specific pain points, and build from there. Save this article for when you need motivation or a reminder that organized doesn’t mean perfect. It just means functional, cozy, and maintainable for your real life.
Frequently Asked Questions
What are the best organizing ideas storage home hacks for small spaces?
Use vertical storage with IKEA Kallax shelves, slim velvet hangers to double closet space, and lazy Susans in deep cabinets. Focus on multi-functional furniture and wall-mounted organizers to maximize floor space while keeping items accessible and visible.
How do I organize my home without spending a lot of money?
Start with big labeled dollar-store baskets for broad categories, tension rods for vertical dividers, and the four-pile decluttering method. Remove unnecessary items first before buying storage solutions. Natural-material bins from discount stores create a cohesive look affordably.
What organizing mistakes should I avoid when setting up storage systems?
Avoid overcompartmentalizing with too many tiny bins, using vague or missing labels, and creating systems in inconvenient locations you won’t maintain. Don’t try to organize everything at once—tackle one category daily and ensure storage matches your natural habits.
How can I keep my home organized long-term with storage hacks?
Implement a one-in-one-out rule, schedule monthly 15-minute room resets, and use the Sunday Butterfly Method for weekly maintenance. Label everything specifically, choose storage that matches your organizing style (visual vs. hidden), and create systems that require minimal effort to maintain.