What’s Inside
- Declutter Ruthlessly Before You Start Your Craft Closet Organization
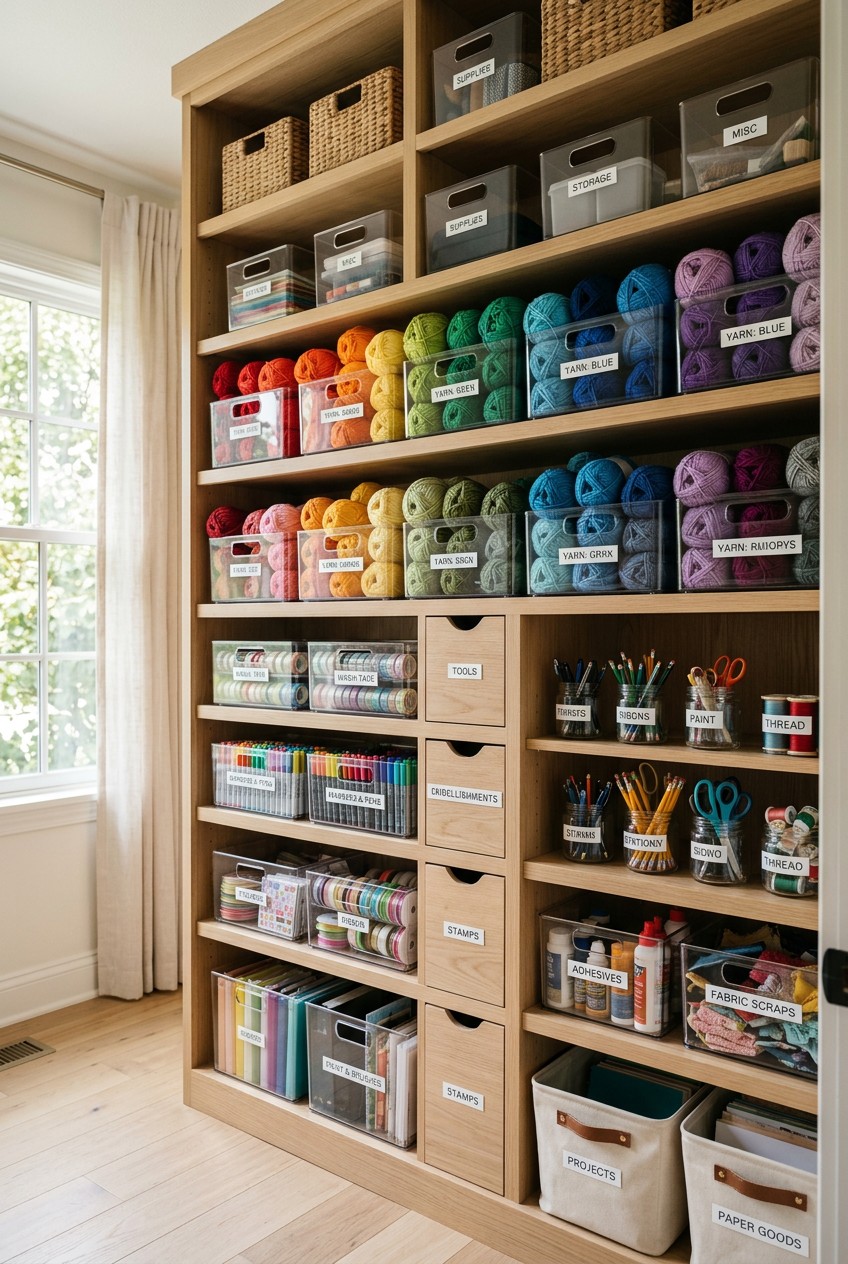
- Maximize Vertical Space with Pegboards and Shelving
- Embrace Clear, Stackable Storage Bins for Visibility
- Organize Paper by Type and Size in Dedicated Holders
- Rewind Ribbons onto Bobbins or Cardboard for Compact Storage
- Repurpose Household Items Creatively to Save Money
- Implement a Workflow System for Craft Closet Organization
- Utilize Shallow Drawers with Dividers to Prevent Black Holes
- Invest in Mobile Storage for Flexibility
- Label Everything Clearly for Easy Retrieval
- Create Wall Art Cabinets for Hidden Storage
- Store Pens, Markers, and Glues Horizontally
- Use Hanging Closet Organizers for Yarn and Fabric Scraps
Last Tuesday at 11 PM, I was sitting on the floor of my guest room. I was buried under a mountain of tangled acrylic yarn, dried-out hot glue sticks, and a massive puddle of spilled fine gold glitter. My attempt at craft closet organization was a total disaster. I couldn’t find my expensive fabric scissors to finish a simple birthday gift, and my fingers were literally stuck together from a leaking 4 oz bottle of Mod Podge. It was the lowest point of my DIY life. The smell of old, dusty felt and the sharp chemical scent of super glue gave me a massive headache. If you’re hiding a chaotic mess behind closed doors, I totally get it. I tried organizing this space wrong for months before figuring it out. Learned that the hard way. I’d buy random cute baskets, shove things inside, and completely forget what I owned. Don’t do that. Let’s fix your space with practical steps that actually work. I’m going to show you exactly how to overhaul your room with specific bins, clever hacks, and real solutions that save your sanity.
1. Declutter Ruthlessly Before You Start Your Craft Closet Organization

I’m telling you right now, buying pretty baskets won’t fix a hoarding problem. Before you buy a single storage bin, you’ve got to declutter your supplies ruthlessly. Professional organizers always say that organization doesn’t create space; decluttering does. A huge mistake most people make is keeping absolutely everything just in case they might need it for a future project. I used to buy the massive 24-pack of Scotch tape from Costco for $29.99 and shove it all in one drawer, along with fifty half-empty bottles of dried-out glitter glue. It’s a terrible habit.
Evaluate every single item in your stash. If you haven’t touched that 1/2 yard of scratchy polyester fabric in twelve months, donate it or throw it away. I tried organizing my space wrong for months before figuring this out. I thought if I just bought a massive storage unit, like the 80,000 cubic inch DreamBox that costs $2,499.00, my problems would disappear. But even a giant cabinet gets instantly overwhelmed if you refuse to purge. Grab a heavy-duty 30-gallon black trash bag and start tossing the dried paint, the dull rotary blades, and the tangled thread. The crinkle of the heavy plastic trash bag as I threw away dead markers felt incredibly therapeutic. You can’t organize trash. Empty the entire closet onto your floor, wipe down the bare shelves with a damp microfiber cloth, and only put back the tools and materials you actually use.
2. Maximize Vertical Space with Pegboards and Shelving

When you’re dealing with a tiny footprint, you’ve got to think upward. Utilizing every single inch of vertical space is mandatory. Last year, I bought a cheap plastic shelf from Walmart for $15.99. It wobbled so badly that my glass jars of beads crashed to the floor. The sound of a thousand tiny glass seed beads hitting my hardwood floor is a nightmare I’ll never forget. After that disaster, I decided to install proper vertical storage.
I’d highly recommend buying a 48 by 24-inch white pegboard from Lowe’s or Home Depot. They usually cost around $22.98, and they’re incredibly easy to install if you use 1.5-inch wood screws and anchor them directly into your wall studs. I bought a 50-pack of 2-inch metal pegboard hooks from Amazon for $9.99. The cold steel feels heavy and durable, unlike the cheap plastic pegs that snap under the weight of a heavy tape measure. The sharp, metallic click of inserting metal peg hooks into the board is so satisfying. I use my pegboard to hang my heavy 8-inch fabric scissors, 12-inch metal rulers, and small plastic bins of safety pins. Keeping these tools at eye level clears up so much surface area. For shelving below the pegboard, you can’t beat the IKEA Kallax 4×4 unit. It costs $149.99 and offers deep, sturdy square cubbies. You can stack these units to reach all the way to your ceiling. Leaving dead air above your shelves is a massive waste of potential storage.
3. Embrace Clear, Stackable Storage Bins for Visibility

I’ll admit it right now. I used to be obsessed with opaque, decorative baskets. Two weeks ago at Target, I was wandering the home goods aisle and bought a set of thick woven baskets for $24.99. Total mistake. They look beautiful on the shelf, but they’re basically dark coffins for your craft supplies. Because I couldn’t see my 2 oz bottles of acrylic paint through the thick fabric, I completely forgot what I owned. I ended up buying three duplicate bottles of cadmium red paint because I thought I was out. It’s the classic out of sight, out of mind dilemma.
To fix this, you’ve got to switch entirely to clear plastic bins. Visibility is everything. When you run your hand across the smooth, cold acrylic of a high-quality bin, you instantly feel more put together. I personally swear by The Home Edit by iDesign clear bins from The Container Store. They range from $8.99 to $175.92 depending on the bundle, but the crystal-clear acrylic is worth every penny. You can instantly see your 4 oz bottles of resin, your bags of 1-inch pom-poms, and your exact inventory of hot glue sticks. If you’re on a tighter budget, the Translucent SmartStore Totes are fantastic and cost between $7.99 and $25.99. For bulky items like 100-gram skeins of chunky wool yarn, the IKEA Samla boxes are a popular, stackable choice. The hard plastic makes a loud scraping noise when you slide them off the shelf, but the ability to stack them four high without crushing your delicate supplies is incredibly helpful.
Rubbermaid Configurations Deluxe Custom Closet Kit 4-8 Ft.
If you want something that just works, Rubbermaid Configurations Deluxe Custom Closet Kit 4-8 Ft. Adjustable is a safe bet (81 reviews, 4.5 stars).
4. Organize Paper by Type and Size in Dedicated Holders

If you’re a paper crafter, you already know the pain of damaged cardstock. Shoving loose sheets of expensive paper into a standard drawer is a guaranteed way to ruin them. The edges get bent, the corners get dog-eared, and the smooth texture gets scratched. I used to stack all my specialty paper in a massive, leaning tower on my desk. One accidental bump, and the whole pile would slide onto the floor in a slippery, chaotic mess. The crisp, heavy snap of 80 lb cardstock is a beautiful sound, but only when the paper is perfectly flat.
You need specialized storage to keep your paper pristine and visible. For standard 12×12 scrapbook paper, vertical file boxes or dedicated trays are your best option. I absolutely love the Modern 12×12 Stackable Paper Trays from Scrapbook.com. An 8-pack costs $34.99, and the sturdy white plastic prevents your heavy paper from bowing in the middle. I separate my sheets strictly by color and weight. For standard 8.5×11 printer-sized paper, Stamp-n-Storage makes incredible 8.5×11 Paper Holders that range from $97.75 to $141.75. They’re made of solid wood and keep every single sheet perfectly flat. Best Craft Organizer also sells angled Paper Shelves for around $118.75 to $136.75. The angled design lets you scan the colors quickly without pulling the whole stack out. Sorting your paper properly stops you from digging through a heavy pile and accidentally creasing that one specific sheet of $4.00 holographic foil paper you’ve been saving for a special project. You might also like: 15 Inspiring Aesthetic DIY Home Decor You Can Try Today
5. Rewind Ribbons onto Bobbins or Cardboard for Compact Storage

Ribbon is notoriously frustrating to store because the original spools come in a million different sizes. Some are thick styrofoam, some are thin plastic, and they never stack neatly together. I bought some cheap, scratchy polyester ribbon from Kroger’s floral department for $3.99 on a whim last month. I left it on the bulky cardboard spool, and it unraveled everywhere, tangling tightly with my expensive 1.5-inch silk ribbons. It took me forty-five minutes to untangle the mess, and I’ve got to admit, I ended up cutting away several frayed sections. The smooth, slippery feel of double-faced satin ribbon is completely ruined when it gets creased. You might also like: 15 Clever Kitchen Small Space Ideas That Changed Everything
A surprising tip that completely changed my space is to ditch the original packaging entirely. Unwind your ribbon and rewind it onto uniform bobbins or flat pieces of cardboard. I cut heavy-duty cardboard into 2 by 3-inch rectangles, wrap my 5/8-inch satin ribbon tightly around them, and secure the end with a 1-inch piece of clear tape. Once they’re flat and uniform, you can file them neatly into shallow drawers or small clear plastic bins like miniature index cards. For tiny ribbon scraps under 12 inches long, I use 8-inch tall glass jars from World Market that cost $12.99. I wrap the small scraps around wooden doll pins from Hobby Lobby. A 30-pack of pins costs just $4.99. You just secure the ribbon to the wood pin with a tiny rubber band and drop it in the jar. It looks incredibly cute and saves so much drawer space. You might also like: 15 Creative Hacks Organizing Ideas You Need to See
6. Repurpose Household Items Creatively to Save Money

You don’t always need to buy expensive, specialized containers to achieve perfect organization. Look around your kitchen and you’ll find amazing storage solutions hiding in plain sight. Last Tuesday at Whole Foods, I bought three tubs of their 365 brand 32 oz vanilla yogurt just because I wanted the sturdy plastic containers for my chunky yarn scraps. I ate so much yogurt I literally felt sick, but once I washed the tubs out with hot soapy water, they became the perfect stackable bins for my leftover wool.
I’m also obsessed with the 16 oz chunky salsa from Trader Joe’s. It costs $3.49, and the glass jars are incredibly durable. After soaking the labels off in warm water, I use these clear jars to store my 1-inch wooden buttons and silver safety pins. The heavy glass feels great in your hand, and the metal lids screw on tight so nothing spills if you drop them. The heavy clink of glass jars sliding onto a wooden shelf makes your space feel like a high-end boutique. You can also repurpose a cheap wooden wine rack. I bought a basic countertop wine rack for $19.99 and use it to store my rolled yarn skeins. You just slide one skein into each slot, organizing them by color. Another brilliant hack is using IKEA BEKVÄM spice racks. They cost $6.99 each. If you mount them directly to the inside of your closet door, they perfectly hold small 2 oz bottles of acrylic paint, tiny vials of loose glitter, and tubes of super glue.

AMKUFO 6 Pack-Closet-Organizers-and-Storage
AMKUFO 6 Pack-Closet-Organizers-and-Storage has been one of the most consistently praised picks in this category. 52 reviewers averaged 4.5/5.
7. Implement a Workflow System for Craft Closet Organization

Most people get this completely wrong when they start organizing. I used to organize strictly by category. I’d put all my scissors in one drawer, all my adhesives in another, and all my paper on a separate shelf. It looked pretty, but it was a functional nightmare. I was eating a $4.99 bag of organic gummy bears from Sprouts last Friday while staring at my messy desk, and I suddenly realized my layout made zero sense. I’ve got to walk across the room three times just to gather the supplies for a basic sewing repair.
Instead of sorting by category, you need to implement a workflow system. Professional organizers strongly recommend creating dedicated zones for specific types of projects. If you’re building a sewing zone, you’ve got to keep your 50-weight cotton thread, your plastic bobbins, your sharp fabric scissors, and your 5 by 5-inch fabric swatches all stored in the exact same bin or drawer. When you want to sew, you just pull out that specific container and everything you need is right there. The smooth zip of a dedicated sewing pouch opening up saves me so much frustration. Create a separate paper crafting zone with your double-sided tape, your bone folder, and your cardstock. Create a painting zone with your 1-inch flat brushes, your watercolor palettes, and your masking fluid. Organizing by how you actually craft makes the whole creative process so much faster. You won’t waste twenty minutes hunting for your fabric scissors in a drawer full of paper punches ever again.
8. Utilize Shallow Drawers with Dividers to Prevent Black Holes

Deep, overstuffed drawers are a massive mistake. They quickly become dark black holes where your most expensive supplies get lost forever at the bottom. I’ve got a massive 12-inch deep drawer in my old desk that I absolutely hate. I’d dump my 4 oz bottles of Mod Podge, my loose spools of wire, and my delicate precision tweezers all into the same cavernous space. The heavy bottles would crush the fragile tools, and the sharp metal wire would poke my fingers every time I reached blindly into the mess.
To fix this, you must opt for shallow, purpose-built drawers. Shallow drawers force your items to lay flat in a single layer, meaning nothing gets buried. I highly recommend The Home Edit by iDesign Large Drawers from The Container Store. They range from $44.99 to $269.94 depending on how many you stack. Because they’re only about 4 inches deep, your supplies are always visible. Inside these shallow drawers, you need to use clear plastic drawer dividers. The sharp plastic edges of the dividers click perfectly into place, creating rigid little cubbies. I use 3 by 9-inch plastic trays to separate my gel pens from my mechanical pencils. A great rule of thumb is to keep your drawers no more than three-quarters full. If you pack them to the brim, the items will catch on the frame when you try to pull the drawer open. The frustrating sound of a jammed drawer scraping against a plastic ruler is enough to ruin your creative mood instantly.
9. Invest in Mobile Storage for Flexibility

Sometimes you don’t want to be trapped inside your closet while you work. Mobile storage units are incredibly trendy right now because they offer ultimate flexibility. You can park a rolling cart inside your closet to keep your floor plan open, and then roll it directly to your kitchen table when you need a larger surface to cut fabric. I used to carry armfuls of heavy 12×12 paper pads back and forth, inevitably dropping them and denting the corners.
A high-quality rolling cart solves this problem instantly. I use the Simply Tidy 15-Drawer Rolling Cart from Michaels, which costs around $69.99. The metal frame is sturdy, and the plastic drawers slide smoothly on their tracks. The soft rubber wheels glide silently over my area rug without snagging the fibers. The caster wheels make a soft, satisfying humming sound as you roll it across a hardwood floor. The Container Store also offers a premium 8-Drawer Rolling Cart that ranges from $12.99 to $153.99 depending on the attachments you buy. If you need a mobile workspace rather than just storage, check out the IKEA LINNMON desk top paired with KRILLE caster legs. The whole setup costs about $119.99. You can lock the wheels in place so the desk won’t shift while you’re trying to draw a straight line. Having your essential tools on wheels means you can adapt your space instantly, moving your heavy 16 oz jars of paint right next to your easel without breaking a sweat.

5 Tier Closet Hanging Organizer
A dependable everyday pick — 5 Tier Closet Hanging Organizer pulls in 1 ratings at 4.5 stars. Not flashy, just solid.
10. Label Everything Clearly for Easy Retrieval

You can buy the most expensive acrylic bins in the world, but if you don’t label them, your system will eventually fail. I learned this the hard way. I spent a whole weekend sorting my supplies into identical white boxes. Two weeks later, I needed a specific 2 oz bottle of fabric medium. I’ve got to open twelve different boxes, peeling back the tight plastic lids one by one, just to find it. I was so frustrated I almost gave up on the project entirely.
Labeling is crucial for maintaining your system and finding what you need in seconds. I’m absolutely obsessed with my Dymo Letra Tag label maker. It costs $29.99, and the mechanical whirring sound it makes as it prints out crisp, bold text is my favorite sound in the world. Peeling the sticky backing off a fresh plastic label and pressing it firmly onto a clear bin is the ultimate finishing touch. I use the standard 1/2-inch black-on-white plastic tape. For woven baskets or canvas bins where adhesive labels won’t stick, use clear acrylic basket labels with scalloped edges. You just clip them over the edge of the bin and write on them with a white chalk marker. Clear labeling completely prevents you from buying duplicates of items you already own. When a bin clearly says “Hot Glue Sticks” in bold black letters, you won’t accidentally toss a stray pack of sewing needles inside. It forces you to respect the boundaries you’ve set for your own space.
11. Create Wall Art Cabinets for Hidden Storage

If your closet doors are constantly open, or if your craft space spills out into a guest bedroom or living room, you might not want all your tiny supplies on full display. A massive trend I’m seeing for 2026 is the use of wall art cabinets. These are brilliant storage units that look exactly like standard framed art pieces or mirrors, but they hinge open to reveal hidden, shallow shelves behind the frame. It’s the perfect way to blend your messy hobbies with your home’s aesthetic.
I bought a 24 by 36-inch Concealment Cabinet online last month for $149.00. On the outside, it looks like a beautiful framed canvas print of a botanical garden. But when you pull the magnetic latch, the heavy wooden frame swings open smoothly. The heavy wooden frame feels substantial, and the hidden magnetic latch clicks shut with a satisfying thud. Inside, there are three shelves that are exactly 3 inches deep. I use this hidden space to store my small, visually cluttered items that don’t look pretty in clear bins. I line up my 1 oz tubes of messy oil paints, my stained wooden palettes, and my sharp craft knives. Hiding these functional but ugly items behind a piece of art keeps the room looking clean and sophisticated. It’s a surprising tip, but if you’re struggling with visual clutter, swapping a standard poster for a functional wall art cabinet will completely fix how clean your room feels.
12. Store Pens, Markers, and Glues Horizontally

This is a lesser-known tip that will save you so much money in the long run. I used to store all my expensive markers in a cute, vintage ceramic mug on my desk. They looked adorable standing straight up, but it was a massive mistake. Because I stored them vertically with the tips pointing up, the ink slowly drained down to the bottom of the barrel. When I went to use my brand new Tombow Dual Brush Pens, which cost $26.99 for a 10-pack, the tips were completely dry. The dry, scratchy sound of a dead marker dragging across 80 lb cardstock is absolutely heartbreaking.
For optimal longevity, you must store your pens, alcohol markers, gel pens, and certain liquid glues horizontally. Storing them flat ensures the ink stays evenly distributed across the entire internal sponge, so both the broad tip and the fine tip remain juicy and ready to use. The wet, juicy sound of a perfectly preserved brush pen on smooth paper makes the extra storage effort totally worth it. I bought a dedicated clear acrylic pen holder with horizontal slots for $18.99. It holds up to 72 markers perfectly flat. You slide the markers into the 1-inch square cubbies, and you can easily read the color codes on the caps. This horizontal rule also applies to dual-tipped liquid adhesive pens. If you store them upright, the glue pools at the bottom, and you’ll spend five minutes aggressively shaking the plastic tube just to get a single drop out.

SNSLXH 5 Pack Stackable Closet Storage Basket
SNSLXH 5 Pack Stackable Closet Storage Basket punches above its price — 39 buyers rated it 4.5 stars. I would buy it again.
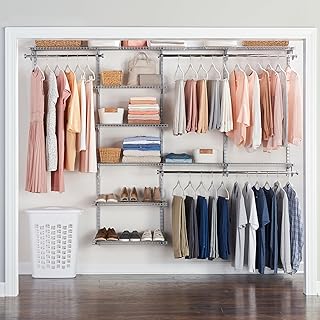
13. Use Hanging Closet Organizers for Yarn and Fabric Scraps

If you’ve got a physical closet with a sturdy hanging rod, you need to exploit that space immediately. Standard shelving is great, but hanging closet organizers are a fantastic, inexpensive alternative. I bought a 6-shelf canvas hanging sweater organizer from The Container Store for just $19.99. The thick canvas material feels incredibly durable, and the strong velcro strap holds tight to the metal closet rod. The rough, sturdy texture of the canvas shelves holds up perfectly against the weight of heavy wool.
I use each 12 by 12-inch compartment as a dedicated yarn cubby. I sort my yarn strictly by fiber type and weight. The top cubby holds my delicate 50-gram skeins of lace-weight mohair, the middle holds my standard worsted-weight acrylics, and the bottom holds my massive blanket yarns. Because the organizer is open in the front, the colorful yarn acts as its own visual inventory. You can also use this hanging space to implement a project pocket system. To avoid having half-finished projects cluttering your desk, use heavy-duty plastic Project Pockets from Stamp-n-Storage. They cost between $26.95 and $36.95 for a pack. These clear, durable 12×12 pouches keep all the components of a single project safely together. I slide a pattern, the exact fabric swatches, and the matching thread into one pouch, then slip the whole pouch into the hanging organizer. It keeps everything protected from dust and ready for the exact moment you’ve got free time to craft.
Organization isn’t a one-time magical event. Staying organized is the real feat. A common mistake I see all the time is people spending hundreds of dollars on bins, but completely refusing to maintain their system. Professional organizers strongly recommend taking exactly 10 minutes at the end of every single crafting session to put everything back in its designated place. Don’t leave that 4 oz bottle of glue on your desk overnight. Put it away. Regular upkeep keeps your space inspiring instead of overwhelming. I personally swear by these methods, and I know they’ll fix your chaotic room. If these tips helped you, please pin this article to your favorite Pinterest board so you can easily find it the next time you’re ready to tackle a messy room!
Frequently Asked Questions
How do I start craft closet organization when I have too much stuff?
Start by completely emptying the space. Sort every single item into keep, donate, and trash piles. If you haven’t used a supply in twelve months, get rid of it. You can’t organize clutter, so ruthless purging is your first mandatory step.
What are the best containers for craft closet organization?
Clear, stackable plastic bins are absolutely essential. They let you see exactly what you own without opening lids. I highly recommend The Home Edit clear bins or simple translucent shoeboxes to prevent supplies from getting lost in the back of deep shelves.
How should I store 12×12 scrapbook paper?
Store your 12×12 paper flat in dedicated stackable paper trays or vertical file boxes. Storing paper upright without rigid support causes the edges to curl and dog-ear. Brands like Scrapbook.com sell specific trays that keep heavy cardstock perfectly pristine.
Is a rolling cart good for craft closet organization?
Yes, a rolling cart is incredibly useful. You can park it inside your closet when you aren’t crafting, then roll it right up to your desk when you need your most-used tools. It keeps your main workspace completely clear of clutter.