What’s Inside
- Invest in a Large Deck Box for Bulky Outdoor Toy Storage
- Utilize Mesh Storage Bags for Pool Toys to Prevent Mildew
- Implement Heavy-Duty Stackable Totes for the Garage
- Create a Dedicated Kiddie Parking Garage for Ride-On Toys
- Install Vertical Storage Systems with Slat Walls
- Use Open Bins and Buckets for Easy Kid Access
- Choose Multi-Functional Storage Benches for Small Patios
- Categorize and Label Everything Clearly for Outdoor Toy Storage
- Embrace Toy Rotation for Engagement and Reduced Clutter
- Prioritize Weather-Resistant Materials for Longevity
- Utilize Rolling Carts for Portable Play Zones
- Don’t Forget About Small Accessories with Divided Bins
- Clean and Dry Ride-On Toys Before Winter Storage
- Regularly Purge Broken or Unused Items
- Consider Under-Deck Storage for Unused Space
Last Tuesday at Whole Foods, I found a moldy, half-deflated pool float stuck to the bottom of my reusable grocery bag. It hit me: I’d completely failed at outdoor toy storage this year. Don’t ask me how it got there. I was in the checkout line, reaching for my wallet, when my fingers brushed against this slimy, neon pink plastic monstrosity. It smelled like swamp water mixed with expired coconut sunscreen. The cashier gave me a look of pure pity. That gross moment forced me to admit my yard organization is a total disaster. I’m Hannah, a home organization coach, and yeah, I mess up sometimes. I’ve spent three months testing bins, bags, and boxes in my own backyard to see what actually survives. If you’re tripping over faded plastic dump trucks, stepping on sharp chalk pieces, or finding spider webs inside buckets, I feel your pain. We aren’t living like this anymore. Let’s fix it. I’m sharing the heavy-duty systems that finally worked for me, plus the specific gear you need.
1. Invest in a Large Deck Box for Bulky Outdoor Toy Storage

I’ve tried keeping large pool floats and bouncy balls in a flimsy pop-up hamper. Huge mistake. The wind blew it over daily, and the sun shredded the fabric. You need something heavy and practically indestructible. I swear by the Keter Java 230-Gallon Deck Box. It usually runs about $189.99 to $250.00 depending on the season. I grabbed mine at Costco during a spring sale. This thing is massive. It holds four giant inflatable flamingos, six pool noodles, and three large patio cushions with room to spare. The dark brown resin looks like real wicker, but it won’t rot or splinter when wet. Plus, it features hydraulic pistons on the lid. If you’re a parent, you know this is crucial. Those pistons stop the heavy lid from slamming on tiny fingers. Before I bought this, my kids were always getting pinched by our old wooden chest. Make sure you place it on a flat surface like a concrete patio or deck. If you put it on the grass, the bottom will sink into the mud after a heavy rain. I learned that the hard way last April. Now, the bulky items stay dry and secure.
2. Utilize Mesh Storage Bags for Pool Toys to Prevent Mildew

There is nothing worse than grabbing goggles and finding them covered in fuzzy, black mildew. I used to throw all our wet pool toys into a solid plastic tub. I thought I was being organized. Instead, I created a science experiment. The trapped moisture bred mold faster than I could bleach it. You need airflow for wet items. I bought the MESH TITAN Hanging Pool Storage Bag for $34.99 on Amazon. It measures 60 inches wide by 34 inches high. This bag is a beast. It holds up to 30 pounds of wet gear, which is roughly 20 full-size basketballs or a mountain of diving rings and squirt guns. The thick black mesh lets water drip right through, so everything air-dries naturally. I hung mine on the chain-link fence near our pool using heavy-duty carabiners. If your yard lacks a fence, the Intex Pool Mesh Caddy Storage Bag is another great option. It measures 59 inches by 13 inches by 28 inches and costs about $24.99 at Walmart. It hangs right over the edge of an above-ground pool. Honestly, this changed how I handle summer cleanup. Just toss the wet toys in the bag and walk away.
3. Implement Heavy-Duty Stackable Totes for the Garage

Most people get this wrong. They buy cheap, clear plastic bins for their garage. I did exactly this three years ago. I spent fifty bucks on a stack of brittle, transparent tubs. By January, the freezing temperatures made the plastic so fragile that a single rogue basketball shattered the side of a bin into sharp shards. You can’t use indoor bins for garage storage. You need rugged, heavy-duty totes that handle extreme temperature shifts. I highly recommend the Rubbermaid ActionPacker Storage Boxes. The 35-gallon version with wheels usually costs around $64.99 at Target. These black and grey bins are bomb-proof. They carry 110 pounds. I use them for awkward items like camping gear, metal horseshoe sets, and winter sleds. The thick plastic won’t crack in the cold, and the tight latches keep out mice and spiders. The wheels are a lifesaver because dragging a 100-pound bin across rough concrete will ruin your back. I stack three against my back garage wall. They interlock perfectly, so you aren’t worried about a leaning tower of plastic collapsing on your car. Skip the cheap stuff. It’s a waste of money. I usually grab a coffee and spend a Saturday morning wiping these down with a damp rag. The textured surface hides scuffs and dirt perfectly, which is what you want for outdoor gear.

Sterilite 4-Pack Ultra Latching Box, Storage Bins with Lids
If you want something that just works, Sterilite 4-Pack Ultra Latching Box is a safe bet (126 reviews, 4.5 stars).
4. Create a Dedicated Kiddie Parking Garage for Ride-On Toys

If your driveway looks like a traffic jam of plastic coupes, tricycles, and electric jeeps, you need a parking garage. I used to let my kids leave their bikes wherever they dropped them. I’d inevitably back my car over a stray scooter. It’s a terrible sound. I finally built a dedicated kiddie parking garage in the corner of our side yard. You don’t need fancy carpentry for this. I bought a heavy-duty, 6-foot plastic folding table for $49.98 at Sam’s Club. I extended the legs to their maximum height and placed it against the fence. Boom. Instant covered parking. The kids drive their cars right under the table, which protects the plastic from fading in the harsh sun and keeps the seats dry during rainstorms. If you prefer something permanent, you can easily create a slanted roof using a 6-foot by 8-foot heavy-duty waterproof tarp (about $14.99 at any hardware store), a few metal hooks, and two wooden posts. I painted white parking lines on the concrete using a $6.50 can of Rust-Oleum spray paint. Giving kids a specific, marked spot to park makes cleanup feel like a game. It’s wildly effective. Last summer, I caught my youngest carefully backing his plastic tractor into his spot, making beep-beep noises. It completely eliminated the daily arguments about cleaning the driveway.
5. Install Vertical Storage Systems with Slat Walls

Garages get cluttered fast when you leave everything on the floor. I spent months tripping over long, awkward items like plastic baseball bats, lacrosse sticks, and foam swords. Floor storage is a rookie mistake for tall items. You’ve got to use your vertical space. I installed a slat wall system on the bare drywall next to my garage door. I bought the Gladiator 4-foot by 4-foot GearWall Panel for $89.99. The installation took me about two hours on a Sunday. You just screw the panels into the wall studs. The beauty of a slat wall is the flexibility. I bought a pack of rubber-coated J-hooks ($12.99 for a set of four) that snap into the grooves. You can move them around in seconds. Right now, I hang three bike helmets, a massive collection of Nerf guns, and a wet skip-it in a row. As my kids grow and their interests change from plastic bats to metal golf clubs, I can just rearrange the hooks. I picked up extra hooks during a grocery run to Kroger last week because they had a hardware endcap on clearance. Getting things off the floor makes sweeping the garage much easier. You might also like: 15 Cozy Room Cleaning Tips Organizing Ideas to Steal Right Now
6. Use Open Bins and Buckets for Easy Kid Access

Complex storage systems with tight lids and tricky latches fail with young kids. If it’s hard to open, they won’t put their toys away. Simple as that. For everyday items like sidewalk chalk, sand molds, and small rubber balls, I use plain, open containers. I bought five bright orange 5-gallon buckets from The Home Depot for $4.98 each. They are cheap, virtually indestructible, and easy for tiny hands to carry. I lined them up along the patio. Here is a pro tip: drill holes in the bottom of any open outdoor container. I learned this the hard way. I left a solid plastic bucket full of toy cars outside during a three-day rainstorm. A week later, I found a bucket full of rusty cars floating in stagnant, mosquito-infested water. It smelled disgusting. Now, I take a standard power drill with a 1/4-inch drill bit and punch five or six holes through the bottom. The rain washes right through, and the toys dry out. After a quick trip to Sprouts for snacks, I have the kids toss their jump ropes and chalk into these buckets before heading inside. It takes ten seconds. You might also like: 15 Clever DIY Easy Home Decor to Inspire Your Next Project

8 Pack Extra Large Heavy Duty Moving Bags
8 Pack Extra Large Heavy Duty Moving Bags has been one of the most consistently praised picks in this category. 17 reviewers averaged 4.5/5.
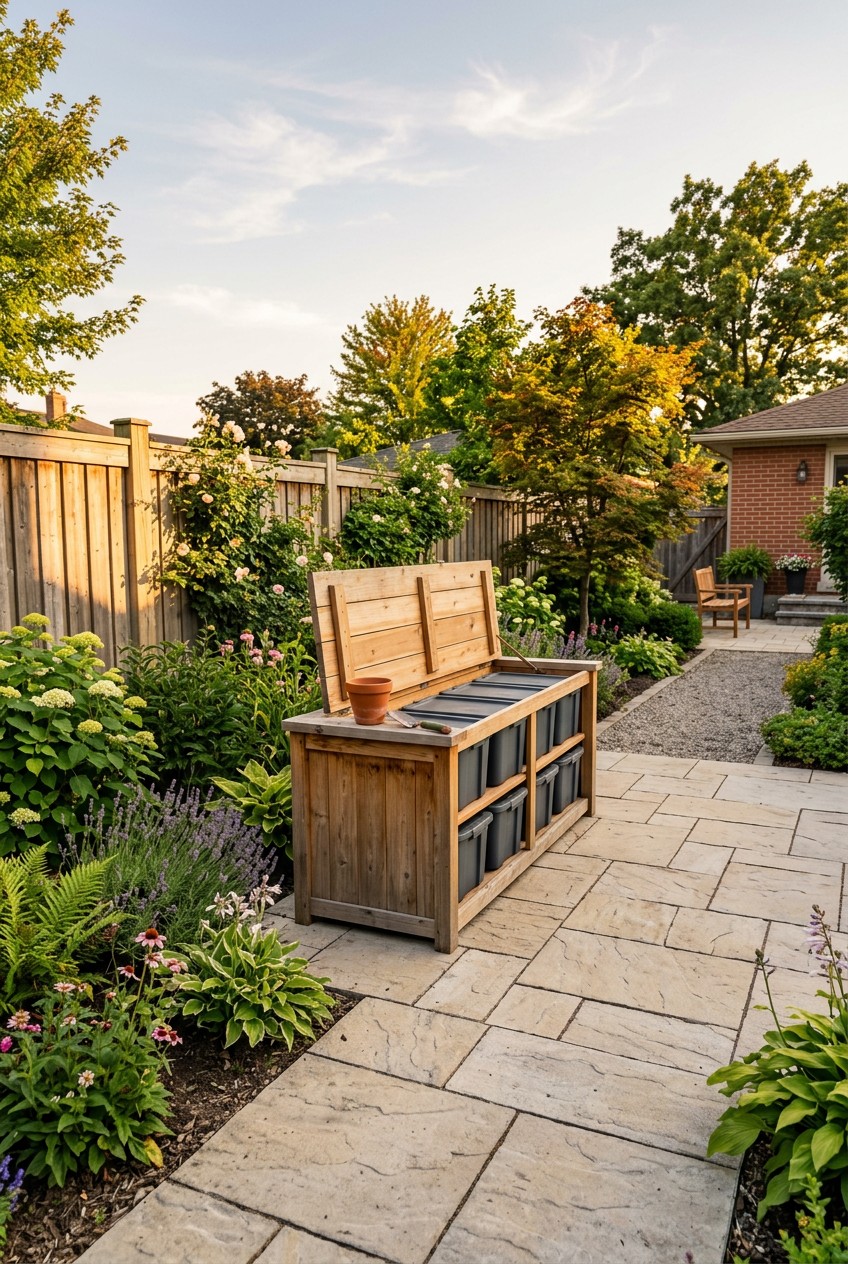
7. Choose Multi-Functional Storage Benches for Small Patios

If you’ve got a tiny deck or apartment patio, you can’t waste square footage on a giant, ugly plastic box. You need furniture that works double duty. I’m obsessed with outdoor storage benches that look like high-end furniture. The IKEA NÄMMARÖ storage box is a perfect example. It costs $125.00 and is crafted from beautiful, natural acacia wood. It looks like a stylish bench, but the seat lifts up to reveal a deep storage compartment. I keep a stack of beach towels and wooden lawn games inside mine. It supports the weight of an adult, so it provides extra seating when we have guests over for a barbecue. If you prefer something slightly more rugged but still functional as seating, the Keter Westwood 150-Gallon Deck Box is fantastic. It runs about $199.99. It features a flat, sturdy top that comfortably holds two adults. The dark grey resin mimics painted wood panels. I used to buy cheap wooden crates for seating, but they always gave my guests splinters after a few months in the sun. Investing in a smooth, weather-treated bench solves the seating problem and the clutter problem at the same time. You might also like: 20 Inspiring Garage Organization Ideas That Are Totally Worth It
8. Categorize and Label Everything Clearly for Outdoor Toy Storage

Throwing every single toy into one giant, bottomless bin is a recipe for chaos. I used to do this. My kids would want a specific water balloon nozzle and dump the entire 50-gallon bin onto the grass to find it. I’d spend twenty minutes picking up stray shovels and frisbees. You must categorize. I separate our gear into zones: sand toys in one bin, water toys in another, and sports equipment in a third. Categorizing isn’t enough, though. You must label everything. I bought a pack of Sterilite 15-Quart Clear Plastic Latching Box containers for $6.98 each at Walmart. Because they are clear, you can see what’s inside, but labels make it foolproof. Don’t just use a black Sharpie directly on the plastic. The UV rays will fade the ink to a pale, unreadable yellow in three weeks. Instead, I use a cheap thermal label maker to print bold text on weather-resistant vinyl tape. For toddlers who can’t read yet, I print small pictures of a ball or a shovel, laminate them with clear packing tape, and stick them to the front of the bin. It stops the dumping-out phase because they know exactly where to look.
9. Embrace Toy Rotation for Engagement and Reduced Clutter

Your yard doesn’t need to look like a chaotic playground 365 days a year. An expert trick I borrowed from preschool classrooms is toy rotation. When kids see fifty different outdoor toys at once, they get overwhelmed and play with none of them. They scatter them around the grass and walk away. I keep a curated selection accessible on the patio and hide the rest in the garage. Every three or four weeks, I swap them out. I’ll pack up the plastic golf set and bubble wands, and I’ll bring out the giant Connect 4 game and the water table. Suddenly, old toys feel brand new. My kids will spend hours playing with a water table they ignored the month before. I store the out-of-rotation items in large black contractor trash bags (a box of 50 costs about $22.99) on a high shelf in the garage. This method drastically reduces visual clutter. I’m no longer forced to look at a mountain of plastic every time I glance out my kitchen window. It takes extra effort on a Sunday, but the peace of mind is worth it.

ULG 1 Pack Over Door Organizer with 5 Large and 10 Mesh
If you want something that just works, ULG 1 Pack Over Door Organizer with 5 Large and 10 Mesh Side Pockets is a safe bet (8 reviews, 4.5 stars).
10. Prioritize Weather-Resistant Materials for Longevity

I can’t tell you how much money I’ve wasted buying trendy storage baskets that disintegrate outside. Wicker, untreated canvas, and cheap indoor plastics won’t survive a single season of sun and rain. You must prioritize weather-resistant materials if you want your setup to last. Right now, the trend is shifting toward powder-coated galvanized steel, and I am here for it. I recently purchased the IKEA SUNDSÖ cabinet for $119.99. It’s a bright, cheerful yellow cabinet made entirely of powder-coated steel. I placed it right next to my back door. It’s rust-resistant and handles extreme temperatures without warping or cracking. I use it to store delicate items that need protection from the damp air, like remote-control cars, extra batteries, and expensive water guns. If you prefer the look of wood, you must ensure it’s treated acacia or teak. Untreated pine will rot and grow fuzzy green moss within months. I bought a cheap pine crate once, thinking it would look rustic. It literally fell apart in my hands after a wet spring. Always check the tag before you buy. If it doesn’t explicitly state UV-protected or weather-resistant, put it back on the shelf immediately.
11. Utilize Rolling Carts for Portable Play Zones

Dragging heavy bins of sports equipment across a rough concrete driveway is exhausting. I used to scrape my knuckles trying to haul a massive plastic tub from the garage to the front yard. It was miserable. A rolling cart changes the dynamic. I bought the Kinghouse Garage Sports Equipment Organizer on wheels for $79.99 on Amazon. It features a sturdy metal frame, heavy-duty caster wheels, and multiple wire baskets. It holds three basketballs, four tennis rackets, a pile of baseballs, and several bats. When the kids want to play in the cul-de-sac, they unlock the wheels and push the entire cart down the driveway themselves. It rolls smoothly over the expansion joints in the concrete. When they finish, they roll it back into its designated spot in the garage. It makes cleanup manageable, especially for kids who can’t lift heavy boxes. The wire mesh design also means dirt and dried grass clippings fall right through to the floor instead of collecting in the bottom of a bin. I usually sweep under the cart once a month. This mobile strategy is perfect if your house features a large driveway or if your kids frequently play at the end of the street.
12. Don’t Forget About Small Accessories with Divided Bins

Small, messy accessories are the worst to organize. I’m talking about half-used sticks of sidewalk chalk, tiny plastic dinosaur figures, and those sticky, leaking bottles of bubble solution. If you toss these into a large bin, they get crushed into a powdery, soapy paste at the bottom. It’s gross. I use all-purpose divided bins for these micro-messes. I bought a heavy-duty plastic cleaning caddy with a comfortable handle for $11.99 at Target. It includes three separate compartments. I put chalk in one side, bubble wands in the middle, and small water squirters in the other. Here is a crucial tip: store this bin out of reach. I keep my messy bin on a high shelf in the garage. Professional organizers recommend storing messy items where only adults can reach them, and I agree. If my kids gain free access to the bubbles, they will pour an entire 32-ounce bottle of solution onto the patio within five minutes. I control the distribution. Last week, I grabbed a bag of organic apples at Trader Joe’s and let the kids sit on the porch with their divided chalk bin. It kept the mess contained.

IRIS USA 13 QT Plastic Storage Box with Lid and Latches
A dependable everyday pick — IRIS USA 13 QT Plastic Storage Box with Lid and Latches – 6 Pack – BPA pulls in 627 ratings at 4.5 stars. Not flashy, just solid.
13. Clean and Dry Ride-On Toys Before Winter Storage

This is a step almost everyone skips, and it costs them hundreds of dollars. You can’t just shove a dirty, battery-operated ride-on jeep into the corner of your shed in November and expect it to work in April. I made this expensive mistake with a $300 Power Wheels truck. I left it outside under a leaky tarp. The battery froze, cracked, and leaked acid everywhere. The metal steering column rusted solid. Now, I follow a strict winterizing routine. First, I wipe down the entire plastic body with a damp microfiber cloth and a squirt of Dawn dish soap. Then, I apply a quick layer of Meguiar’s Quik Wax (about $10.99 for a 16-ounce spray bottle). It takes five minutes and leaves a protective coating that repels moisture and prevents the plastic from cracking in the cold. Most importantly, I remove the 12-volt battery entirely. I store the battery on a wooden shelf in my laundry room, where it stays warm and dry. I plug it into the charger for about eight hours every four to six weeks to maintain its health. Taking twenty minutes to properly clean and prep your electric toys will easily double their lifespan. Don’t let laziness ruin your gear.
14. Regularly Purge Broken or Unused Items

Storage bins aren’t magic. If you own too much junk, no amount of organizing will fix your yard. A common mistake is holding onto broken or outgrown toys simply because you feel guilty throwing them away. I used to hoard cracked plastic shovels and water guns with missing triggers, thinking I’d eventually fix them with super glue. Spoiler alert: I never did. They just sat in a bin collecting spider webs. Professional organizers advise a ruthless purge twice a year, usually in the spring and fall. I take an empty black trash bag and a cardboard donation box out to the patio. I throw away anything with sharp cracked edges, faded plastic, or missing parts. If a toy sits in great condition but my kids haven’t touched it in six months, it goes into the donation box. Last fall, I donated a pristine plastic sandbox to a local daycare because my kids had outgrown it. Removing the sheer volume of unused items makes organizing the remaining toys infinitely simpler. You won’t need five expensive deck boxes if you only keep one box worth of toys that your kids actually play with. Be ruthless.
15. Consider Under-Deck Storage for Unused Space

If your yard features a raised wooden deck, you’re likely sitting on a goldmine of unused storage space. For years, the area under my deck remained a dark, creepy void filled with dead leaves, tennis balls, and wolf spiders. It was wasted square footage. I finally decided to reclaim it. I installed a heavy-duty, weather-resistant under-deck storage drawer. You can buy specialized sliding plastic bins, but I went with a DIY approach to save money. I purchased three long, shallow under-bed plastic storage boxes with wheels (the Sterilite 60-Quart size, about $22.98 each). I laid down a few cheap concrete pavers to create a smooth, flat track over the dirt. I slide these long bins right under the wooden deck joists. They are practically invisible from the yard. I use them to store long, flat seasonal items like collapsed kiddie pools, slip-and-slides, and extra patio umbrella fabric. The plastic lids keep the dirt and bugs out. It frees up an enormous amount of space in my garage and deck boxes. Just make sure you measure the clearance height under your deck before you buy any bins. I bought a bin that was two inches too tall on my first try, and it was frustrating.
Organizing your yard doesn’t have to be a miserable chore that you put off until the end of summer. Once you implement a few of these heavy-duty systems, the cleanup practically runs itself. I can’t tell you how nice it feels to sip my morning coffee on the patio without staring at a mountain of faded plastic dump trucks. Invest in a solid Keter deck box, get those wet pool toys hanging in a mesh bag, and definitely try the kiddie parking garage trick. Your sanity is worth it. If you found these tips helpful, pin this article to your favorite home organization board so you can reference the exact product names and prices later. Let’s reclaim our backyards!

Sterilite 4 Pack Ultra Latching Box, Storage Bins with Lids
If you want something that just works, Sterilite 4 Pack Ultra Latching Box is a safe bet (126 reviews, 4.5 stars).
Frequently Asked Questions
How do you store outdoor toys so they don’t get moldy?
You must use breathable materials like heavy-duty mesh bags for wet items. For solid plastic bins or 5-gallon buckets, always drill drainage holes in the bottom to prevent stagnant water from pooling and breeding mildew.
What is the best way to store large ride-on toys?
Create a dedicated parking zone using a heavy-duty plastic folding table to act as a covered garage. This protects the plastic from harsh UV fading and keeps the seats dry during rainstorms while encouraging kids to park neatly.
Can I use regular clear plastic bins for outdoor toy storage?
No, standard clear indoor bins become brittle and shatter in freezing temperatures. You need heavy-duty, weather-resistant totes made of thick opaque plastic or UV-protected resin designed specifically to withstand extreme outdoor temperature fluctuations.
How should I prep battery-operated toys for winter storage?
Always remove the 12-volt battery and store it in a warm, dry place indoors, charging it every four to six weeks. Wipe down the plastic body with soap and apply a protective wax coating to prevent moisture damage.