What’s Inside
- 1. Inventory Everything Before You Buy a Single Shelf
- 2. Measure Twice Before Ordering Anything Online
- 3. Install Slatwall Panels for Seriously Versatile Storage
- 4. Mount Magnetic Tool Bars Above Your Workbench
- 5. Choose Deep-Storage Racking for Bulky Items
- 6. Install Overhead Racks for Seasonal Items You Rarely Touch
- 7. Create Dedicated Zones with Pegboards
- 8. Label Clear Bins Systematically (Not Just Sometimes)
- 9. Choose Husky Stamped Metal Shelves for Heavy-Duty Needs
- 10. Hang Bikes with Heavy-Duty Hooks (Not Cheap Ones)
- 11. Add Wall-Mounted Cabinets for Automotive Fluids
- 12. Use Modular Connecting Systems for Future Flexibility
- 13. Never Overload Shelves Beyond Their Weight Limit
- 14. Preserve Your Parking Zone First (Then Organize Around It)
- 15. Don’t Overlook Ceiling Storage for Rarely Used Items
- 16. Invest in a Proper Workbench (Not a Folding Table)
- 17. Create a Donation Station for Constant Decluttering
- 18. Install Proper Lighting (Seriously, It Matters)
- 19. Use Color-Coded Bins for Family Members
- 20. Schedule Quarterly Garage Audits (Put It on Your Calendar)
I’ll be honest: my garage was a disaster zone for three years. We couldn’t park inside because camping gear, holiday decorations, and random tools had taken over every square inch. Then I discovered these ideas garage organization professionals actually use, and everything changed. Now we park both cars inside with room to spare, and I can find my drill in under ten seconds.
The difference wasn’t some expensive overhaul. It was smart systems that work with real life. These 20 ideas garage organization strategies transformed my space from chaotic dumping ground to functional room, and I’m betting they’ll do the same for you.
1. Inventory Everything Before You Buy a Single Shelf

This step saved me probably $400 in shelving I didn’t need. Before I touched anything, I spent two hours listing every single item in that garage: gardening tools, sports equipment, seasonal decorations, cleaning products, camping gear, automotive supplies. Everything.
Professionals say this prevents overbuying shelves by 30-50%, and I believe it. When I actually counted, I realized I had way more holiday decor than tools, which meant I needed different storage than I’d assumed. I made categories on my phone notes app and tallied quantities.
Most people skip this and just start buying random bins at Target. Don’t be most people. Once you know exactly what you’re storing, you can calculate precise storage needs instead of guessing. I discovered I needed three times more overhead space than floor shelving, which completely changed my shopping list. Take photos of each category too. When you’re standing in Home Depot trying to remember if your camping chairs will fit in those bins, you’ll thank yourself.
2. Measure Twice Before Ordering Anything Online

I learned this the hard way when I had to return a $180 shelving unit that was four inches too tall. Grab a tape measure and record your garage height, width, depth, and critically, your open garage door clearance. You need at least 7-8 feet for overhead racks, or you’ll damage them every time you open the door.
Car and Driver experts have this saying: “measure twice, order once.” It sounds obvious until you’re hauling back an Amazon Basics 4-Shelf Adjustable wire shelving unit ($50-80 range) because it blocks your car door. I measured my ceiling height at 9 feet, but forgot about the garage door track that eats up 18 inches when open.
Write down every measurement on your phone. Wall lengths, distances between studs (usually 16 inches), ceiling height at multiple points (mine varied by 6 inches), and how much clearance you have around your parked cars. When shopping for something like overhead racks, these numbers aren’t suggestions. They’re requirements. I keep a running note with all my garage dimensions that I reference constantly when browsing storage solutions online.
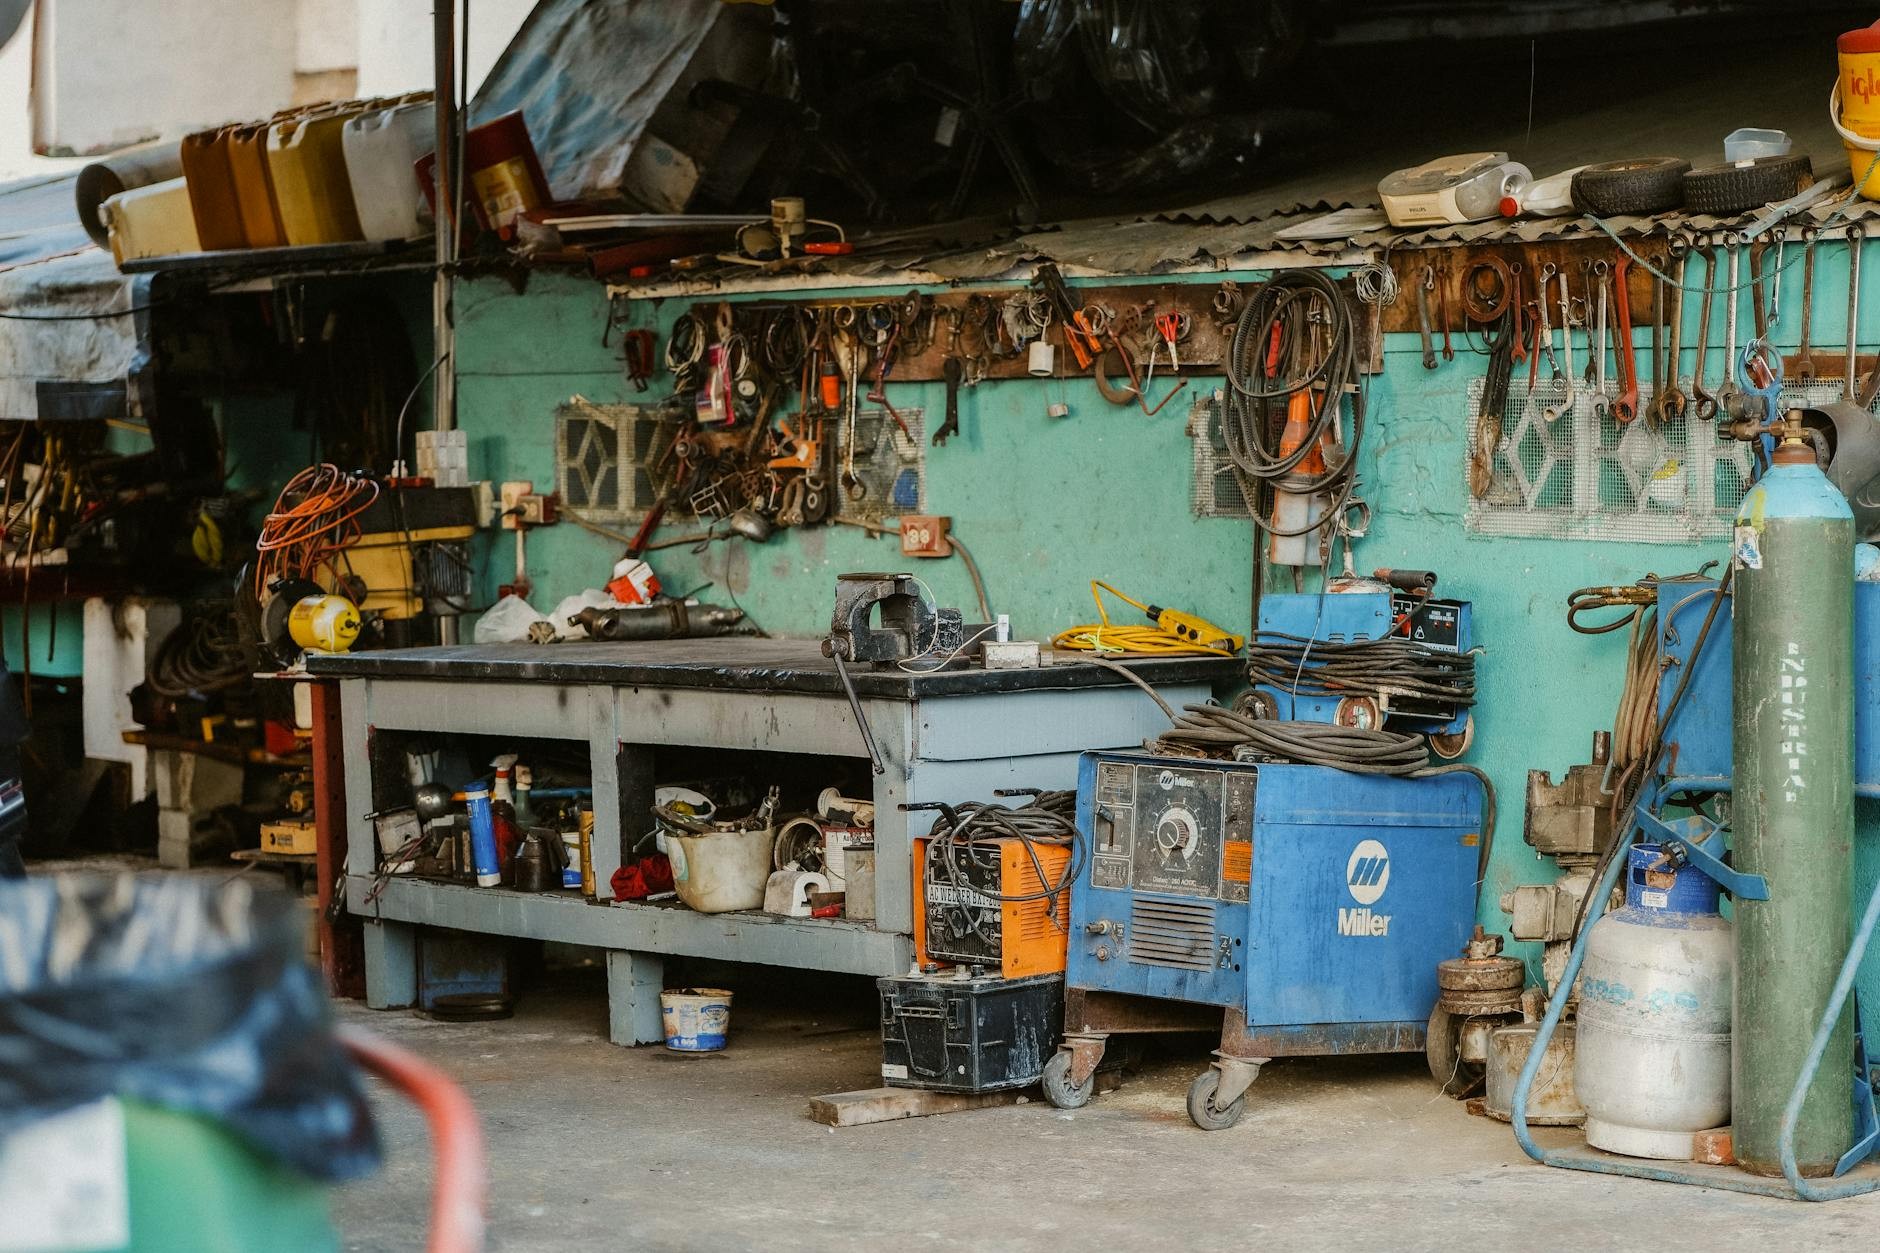
3. Install Slatwall Panels for Seriously Versatile Storage

Slatwall panels changed my entire approach to wall storage. I installed three 4×8-foot Rubbermaid panels along my back wall, and they hold up to 75 lbs per square foot. That’s a 2026 trend according to Steel Power Shelving, and I’m here for it.
The beauty is the flexibility. I can move hooks around whenever my storage needs change, which happens more than I expected. Last month I rearranged everything to make room for new bike hooks without any tools. Just pop the old hooks out, slide in new ones.
Installation took my husband and me about three hours for all three panels. We mounted them directly into wall studs with heavy-duty screws. Now I have rakes, shovels, extension cords, and both bikes hanging vertically without touching the floor. My garage floor space increased dramatically. The upfront cost was around $120 per panel, but considering I can reconfigure endlessly without buying new storage units, it’s paid for itself. Pro tip: buy extra hooks upfront in various sizes. You’ll use more than you think.

Sakugi Storage Racks – 2 Pack
Honestly, Sakugi Storage Racks – 2 Pack surprised me — sturdier than it looks in the photos, and over 198 buyers gave it 4.5 stars.
4. Mount Magnetic Tool Bars Above Your Workbench

I was skeptical about magnetic strips until I installed one above my workbench. Now I’m a complete convert. I mounted a 24-inch Strong Hand Tools magnetic bar ($22 on Amazon) and it holds every metal tool I own: screwdrivers, pliers, wrenches, utility knives.
Experts say this cuts retrieval time by half versus digging through loose drawers, and honestly, it’s probably more than half for me. Everything’s visible and within arm’s reach. I can grab what I need in two seconds instead of rummaging through three different toolboxes.
The installation was stupidly simple. Two screws into the wall studs, done. I positioned mine at eye level, about 5 feet up, so I don’t have to reach or bend. Common mistake: mounting them too high where you can’t see what you’re grabbing. I added a second 12-inch strip ($15) for smaller items like drill bits and Allen wrenches. My workbench went from cluttered disaster to actually functional workspace. If you do any kind of DIY projects, this $40 investment will change your life.
5. Choose Deep-Storage Racking for Bulky Items

Shallow shelves were my nemesis. I kept buying standard 12-inch deep units and nothing fit properly. Camping gear, large toolboxes, and storage bins just hung off the edges looking precarious and messy.
Then I discovered the 2026 trend toward deeper units. I replaced two shallow units with one Steel Power Shelving system: 2.0m high by 4.0m long by 0.6m deep (that’s about 6.5 feet tall, 13 feet long, and 24 inches deep). It’s upgradable to 1600kg capacity, which is absolutely wild. Cost was around $450, but it replaced $300 worth of inadequate shallow shelving.
The difference is night and day. My camping gear actually fits without tetris-level stacking. Large Rubbermaid bins sit completely on the shelves instead of hanging half off. I can store my air compressor, shop vac, and paint sprayer without playing jenga every time I need something. The modular system means I can add extensions if needed. For anyone with serious storage needs beyond basic hand tools, deep racking isn’t optional. It’s essential. Just make sure you have the floor space, because these units have a bigger footprint.
6. Install Overhead Racks for Seasonal Items You Rarely Touch

Overhead storage was my secret weapon for reclaiming floor space. I installed a NewAge VersaRac Pro 4 ft by 8 ft adjustable rack with black powder-coated finish. Cost was $320, and it holds over 500 lbs of Christmas decorations, camping gear we use twice a year, and winter clothes.
The most common mistake here? Not measuring door clearance first. I almost made this error. When your garage door opens, it needs at least 7-8 feet of clearance, or you’ll smash into your new rack. I measured with the door fully open and marked the track path before drilling anything.
Installation required two people and took about 90 minutes. We mounted it to ceiling joists with lag bolts. Now all my seasonal items live up there, completely out of the way but still accessible with a step ladder. I labeled everything clearly so I know which bin has Halloween versus Christmas.
Pro tip: don’t put anything up there you need more than quarterly. Climbing up and down gets old fast. This is for true seasonal rotation items. My overhead rack freed up an entire wall of floor shelving that I repurposed for daily-use items. Best $320 I spent on garage organization.
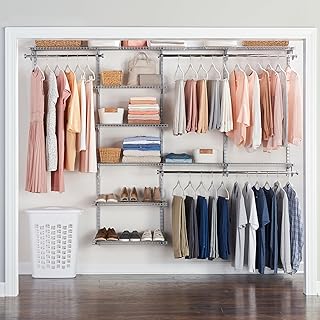
Rubbermaid Configurations Deluxe Custom Closet Kit 4-8 Ft.
Rubbermaid Configurations Deluxe Custom Closet Kit 4-8 Ft. Adjustable has been one of the most consistently praised picks in this category. 81 reviewers averaged 4.5/5.
7. Create Dedicated Zones with Pegboards

Zoning changed everything about how I use my garage. I installed a 4×4-foot Wall Control pegboard ($55 at Home Depot) specifically for automotive care: car wash sponges, tire pressure gauge, fluids, microfiber cloths, wax. Everything car-related lives in that one spot.
Extra Space Storage professionals say zoning by category boosts efficiency by 40%, and I totally see it. Instead of hunting through the entire garage for car soap, I walk to the automotive zone. Done.
I created five zones total: automotive, gardening, tools, sports equipment, and household maintenance. Each has its own pegboard or section of slatwall. The pegboard was easiest to install because it comes with all the hooks and accessories included. I mounted mine directly to studs with 3-inch screws.
The key is being strict about zones. If something doesn’t belong in that category, it doesn’t go there. Period. This discipline keeps everything from devolving back into chaos. I even labeled each zone with vinyl letters so my husband knows where stuff goes. It sounds obsessive, but when you can find anything in under 30 seconds, you’ll understand why zoning matters so much.
8. Label Clear Bins Systematically (Not Just Sometimes)

I used to throw stuff in bins and think I’d remember what was inside. Spoiler: I never remembered. Now I use Iris WeatherPro 54-quart stackable bins ($18 each) with dry-erase clip-on labels, and it’s honestly transformed how I find things.
The 2026 pros emphasize systematic labeling because it saves massive amounts of seasonal search time. Instead of opening six bins to find Halloween decorations, I read labels and grab the right one immediately. The bins are waterproof, which matters in my garage that gets humid in summer.
I label everything: contents, which room it came from, and what season I’ll need it. So a label reads “Christmas: Living Room Decor” or “Camping: Cooking Gear.” Specific beats vague every time.
Common mistake: using opaque bins without labels. You’ll never know what’s inside without opening them. Clear bins plus labels is the winning combination. I bought a 10-pack of bins and labeled them all in one afternoon. Now my seasonal rotation takes 15 minutes instead of two hours of frustrated searching. Spend the extra $2 per bin for clear instead of opaque. Your future self will thank you.
9. Choose Husky Stamped Metal Shelves for Heavy-Duty Needs

After my plastic shelving unit literally cracked under the weight of paint cans, I upgraded to Husky 4-Tier stamped metal units. These things are beasts: 46 inches wide, 72 inches tall, 18 inches deep, with 500 lb capacity per shelf. Cost around $140 at Home Depot.
Car and Driver tests show stamped metal outperforms plastic in heavy-duty garages exposed to moisture, temperature swings, and serious weight. My garage gets all three. The metal doesn’t warp, crack, or fade like my old plastic units did after two summers.
I have two of these units now, and they hold all my heaviest items: paint, automotive fluids, power tools, bulk cleaning supplies. Assembly took about 45 minutes per unit with just a rubber mallet. No tools required, though I used gloves because the metal edges are sharp during assembly.
The powder-coated finish resists rust, which matters because my garage isn’t climate controlled. After 18 months, they still look brand new. If you’re storing anything heavy or dealing with temperature extremes, skip plastic entirely. Metal shelving costs more upfront but lasts exponentially longer. Mine will probably outlive my house.

OUTNILI Mop and Broom Holder Wall Mount
Honestly, OUTNILI Mop and Broom Holder Wall Mount – Rustic Wood Broom Mop Hanger surprised me — sturdier than it looks in the photos, and over 45 buyers gave it 4.5 stars.
10. Hang Bikes with Heavy-Duty Hooks (Not Cheap Ones)

I learned about hook quality the hard way when a cheap $5 hook failed and my bike crashed onto my car hood. Now I only use Rubbermaid or Ryobi hooks rated for 50-100 lbs. They cost $15-20 per pair, and they’re worth every penny.
Hanging bikes vertically freed up 25 square feet of floor space in my garage. That’s enough room for a whole storage cabinet. I mounted the hooks directly into wall studs, not just drywall. This is critical. Drywall anchors won’t hold a 30-lb bike long-term.
I hung our two adult bikes and one kids bike on the slatwall panels using heavy-duty bike hooks. They’re positioned at different heights so the handlebars don’t clash. My husband was skeptical about vertical storage, but now he’s a believer.
Common error: using hooks not rated for your bike’s weight. Mountain bikes with full suspension can weigh 35-40 lbs. Check your bike weight and buy hooks rated for at least 25% more. I also added rubber coating to the hooks so they don’t scratch the bike frames. If you have multiple bikes eating up floor space, vertical hanging is the single best solution. Just don’t cheap out on the hooks.
11. Add Wall-Mounted Cabinets for Automotive Fluids

Storing automotive fluids on the floor was asking for disaster. One knocked-over bottle of antifreeze and I learned my lesson. Now I have Seville Classics wall-mounted cabinets (24 inches wide by 12 inches deep, $95 each) specifically for all liquids.
Organized Assistant pros advise against floor storage to prevent spills, and they’re absolutely right. My cabinets are mounted 4 feet up the wall, completely out of the way but still accessible. They’re weather-resistant and have adjustable shelves inside.
I store motor oil, antifreeze, windshield washer fluid, brake fluid, power steering fluid, and all my car cleaning products in these cabinets. Everything’s contained, organized, and impossible to knock over. The doors keep dust out too, which matters for products you don’t use weekly.
Installation required finding studs and using heavy-duty mounting brackets. Each cabinet took about 30 minutes to hang. I positioned them near my automotive zone pegboard so everything car-related is in one area. If you have kids or pets, lockable cabinets are even better. Mine aren’t lockable, but they’re high enough that my toddler can’t reach. Wall-mounted storage for liquids isn’t just organized, it’s safer.
12. Use Modular Connecting Systems for Future Flexibility

I initially bought standalone shelving units, and expanding was a nightmare. Nothing matched, nothing connected, everything looked chaotic. Then I discovered modular systems like Steel Power’s adjustable shelves with click-in assembly.
These systems use 4 adjustable shelves per bay and can extend from 1.2 to 2.0 meters seamlessly. I started with one 4-meter wall section ($250) and added extensions as needed. The 2026 modular trend means you can build connected storage without any tools beyond the initial assembly.
The genius is that everything matches and connects. When I needed more storage six months later, I bought an extension kit that clicked right into my existing unit. No measuring, no drilling, no trying to match finishes. It all works together.
I now have 12 feet of connected shelving that looks like one custom built-in unit instead of random mismatched pieces. The modular approach costs slightly more upfront, but the expandability is worth it. You’re not locked into your initial configuration. As your storage needs change (and they will), you can adapt without starting over. I’m planning to add another bay next month for sports equipment.

Sakugi Storage Shelves
A dependable everyday pick — Sakugi Storage Shelves – 5-Tier Heavy Duty Garage Shelving Units with pulls in 30 ratings at 4.5 stars. Not flashy, just solid.
13. Never Overload Shelves Beyond Their Weight Limit

This seems obvious, but I see people do it constantly. Every shelving unit has a weight limit per shelf and total capacity. Ignore these numbers at your peril. I watched my neighbor’s shelf collapse because he loaded 600 lbs onto a unit rated for 350 lbs total.
Check limits before loading: a CX 4-Tier plastic unit handles about 350 lbs total ($50-60), while Amazon Basics wire shelving manages 1000 lbs total distributed across shelves. Drew and Jonathan from HGTV say overloading causes 70% of shelf collapses.
The expert tip is distributing weight evenly. Don’t put all your heaviest items on one shelf. Spread them across multiple levels. I keep paint cans (heavy) on the bottom shelf, medium-weight items in the middle, and lightest stuff up top. This prevents bowing and collapse.
I also avoid storing anything heavier than the per-shelf rating. If a shelf maxes out at 200 lbs, I keep it under 175 lbs to be safe. The brackets and supports will last longer. I’ve seen too many garage sale listings for “slightly damaged shelving” to ignore weight limits. Read the manual, follow the numbers, and your shelves will last decades instead of months.
14. Preserve Your Parking Zone First (Then Organize Around It)

Here’s where most people mess up: they organize first and parking becomes an afterthought. Wrong order. I marked my parking zone first with blue painter’s tape: 9 feet wide by 18 feet long per car, plus 2-3 feet of clearance around each vehicle.
Functional area professionals stress preserving parking space because crowding cars leads to disorganized chaos. If you can’t park inside, what’s the point of a garage? I literally taped off both parking spots before installing anything.
This forced me to get creative with wall and ceiling storage instead of just shoving shelves everywhere. I have 36 square feet dedicated to parking (two cars) that’s completely off-limits for storage. Everything else had to work around that.
I see so many garages where people can barely squeeze past their car to get inside. That’s not organized, that’s just differently chaotic. Mark your parking zones with tape or paint, and treat them as sacred. Build your storage systems around them, not through them. We’ve parked both cars inside for 14 months now, and it’s honestly one of my favorite things about our organization system. Parking inside isn’t a luxury. It’s the whole point.
15. Don’t Overlook Ceiling Storage for Rarely Used Items

I ignored my ceiling for two years, and that was dumb. Ceilings offer massive storage potential for items you touch maybe twice a year. I finally installed adjustable heavy-duty racks (500 lb capacity, $280) for holiday decorations and they freed up an entire wall.
This is trending hard in 2026 according to organization experts because it maximizes unused space. Most garages have 8-10 feet of ceiling height. Why waste it? My racks are adjustable from 22 to 40 inches below the ceiling, so I customized the height based on what fits underneath.
I store Christmas decorations, Halloween bins, camping gear we use twice a year, and seasonal clothing up there. Everything I don’t need regular access to lives on the ceiling. It took two people about two hours to install, and we used a stud finder to locate ceiling joists for secure mounting.
Pro tip: only put lightweight-to-medium items up there even if it’s rated for 500 lbs. Climbing up and down with heavy items gets dangerous. I use a 6-foot step ladder to access ceiling storage, and I’m glad I’m not hauling 50-lb boxes. Ceiling storage is perfect for bulky but light items like artificial Christmas trees and sleeping bags.
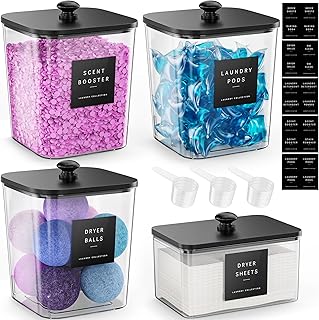
4 Pack Laundry Pods Container
Honestly, 4 Pack Laundry Pods Container surprised me — sturdier than it looks in the photos, and over 469 buyers gave it 4.5 stars.
16. Invest in a Proper Workbench (Not a Folding Table)

I tried using a folding table as my workbench for six months. It wobbled, couldn’t handle heavy projects, and had zero storage. Finally buying a real workbench with built-in storage changed how I approach projects.
I got a Husky 46-inch workbench with drawers and a pegboard back ($250). It has a solid wood top that can handle hammering, cutting, and heavy tools without shaking. The four drawers hold all my hand tools organized by type.
The pegboard back gives me vertical storage right at the workspace. I hung my most-used tools there: hammer, tape measure, level, utility knife, screwdrivers. Everything’s within arm’s reach while I’m working. No more walking across the garage to grab tools.
The stability matters more than I expected. When I’m using a circular saw or sanding something, the bench doesn’t move at all. My old folding table would shimmy across the floor. If you do any DIY work, a real workbench isn’t optional. It’s the foundation of a functional workspace. I should have bought mine two years earlier.
17. Create a Donation Station for Constant Decluttering

Here’s something nobody talks about: organization isn’t one-and-done. Stuff accumulates constantly. I set up a permanent donation station in my garage: a large bin labeled “DONATE” that’s always available.
Whenever I find something we don’t use anymore, it goes straight into that bin. When it’s full, I load it into my car and drop it at Goodwill. This prevents the re-cluttering that kills most organization systems within months.
I use a 30-gallon Rubbermaid bin ($15) positioned near the door to the house. It’s convenient, so I actually use it instead of just piling things in corners “to deal with later.” The bin has a lid to keep dust out.
My rule: if we haven’t used something in 12 months and it’s not seasonal, it goes in the donation bin. This has kept my garage from creeping back toward chaos. I probably donate 2-3 bins worth of stuff per year, which sounds like a lot until you realize how much unnecessary stuff accumulates.
The donation station also gives me permission to let go of things. Instead of agonizing over each item, I know it’s going somewhere useful. This psychological trick has kept my garage organized longer than any previous attempt. Make decluttering easy and constant, not hard and occasional.
18. Install Proper Lighting (Seriously, It Matters)

My garage had one dim bulb in the center. I couldn’t see anything in the corners, which meant I avoided using those spaces. Then I installed four LED shop lights (4-foot, 4000 lumens each, $30 per light) and it was like discovering a new room.
Proper lighting makes organization actually usable. I can see into bins on high shelves. I can read labels from across the garage. I can work at my bench without shadows. This seems basic, but inadequate lighting ruins even good organization.
I positioned lights strategically: one over the workbench, one over each parking spot, and one over the main storage wall. They’re daylight color temperature (5000K), which makes everything visible and reduces eye strain. Installation was simple: they plug into regular outlets and mount with included clips.
The total cost was $120 for four lights, and it’s the best $120 I spent after the actual storage systems. I use my garage more now because it’s not a dark cave. I can find things at night. I can work on projects without squinting. If your garage lighting sucks, fix it before you organize anything else. You can’t maintain systems you can’t see properly.
19. Use Color-Coded Bins for Family Members

This idea came from my kids’ school organization system, and it works brilliantly at home. I assigned each family member a color: I’m blue, my husband is green, kids are red and yellow. All personal items go in bins matching that color.
My daughter’s sports equipment lives in yellow bins. My husband’s fishing gear is in green bins. My gardening stuff is blue. This eliminates the “whose stuff is this” arguments and makes everyone responsible for their own items.
I bought Sterilite 30-quart colored bins ($12-15 each) in each family color. They stack nicely on the metal shelving, and everyone knows which bins are theirs. If a yellow bin is out of place, I know exactly who to ask about it.
This system also teaches my kids responsibility. They know their red and yellow bins are their problem. If they can’t find their soccer cleats, they check their yellow bin first. It’s cut down on the “Mom, where’s my…” questions by probably 60%.
The color-coding extends to hooks too. My daughter’s bike hangs on a yellow hook. My husband’s tools hang on green hooks on the pegboard. Visual systems work better than verbal rules, especially with kids. The $50 I spent on colored bins has saved countless hours of “whose stuff is this” debates.
20. Schedule Quarterly Garage Audits (Put It on Your Calendar)

This is the idea that keeps everything else working. I schedule garage audits four times a year: January, April, July, October. I put them on my phone calendar with reminders. Otherwise, I’d never do it and things would slide back to chaos.
During each audit, I spend 1-2 hours going through everything. I check if items are in the right zones. I move seasonal stuff to or from overhead storage. I fill the donation bin. I wipe down shelves. I tighten any loose hooks or brackets.
This might sound obsessive, but it’s way easier than doing a massive reorganization every few years. Quarterly maintenance keeps small problems from becoming big disasters. I catch issues like overloaded shelves or bins in wrong zones before they spiral.
I also use audit time to reassess if my systems still work. Last July, I realized my sports equipment zone was too small and my tool zone was too big. I swapped them during that audit. Systems should evolve with your actual usage patterns.
The October audit is biggest because I’m swapping summer and winter seasonal items. The others are quicker tune-ups. But having them scheduled means they actually happen instead of being “something I should do someday.” If you implement only one idea from this entire list, make it scheduled maintenance. Everything else falls apart without it.
These 20 ideas garage organization strategies completely transformed my disaster garage into a space I actually enjoy using. We park both cars inside, I can find any tool in seconds, and nothing’s piled in chaotic corners anymore. The key was combining multiple approaches instead of relying on one magic solution.
Start with the basics: inventory, measure, preserve parking zones. Then build your system with quality shelving, vertical storage, and proper zones. Add the maintenance habits that keep it working long-term. You don’t need to implement everything at once. I built my system over four months, one project at a time.
If you found these ideas helpful, save this for when you’re ready to tackle your garage. Trust me, you’ll want to reference specific product names and measurements when you’re standing in Home Depot wondering what to buy. Your organized garage is totally achievable. Mine was a disaster three years ago, and now it’s the most functional room in my house.
Frequently Asked Questions
What’s the first step in garage organization?
Inventory everything before buying storage. List all items by category (tools, sports gear, seasonal decor) to calculate exact needs. This prevents overbuying shelves by 30-50% and saves hundreds of dollars on unnecessary units you’ll never fill.
How do I maximize vertical space in my garage?
Install slatwall panels that hold 75 lbs per square foot for hooks and accessories. Combine with overhead ceiling racks for seasonal items and wall-mounted cabinets for fluids. This approach frees 40-60% of floor space compared to traditional shelving alone.
What shelving is best for heavy garage items?
Husky stamped metal shelves handle 500 lbs per shelf and resist moisture better than plastic. For extremely heavy loads, Steel Power deep-storage units offer 0.6m depth with 1600kg total capacity. Always check weight limits and distribute items evenly to prevent collapse.
How much clearance do I need for overhead storage racks?
Measure your open garage door clearance first. You need at least 7-8 feet of clearance for overhead racks to avoid collision damage. This is the most common installation mistake that leads to dented racks and expensive replacements.