What’s Inside
- 1. Install Motion-Activated LED Lighting for Instant Visibility
- 2. Create a Retail Boutique Display with Glass-Front Cabinets
- 3. Maximize Vertical Space with Strategic Double-Hang Rods
- 4. Use Pull-Out Drawers at Waist Height for Small Items
- 5. Adopt Color-Blocking Organization for Visual Clarity
- 6. Incorporate Discreet Hidden Storage Solutions
- 7. Apply the Influencer Method with Digital Outfit Lookbooks
- 8. Add Lifestyle Zones for Multiple Functions
- 9. Switch to Two-Tone Color Palettes for Visual Depth
- 10. Use Warmer Natural Finishes for Texture
- 11. Implement the Reverse Hanger Method for Decluttering
- 12. Double Your Closet as a Mudroom Solution
- 13. Install Automated Wardrobe Lifts for High Storage
- 14. Avoid Overstuffing Drawers with Proper Dividers
- 15. Create Aesthetic Closet Organization Ideas with Matching Bins
- 16. Install a Full-Length Mirror on the Back of Your Door
- 17. Dedicate Space for a Laundry Sorting System
- 18. Add Floating Shelves for Vertical Display
- 19. Incorporate Seasonal Rotation Bins
- 20. Design a Jewelry Display Wall
Last spring, I stood in my closet surrounded by piles of clothes I swore I’d organize “next weekend,” and honestly, I was drowning in chaos. Finding aesthetic closet organization ideas that actually work—not just look pretty on Pinterest—took me months of trial and error. I’ve tested everything from budget-friendly hacks to splurge-worthy systems, and I’m sharing the 20 strategies that genuinely transformed my space into something functional and beautiful.
These aren’t your basic “fold your shirts” tips. I’m talking about the specific products, exact measurements, and real-world tricks that professional organizers use but rarely share publicly. Some of these aesthetic closet organization methods cost under $20, while others require investment—but I’ll tell you which ones are actually worth your money.
1. Install Motion-Activated LED Lighting for Instant Visibility

I personally swear by motion-activated LED strips, and honestly, this changed how I interact with my closet every single morning. Before installing Philips Hue LED strips ($50–$150 depending on length), I’d fumble around in the dark trying not to wake my partner at 6 AM. Now? The lights sense me coming and illuminate everything automatically.
The installation took me about 30 minutes using the adhesive backing. I placed one strip along the top shelf edge and another vertically near the door frame. The motion sensor has a 10-foot range and shuts off after two minutes of inactivity, which saves energy. This is a top 2026 trend for seamless smart technology integration, and I get why—it’s genuinely life-changing.
Pro tip: Skip the cheap Amazon knockoffs. I tried a $25 set first, and they died within three months. The Philips version connects to your phone app, letting you adjust brightness and color temperature. I keep mine at warm white (3000K) because it makes my clothes look more accurate than harsh cool lighting.
2. Create a Retail Boutique Display with Glass-Front Cabinets

Most people shove their nice bags on shelves where they collect dust and lose their shape. I installed IKEA’s BESTÅ glass-front cabinets (starting at $99), and suddenly my closet looks like a high-end boutique instead of a storage unit. The transparent doors keep dust out while letting me see exactly what I own, which stops me from buying duplicates.
I mounted three units side-by-side at eye level (about 60 inches from the floor) and use them exclusively for handbags, sunglasses, and my watch collection. The interior LED lighting strips I added ($15 from IKEA) make everything look museum-quality. This display method follows 2026 trends toward visually curated spaces that feel intentional.
Here’s what nobody tells you: glass shows fingerprints like crazy. I wipe mine down weekly with vinegar spray, which takes maybe five minutes. But honestly? Seeing my accessories beautifully displayed makes me actually use them instead of forgetting they exist in the back of a shelf.
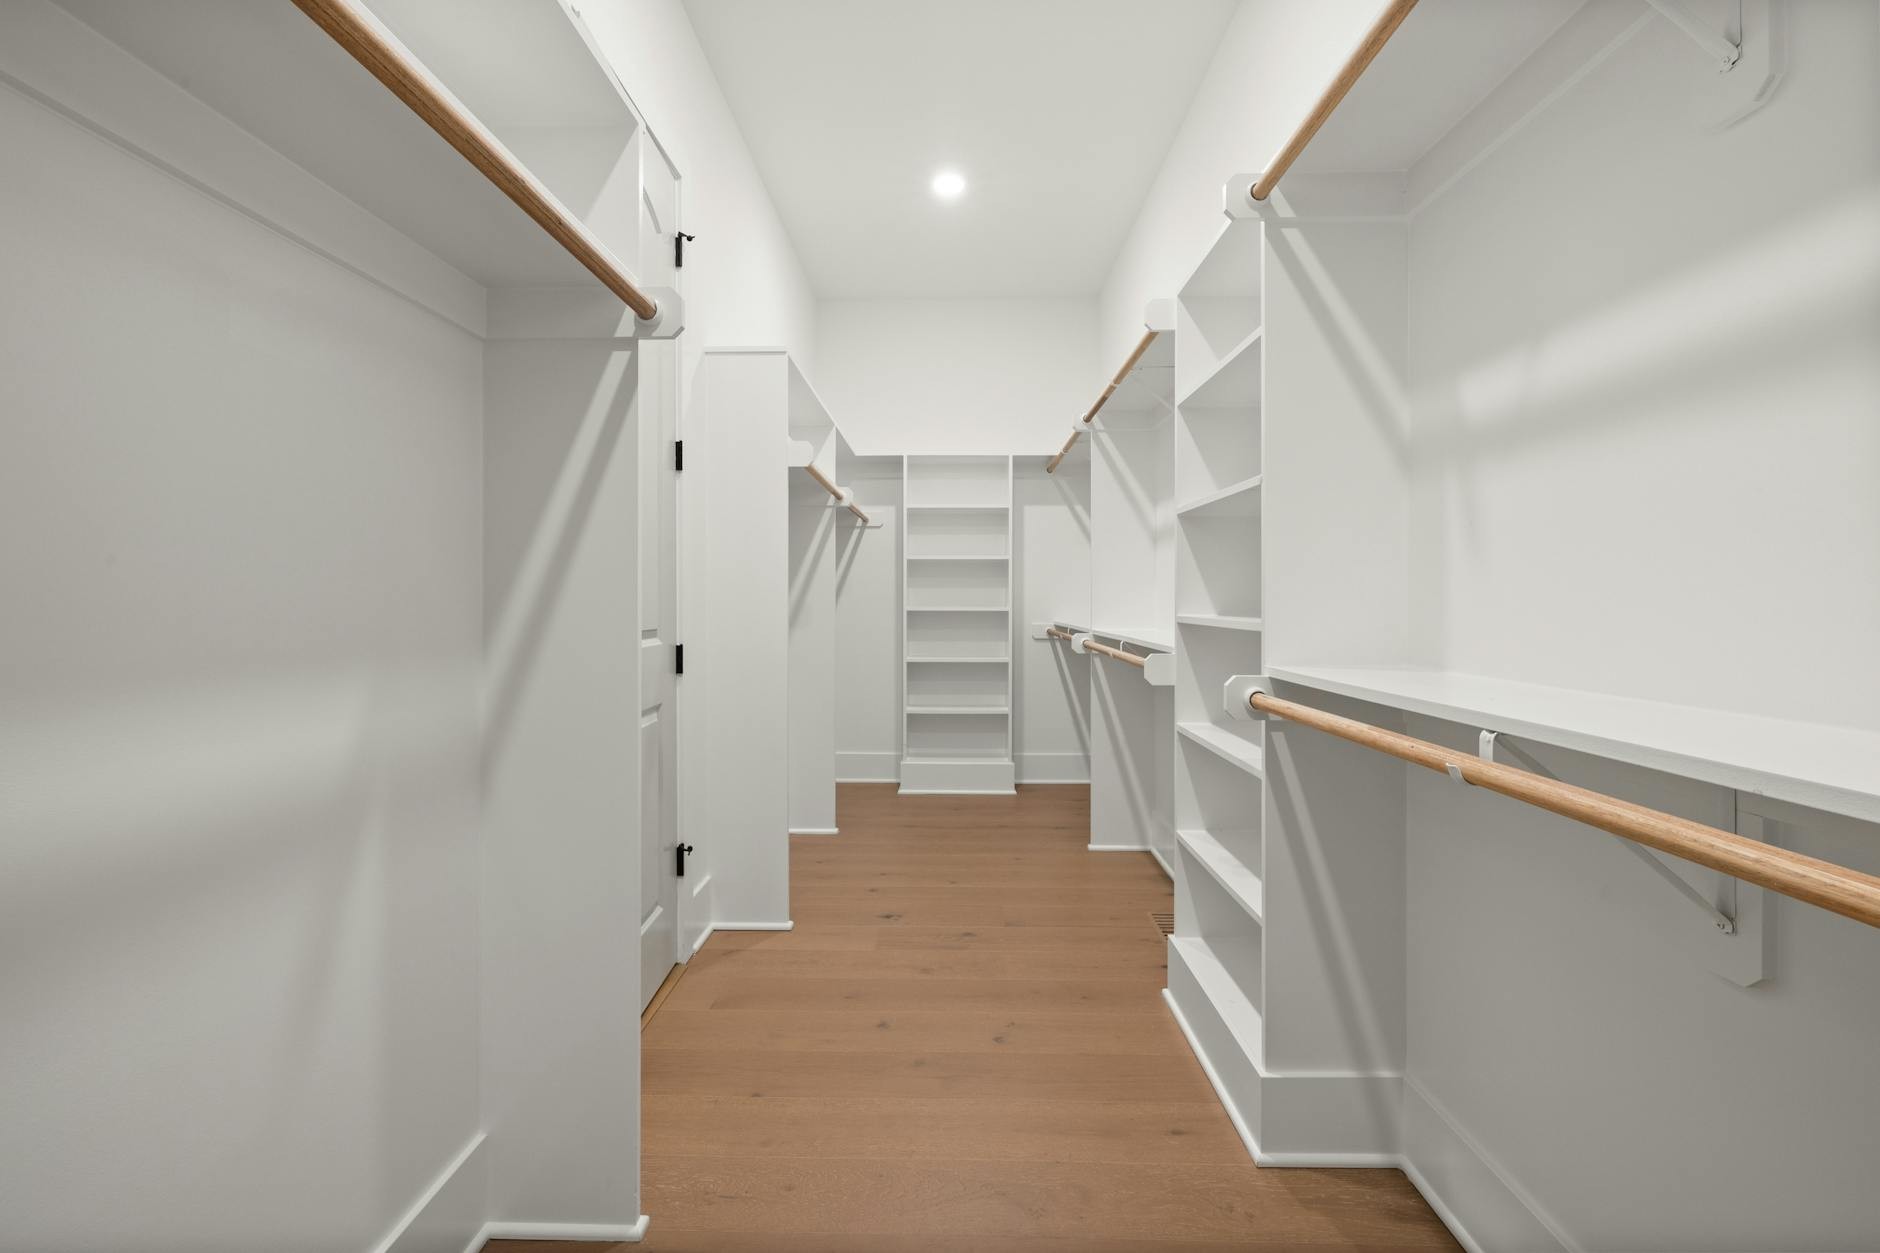
3. Maximize Vertical Space with Strategic Double-Hang Rods

I wasted 30% of my closet for years before understanding vertical space properly. The common mistake? Installing one rod at a standard 65-inch height and calling it done. Instead, I added double-hang rods at 40 inches and 80 inches specifically for shirts and pants, which instantly doubled my hanging capacity.
The math matters here. Short items like folded pants and shirts only need 38-40 inches of clearance, so stacking two rods in that zone makes perfect sense. I kept my full-height section (80 inches) for dresses and coats on one side. This configuration uses full-height doors efficiently and prevents that dead space most people ignore.
I bought adjustable closet rods from Home Depot for $18 each and installed them myself with a level and drill. The whole project took two hours. Now I can fit probably 60 more garments in the same footprint. If you’re not using your vertical space to the ceiling, you’re basically throwing away free storage.

AMKUFO 6 Pack-Closet-Organizers-and-Storage
AMKUFO 6 Pack-Closet-Organizers-and-Storage has been one of the most consistently praised picks in this category. 52 reviewers averaged 4.5/5.
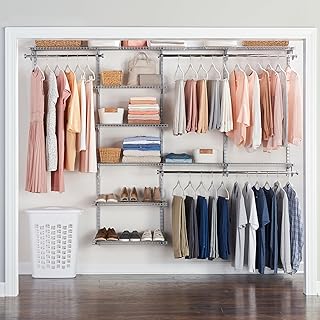
4. Use Pull-Out Drawers at Waist Height for Small Items

Jewelry and socks used to disappear into the black hole of my dresser until I installed pull-out drawer systems at waist height (30–36 inches). I went with Elfa systems from Container Store ($200–$400 per tower), and yes, it’s an investment, but these things are built like tanks. The smooth gliding mechanism still works perfectly after two years of daily use.
The waist-height placement is crucial because it’s the most ergonomic zone for accessing frequently used items. I don’t have to bend or reach, which sounds minor but makes a massive difference when you’re rushing to get ready. Each drawer has velvet-lined dividers that keep my necklaces from tangling and my rings organized by type.
Pro tip from organizers: measure your items first. My sock drawer has 4×6-inch compartments, which fits rolled socks perfectly. My underwear drawer uses 6×8-inch sections. This prevents the “junk drawer effect” where everything becomes a jumbled mess within a week. The dividers stay put instead of sliding around like cheaper plastic versions.
5. Adopt Color-Blocking Organization for Visual Clarity

I’ll be honest—I thought color-blocking was just for Instagram aesthetics until I actually tried it. Now I organize my entire wardrobe rainbow-style on slim velvet hangers from Amazon Basics (pack of 50 for $20), and it’s genuinely made getting dressed faster. I can spot exactly what I need without rifling through everything.
The system goes: whites, creams, tans, pinks, reds, oranges, yellows, greens, blues, purples, grays, blacks. Within each color family, I arrange light to dark. This professional tip reveals wardrobe gaps instantly—I realized I owned 12 black shirts but zero yellow ones, which explained why my outfits felt repetitive.
The velvet hangers are non-negotiable for this system because clothes don’t slip off like they do on plastic. They’re also ultra-thin (about 0.2 inches), so I fit way more in the same rod space. I replaced all 80 of my old hangers in one afternoon, and the visual uniformity alone makes my closet look 10 times more expensive than it is.
6. Incorporate Discreet Hidden Storage Solutions

Hidden storage is surging as a 2026 trend for “purposeful zoning” without visual chaos, and I’m completely on board. I installed a pull-out hamper behind a cabinet door and a storage bench with a lift-up seat from Wayfair (under $150) that hides my off-season accessories. Nobody sees the mess, but everything has a designated spot.
The hamper was the game-changer for me. Before, dirty clothes piled on my closet floor because I was too lazy to walk them to the laundry room. Now I just toss them in the pull-out bin, and when it’s full, I carry the whole thing out. The bench stores my winter scarves and gloves during summer, keeping them protected but accessible.
Common mistake: buying hidden storage that’s too deep. I learned this the hard way with a 24-inch-deep bench where items got lost in the back. Now I stick to 18-inch depths max for anything I need to access regularly. You want hidden storage to simplify your life, not create new black holes where stuff disappears forever.
Rubbermaid Configurations Deluxe Custom Closet Kit 4-8 Ft.
If you want something that just works, Rubbermaid Configurations Deluxe Custom Closet Kit 4-8 Ft. Adjustable is a safe bet (81 reviews, 4.5 stars).
7. Apply the Influencer Method with Digital Outfit Lookbooks

This sounds extra, but photographing 20–30 outfit combinations from my wardrobe and storing them in Stylebook app ($5) has been the top anti-clutter hack I’ve adopted. It’s an editor-favorite 2026 strategy that curbs impulse buying and decision fatigue. When I’m shopping online, I check my lookbook first to see if I actually need that new sweater or if I already own three similar ones.
I spent one Sunday afternoon trying on outfit combos and snapping photos with my phone. The app lets you tag items, create a virtual closet, and plan outfits for trips or events. Now when I’m standing in my closet at 7 AM with no idea what to wear, I scroll through my proven combinations instead of panicking.
The psychological benefit surprised me most. Seeing my wardrobe as complete outfits rather than individual pieces made me appreciate what I already own. I stopped buying random trendy items that don’t match anything else. My clothing budget dropped by probably 40% in the first year because I became way more intentional about purchases.
8. Add Lifestyle Zones for Multiple Functions

My closet isn’t just for clothes anymore—it’s evolved into a multi-use space with distinct lifestyle zones. I built a vanity area with a 24×36-inch mirror and task lighting for makeup application, plus a phone charging station nook with a small shelf for my devices. This aligns with 2026’s shift toward closets that serve grooming and work attire needs simultaneously.
The vanity took up about 3 feet of wall space that was previously wasted corner area. I mounted a floating shelf at 30 inches (standard desk height) and added a cushioned stool underneath. The dedicated lighting—a ring light from Amazon for $35—makes doing makeup way easier than my dim bathroom.
I also created a “getting ready” zone near the door with hooks for tomorrow’s outfit and a small tray for keys and wallet. This prevents the morning scramble where I’m hunting for stuff while half-dressed. The zoning concept makes my closet feel more like a personal dressing room than a storage space, which honestly makes me enjoy using it.
9. Switch to Two-Tone Color Palettes for Visual Depth

Painting my entire closet white felt safe but boring, so I experimented with a two-tone palette pairing Benjamin Moore’s Revere Pewter (a soft greige) on the walls with bold navy blue drawer fronts. Expert Nancy Dengler recommends this approach for adding depth without overwhelming small spaces, and she’s absolutely right.
The neutral base keeps everything feeling open and bright, while the colored accents on drawer fronts and one accent wall create visual interest. I used painter’s tape and knocked out the project in a weekend for under $100 in paint. The contrast makes the space feel designed rather than default-builder-grade.
Pro tip: test paint samples in your actual closet lighting before committing. I almost went with a gray that looked beautiful in the store but turned dingy and cold under my LED lights. The Revere Pewter has warm undertones that work with both natural and artificial light, which is why it’s such a popular choice among designers.

Timate P3 Closet Organizer System with 5 Hanging Rods
Honestly, Timate P3 Closet Organizer System with 5 Hanging Rods surprised me — sturdier than it looks in the photos, and over 4 buyers gave it 4.5 stars.
10. Use Warmer Natural Finishes for Texture

I’m seeing this everywhere in 2026 trends, and I jumped on board: mixing warmer natural finishes like oak woodgrain shelves with matte black hardware. Designer Michael Danes advocates for this earthy, textured aesthetic, and it creates a way more sophisticated look than the all-white closets that dominated for years.
I replaced my wire shelving with oak woodgrain shelves from ClosetMaid ($50–$100 per unit) and swapped all my handles and rods to matte black. The wood grain adds warmth and texture that makes the space feel less clinical. The black hardware provides contrast without feeling harsh like shiny chrome or brass.
Installation was straightforward—the ClosetMaid system uses brackets that click into wall standards. I did my entire 8-foot closet wall in about three hours. The natural wood also hides dust and imperfections better than white laminate, which showed every fingerprint and scuff mark. It’s a more forgiving finish for real life, not just photoshoots.
11. Implement the Reverse Hanger Method for Decluttering

This stylist-backed trick finally got me to purge clothes I was keeping “just in case.” Here’s how it works: hang all your clothes facing backward on wooden hangers like The Container Store’s basic version ($12 for 10). After wearing something, rehang it facing forward. After three months, anything still backward gets donated because you clearly don’t wear it.
I was skeptical this would work on me because I’m sentimental about clothes. But seeing those backward hangers after three months made the decision obvious—if I hadn’t reached for something in a full season, I wasn’t going to. I donated 30 items my first round and honestly haven’t missed a single one.
The wooden hangers are important because they’re substantial enough to notice the direction, unlike thin plastic ones. Plus they last forever and look cohesive. I started this method in January, and by April my closet felt 50% less crowded. It’s way less emotional than the Marie Kondo “does it spark joy” question, which always made me overthink everything.
12. Double Your Closet as a Mudroom Solution

Living in a small apartment without a proper entryway, I converted part of my coat closet into a mudroom zone with closed shoe cabinets (18-inch depth) and hooks for bags. This matches 2026 remodel trends for apartments where you need to contain entry clutter without a dedicated space.
I installed a ClosetMaid shoe cabinet ($80) that holds 12 pairs behind closed doors, keeping street shoes separate from my bedroom. Above it, I mounted three heavy-duty hooks for daily bags and my dog’s leash. The closed fronts match my room’s white trim, so it looks intentional rather than like I’m storing shoes in a weird spot.
Common mistake: using open shoe racks near your entry. They collect dirt and make everything look messy. The closed cabinet keeps dust and street grime contained, plus it just looks cleaner. I wipe down the shoes before storing them, which takes 10 seconds but prevents tracking dirt through my apartment.

VIPEK V5 Portable Closet Wardrobe Heavy Duty Clothes Rack
If you want something that just works, VIPEK V5 Portable Closet Wardrobe Heavy Duty Clothes Rack is a safe bet (56 reviews, 4.5 stars).
13. Install Automated Wardrobe Lifts for High Storage

I’m 5’4″, and my closet has 9-foot ceilings, which meant that top shelf was basically decorative until I installed a Rev-A-Shelf automated wardrobe lift ($300–$500). Now I press a button and the rod descends to shoulder height, letting me access seasonal clothes stored over 7 feet up without a step stool or strain.
This smart tech trend prevents underutilized top storage, which is huge in small spaces. I keep my winter coats and formal wear up there during off-seasons. The motor is quiet and smooth—way better than the cheap manual pull-down rods I tried first that required serious arm strength.
Installation required an electrician for the outlet ($150), which I’ll admit made this a pricier upgrade. But for anyone with mobility issues or high ceilings, it’s genuinely worth it. I use that top space constantly now instead of forgetting what’s up there. It probably added 20% more functional storage to my closet.
14. Avoid Overstuffing Drawers with Proper Dividers

Overstuffing drawers is the top mistake I see (and made myself for years). Everything becomes a wrinkled mess where you can’t find anything. I started with Dollar Tree acrylic inserts (10 for $10) customized for my sock drawer with 4×6-inch sections, then upgraded to sturdy bamboo dividers from Yamazaki ($25) for my underwear drawer when I realized I wanted something longer-lasting.
The key is matching divider size to your actual items. I measured my rolled socks first—they’re about 4 inches across—so I knew exactly what spacing I needed. The Dollar Tree version works fine for lightweight items, but for heavier stuff or drawers I open 10 times a day, the Yamazaki bamboo doesn’t slide around.
I also leave about 20% of each drawer empty now, which sounds wasteful but actually keeps everything neater. When drawers are packed full, items shift and tangle every time you open them. That little bit of breathing room means everything stays in its section, and I can actually see what I own at a glance.
15. Create Aesthetic Closet Organization Ideas with Matching Bins

I used to have a random collection of cardboard boxes and mismatched plastic bins, and honestly, it looked terrible. Switching to matching fabric bins from Target’s Brightroom collection ($12-$18 each) transformed my shelves into something actually aesthetic. The uniform look makes everything feel cohesive, even though I’m just storing random off-season stuff.
I went with gray linen-look bins because they hide dust better than white and match my neutral color scheme. I labeled each one with a Brother P-Touch label maker ($25) so I know exactly what’s inside without digging. The labels go on the short end facing out for easy scanning.
Pro tip: measure your shelf depth before buying bins. I learned this after buying 14-inch-deep bins for 12-inch shelves. Now I stick to bins that are 2 inches shallower than my shelf depth so they slide in and out easily. The Brightroom bins come in multiple sizes, which let me customize exactly what fits where.

Ulif M1 Closet Storage Organizer System
Honestly, Ulif M1 Closet Storage Organizer System surprised me — sturdier than it looks in the photos, and over 378 buyers gave it 4.5 stars.
16. Install a Full-Length Mirror on the Back of Your Door

I resisted this for years because I thought door mirrors were tacky, but installing a full-length mirror on the back of my closet door was genuinely one of the smartest moves I made. I got a frameless 18×60-inch mirror from Home Depot ($40) with adhesive mounting strips, and it’s perfect for checking full outfits before leaving.
The placement matters—I mounted mine at 6 inches from the floor so I can see my shoes and hem lengths. Having the mirror inside my closet means I can try on multiple outfits without walking back and forth to my bathroom mirror. It speeds up my morning routine by probably 10 minutes.
Common mistake: using those cheap over-the-door mirrors that wobble. The adhesive-mounted version stays put and looks way more polished. Just make sure your door is smooth (not textured) before using adhesive strips, or you’ll need to drill and use proper mirror mounting hardware instead.
17. Dedicate Space for a Laundry Sorting System

I added a three-compartment laundry sorter from Amazon ($45) to my closet, and it’s eliminated the clothes piles that used to accumulate on my bedroom floor. The three sections let me pre-sort whites, colors, and delicates, so laundry day is just grabbing a bag and going instead of sorting through a mountain of mixed clothes.
The sorter fits in a 24-inch-wide space at the bottom of my closet. Each bag is removable, which makes carrying laundry to my building’s basement way easier than using a traditional hamper. I also keep a small container of stain remover pens clipped to the side for immediate treatment of spills.
I’ll be honest—this only works if you actually use the sorting system consistently. For the first month, I’d still throw clothes randomly in whichever bag was closest. But once I built the habit, it genuinely saves time and prevents color-bleeding disasters. My white shirts have stayed actually white for two years now.
18. Add Floating Shelves for Vertical Display

I installed three 24-inch floating shelves from IKEA’s LACK series ($10 each) on an empty wall section of my closet for displaying folded sweaters and decorative storage boxes. The floating design looks way more modern than traditional bracketed shelves, and they’re incredibly easy to install with the included hardware.
I spaced mine 14 inches apart vertically, which accommodates folded sweaters (about 12 inches tall when stacked three high) with a little clearance. The shelves are only 10 inches deep, so they don’t protrude too far into the space but still hold plenty. I used them to create a display area for my favorite cashmere sweaters that I want to keep visible.
Pro tip: don’t overload floating shelves. They’re rated for about 25 pounds each, but I keep mine under 15 pounds to prevent sagging over time. I learned this after watching a friend’s overloaded shelf slowly bow in the middle over six months. Better to add another shelf than risk structural failure.
19. Incorporate Seasonal Rotation Bins

I keep four large bins on my top shelf labeled “Winter,” “Spring,” “Summer,” and “Fall” for true seasonal items like heavy coats and swimsuits. Every three months, I swap out what’s hanging with what’s stored, which keeps my active closet space focused on current-season clothes. This rotation system prevents overcrowding and makes getting dressed way less overwhelming.
The bins are clear plastic from Sterilite ($15 each at Target) so I can see inside without opening them. I add cedar blocks to each one to prevent moths and musty smells during storage. The clear material also lets me verify I’m grabbing the right bin without pulling everything down.
This system revealed that I was keeping way too many clothes “just in case.” When I rotated seasons and realized I hadn’t worn certain items all season, it made donating them obvious. Now I do a mini-purge during each rotation, which keeps my wardrobe current and manageable without requiring huge decluttering sessions.
20. Design a Jewelry Display Wall

My final transformation was creating a jewelry display wall using a pegboard system from Home Depot ($20 for a 2×4-foot board). I painted it the same color as my accent wall, added gold pegboard hooks ($12 for a variety pack), and hung my necklaces, bracelets, and earrings like artwork. It’s both functional and genuinely beautiful to look at.
The pegboard mounts directly to the wall with screws into studs for stability. I arranged my jewelry by type—necklaces on the left, bracelets in the middle, earrings on the right. The visibility means I actually wear my jewelry instead of forgetting it exists in a drawer. Plus, it adds a personal, curated touch that makes my closet feel special.
Common mistake: hanging delicate chains without protection. I learned to use individual hooks for each necklace to prevent tangling, and I added felt pads behind anything that might scratch the wall. The system works beautifully for costume jewelry, but I keep my expensive pieces in a locked drawer for security. This display is for everyday items I want quick access to.
Look, transforming your closet isn’t about buying the most expensive systems or copying someone’s Pinterest-perfect setup exactly. It’s about understanding your actual habits and designing storage that works with your life, not against it. I’ve tried probably 50 different organization methods over the years, and these 20 are the ones that stuck because they’re genuinely functional, not just pretty.
Start with one or two ideas that address your biggest pain points—maybe it’s the lighting that makes finding clothes impossible, or the lack of drawer dividers that turns everything into chaos. Build from there as you figure out what works for your space and budget. Save this article and come back to it when you’re ready to tackle your next closet project. I promise, a well-organized closet genuinely makes daily life easier, and you deserve that kind of peace.
Frequently Asked Questions
What are the best aesthetic closet organization ideas for small spaces?
Focus on vertical storage with double-hang rods at 40 and 80 inches, install motion-activated LED lighting, use slim velvet hangers for color-blocking, and add pull-out drawer systems at waist height. Glass-front cabinets and floating shelves maximize wall space while keeping everything visible and beautiful.
How much does it cost to organize a closet aesthetically?
Budget options start around $100 using Dollar Tree dividers, Amazon Basics hangers, and IKEA storage. Mid-range systems like Elfa drawers cost $200-$400. Premium upgrades including automated lifts and custom built-ins range from $500-$2000. Most effective transformations mix budget and splurge items strategically.
What’s the best way to organize clothes by color in a closet?
Arrange clothes rainbow-style using slim velvet hangers: whites, creams, tans, pinks, reds, oranges, yellows, greens, blues, purples, grays, blacks. Within each color family, organize light to dark. This system makes outfit selection faster and instantly reveals wardrobe gaps for smarter shopping decisions.
How do I keep my closet organized long-term?
Use the Reverse Hanger Method to identify unworn items, implement seasonal rotation bins every three months, avoid overstuffing drawers by leaving 20% empty space, and maintain matching storage systems with clear labels. Digital outfit lookbooks prevent impulse purchases that create clutter. Consistency beats perfection.