What’s Inside
- Declutter First: The Foundation of All Utility Closet Organization Ideas
- Maximize Vertical Space with Adjustable Shelving Systems
- Utilize Over-the-Door Organizers for Small Essentials
- Install Wall-Mounted Tool Holders for Long-Handled Items
- Categorize and Zone for Intuitive Access
- Invest in Opaque, Labeled Storage Bins for Visual Calm
- Implement the 20 Percent Breathing Room Rule
- Incorporate a Rolling Cart for Mobile Supplies
- Label Everything Without Exception for Foolproof Utility Closet Organization Ideas
- Smart Storage for Specifics: Light Bulbs and Rubber Gloves
- Integrate Smart, Motion-Activated Lighting
- Choose Sustainable and Aesthetically Pleasing Materials
- Plan Your Organizers Based on Inventory, Not Impulse
- Keep a Collapsible Step Stool Handy
- Schedule Regular Maintenance and Micro-Declutters
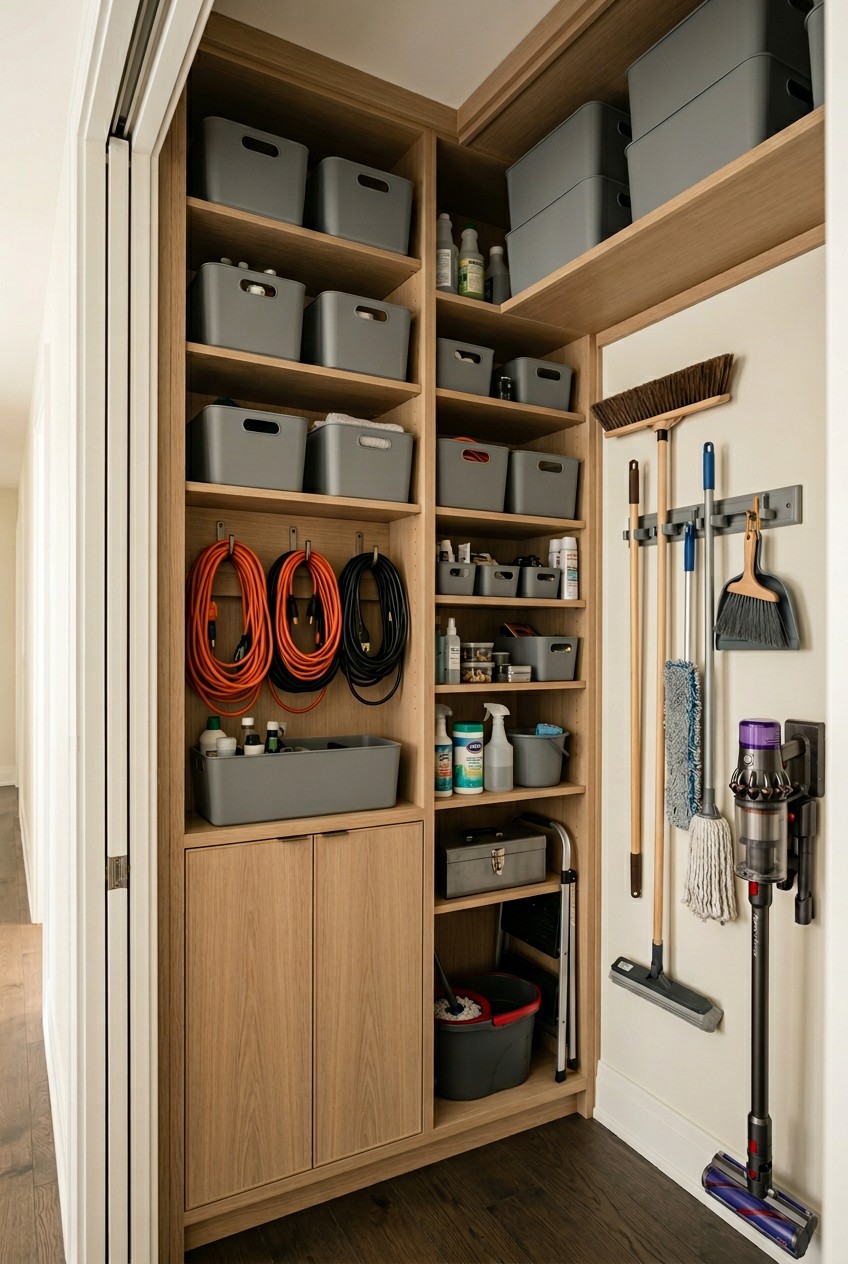
Last Tuesday, I opened my hallway door to grab a simple 4 oz bottle of Windex, and a rusty Swiffer handle smacked me right in the forehead. If you’re tired of dodging falling brooms, you need these utility closet organization ideas now. That loud, metallic thwack and the subsequent avalanche of crumpled paper towels and half-empty bleach bottles was my breaking point. I’ve spent years helping clients fix their chaotic storage spaces, and the utility closet is always the worst offender. We tend to shove our ugliest, bulkiest items in there and pray the door stays shut. But it doesn’t have to be a dark cavern of despair. I’ll walk you through how to turn this disaster zone into a functional space.
1. Declutter First: The Foundation of All Utility Closet Organization Ideas
Before you buy a single bin or basket, you must empty out your space. Professional organizers at Morganize with Me emphasize that failing to declutter first is the most common mistake people make. It leads to continued chaos. I learned that the hard way last October. I tried to organize around my existing mess by shoving a few new baskets onto the shelves. Two weeks later, the closet looked worse than before. You can’t organize garbage.
To do this right, grab a box of Hefty Ultra Strong 30-Gallon Black Trash Bags (they cost $14.99 at Target) and lay everything out on your hallway floor. You need to see the volume of stuff you’re hoarding. Sort every item into piles for keeping, donating, or trashing. During my last purge, I found a fossilized 16 oz bottle of floor wax from three apartments ago and a crusty old sponge that smelled like swamp water. Toss that stuff immediately. Only return items you actually use on a weekly or monthly basis. This initial purge creates a clean slate. It forces you to touch every item and make a decision about its value. If you skip this empty-shelf approach, your new systems won’t stick. You’re just rearranging clutter instead of solving the problem.
2. Maximize Vertical Space with Adjustable Shelving Systems
The biggest mistake I see clients make is ignoring their vertical space. Most builder-grade closets come with one or two fixed shelves that leave massive gaps of wasted air up top. You need to rip those out. I tried this wrong for months before figuring it out. I used to stack 32 oz spray bottles on top of paper towel rolls just to reach the ceiling, which resulted in a daily avalanche.
Instead, install adjustable shelving units that reach your ceiling. The Rubbermaid HomeFree series is fantastic. You can grab a 3-foot to 6-foot closet kit for about $129.99 at Walmart. If you want something that looks custom, the ClosetMaid SuiteSymphony modular wood laminate system runs around $249.00 at Home Depot and comes with a lifetime warranty. The beauty of adjustable tracks is that you can change the height of each shelf as your needs shift. I keep my heavy 128 oz jugs of laundry detergent at waist height for easy lifting, while my extra 4-packs of furnace filters sit on the top shelf. The cold metal tracks might look industrial, but the functionality is unmatched. You’ll double your usable square footage just by going upward. Don’t settle for the standard shelf heights your house came with.
3. Utilize Over-the-Door Organizers for Small Essentials
Please don’t neglect the back of your closet door. This is a prime spot for storage that almost everyone leaves blank. I used to toss all my tiny, random items into a giant plastic tub on the floor. Finding a simple roll of tape meant digging through a dark bin and getting poked by rogue zip ties. It was miserable.
The solution is simple and cheap. Pick up an over-the-door utility closet organizer with clear pockets. The Simple Houseware 24 Clear Pocket Organizer costs $16.99 at Costco, and it changed my setup. The thick plastic pockets have a satisfying crinkle when you slide items in, and they’re durable. I use these pockets to stash all my small, lightweight essentials. I’m talking about 2 oz rolls of plumber’s tape, 8 oz cans of air freshener, spare flashlights, and extra microfiber cleaning cloths. Because the pockets are transparent, everything is visible. You don’t have to waste shelf space on these tiny items that usually end up getting pushed to the back. I recommend buying a model with metal hooks rather than plastic ones, as the plastic hooks tend to snap under the weight of heavy batteries or small tools. This one addition will free up an entire shelf.

AMKUFO 6 Pack-Closet-Organizers-and-Storage
If you want something that just works, AMKUFO 6 Pack-Closet-Organizers-and-Storage is a safe bet (52 reviews, 4.5 stars).
4. Install Wall-Mounted Tool Holders for Long-Handled Items
If you’re letting your brooms, mops, and heavy dusters lean against the closet wall, you need to stop. They inevitably topple over the second you open the door, creating a frustrating obstacle course. Plus, resting a broom on the floor crushes its bristles over time. I ruined a perfectly good angled sweeping brush this way last year.
To fix this, you need a heavy-duty wall-mounted holder. I swear by the Command Broom and Mop Gripper. They cost around $14.49 at Kroger, and they use a spring-loaded rubber grip system. You just push the handle in, and you hear a firm click. These grippers hold up to 35 pounds, meaning they won’t slide down the wall even if you hang a heavy, wet string mop. Eryn, a professional organizer I follow, suggests mounting these holders higher on the wall than you naturally would. By lifting the tools 12 to 18 inches off the ground, you free up your floor space. Now I can easily slide my vacuum cleaner directly underneath my hanging brooms. It keeps the dirty tool heads off the floor, preserves your equipment, and stops the domino effect of falling handles.
5. Categorize and Zone for Intuitive Access
Creating designated zones for different categories of items is an expert tip that sounds obvious but is rarely executed properly. If you just shove things wherever they fit, you’ll never maintain your organization. Last Tuesday at Whole Foods, I bought three new 32 oz bottles of all-purpose cleaner because I couldn’t find the ones I already owned. They were buried behind a stack of spare air filters. You might also like: 20 Cozy Aesthetic Organizing Ideas to Inspire Your Next Project
You need strict zones. Dedicate one shelf solely to liquid cleaning supplies, another to basic household tools, and a separate section for bulky paper goods. Within these zones, group similar items tightly together. Put all your window cleaners in one row and all your wood polishes in another. To keep these zones separated, I grabbed some bamboo drawer dividers for $12.99 at Sprouts. They usually go in kitchen drawers, but they work perfectly on flat closet shelves to create boundaries between categories. This method makes finding a specific 16 oz bottle of carpet spot remover quick. More importantly, it makes returning the item simple. When there’s a designated home for the glass cleaner, you won’t just toss it back randomly. Zoning reduces visual clutter and stops you from rebuying products you already own. You might also like: 15 Clever DIY Easy Home Decor to Inspire Your Next Project
6. Invest in Opaque, Labeled Storage Bins for Visual Calm
While clear acrylic bins are popular on social media, professional organizer Eryn actually suggests the opposite for utility spaces. Opaque bins are often superior, especially for hiding ugly, utilitarian items like bulky light bulbs, dirty power cords, or stained cleaning rags. This aligns with the trend of discreet, concealed storage to maintain clean visual lines. You might also like: 20 Stunning Tool Storage Organizing Ideas for a Fresh New Look
I used to keep my spare sponges and rags in clear Sterilite 17 Qt ClearView Latch Boxes (which are great and cost about $8.99 at Walmart). But seeing the neon yellow sponge wrappers and jagged cords through the plastic created visual noise. It made the closet look messy even when it was organized. I switched to the solid, opaque Everything Organizer bins from The Container Store, which run $19.99 each. The difference is staggering. The solid white plastic hides the chaotic shapes and bright colors of the cleaning supplies. Of course, when you use solid bins, you must label them. I use a bold black font on white tape to label each bin with specific contents like Extension Cords or Microfiber Rags. This prevents you from blindly rummaging through three different boxes just to find a simple 9-volt battery.
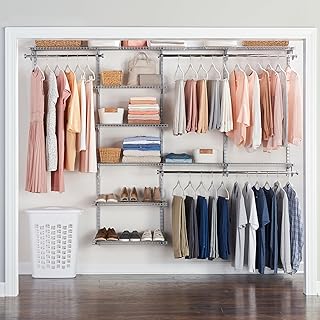
Rubbermaid Configurations Deluxe Custom Closet Kit 4-8 Ft.
Rubbermaid Configurations Deluxe Custom Closet Kit 4-8 Ft. Adjustable punches above its price — 81 buyers rated it 4.5 stars. I would buy it again.
7. Implement the 20 Percent Breathing Room Rule

Here’s a surprising tip from top organizers: always leave 20 percent of your shelf and bin space empty. Most people try to cram every single square inch with products. I used to play Tetris with my supplies, wedging a 64 oz bottle of bleach into a tiny gap just because it fit. The result? The horrible, loud scrape of plastic on plastic every time I tried to pull it out, usually knocking over three other bottles.
Overstuffing your utility closet defeats the purpose of organizing it. When you leave breathing room, it becomes easier to put items back. It also allows you to scan your inventory without moving things around. I recently bought an OXO Good Grips 3-Piece Pop Container set for $32.99 at Whole Foods to store my powdered laundry boosters. Instead of filling them to the brim, I leave the top two inches empty. I apply this same rule to my shelves. If a shelf looks packed, I know it’s time to purge or relocate items. This 20 percent rule reduces decision fatigue and stops clutter from building up again. You need that empty space to function smoothly.
8. Incorporate a Rolling Cart for Mobile Supplies

If you have a deep utility closet or a large home where you use cleaning supplies in multiple rooms, a compact rolling cart is invaluable. I used to carry a heavy, sloshing 5-gallon plastic bucket from room to room. It was exhausting, and the wet bottom always left dirty ring marks on my hardwood floors.
Professional organizers recommend using a 3-tier utility cart. I bought the classic metal IKEA Raskog cart for $39.99. It fits perfectly into the bottom half of my closet right under the lowest shelf. I load the top tier with my daily 16 oz spray cleaners and a roll of paper towels, the middle tier with scrub brushes and sponges, and the bottom tier with heavy trash bags. The smooth roll of the caster wheels on my tile floor is music to my ears because I don’t have to carry anything. I just wheel the station into the bathroom, clean everything, and roll it back into its corner. It keeps your most frequently used items mobile and prevents you from leaving half-empty bottles of cleaner scattered under different sinks. Just measure the clearance under your bottom shelf before buying one. The Raskog is about 30 inches tall, so you’ll need at least 32 inches of open floor height to slide it in without knocking things over.
9. Label Everything Without Exception for Foolproof Utility Closet Organization Ideas

This is a non-negotiable expert tip. You must label every single bin, basket, and zone in your closet. I used to think I’d remember that the white shoebox on the middle shelf held my spare furnace filters. Six months later, I was tearing apart the entire closet looking for them while the AC unit beeped at me. Relying on your memory is a mistake. Took me years to figure out.
You need a dedicated label maker. I bought the Brother P-touch Cube for $49.99 at Target, and it connects directly to my phone via Bluetooth. The mechanical whir it makes as it spits out crisp white labels is addictive. Labels ensure that everyone else in your household knows where things belong. If your partner or kids don’t know where the 4 oz tube of super glue goes, they’ll just leave it on the kitchen counter. Consistent labeling prevents items from being misplaced and speeds up retrieval. For those opaque bins, labels are the only way to know their exact contents without popping the lids off. Stick to a simple, bold font and place the labels in the bottom center of each bin for a professional look.
Closet Organizers and Storage
Closet Organizers and Storage has been one of the most consistently praised picks in this category. 30 reviewers averaged 4.5/5.
10. Smart Storage for Specifics: Light Bulbs and Rubber Gloves
Certain items require specific storage solutions, otherwise they become a nightmare. Light bulbs and heavy rubber cleaning gloves are the two biggest offenders. I used to toss loose 60-watt light bulbs into a fabric bin. Unsurprisingly, I reached in one day and cut my finger on a shattered glass bulb.
To store light bulbs safely, you need rigid, clear stacking boxes with secure latch lids. This prevents accidental crushing while allowing you to quickly check if you’re out of the soft-white LED bulbs. Keep them on a higher shelf away from heavy tools. As for rubber gloves, never toss them onto a shelf. I used to do this, and the inside of the gloves would stay damp, creating a gross, clammy feeling and a mildew smell the next time I put them on. Instead, buy a pair of Playtex Living Rubber Gloves (about $4.49 at Kroger) and hang them from a small, spring-loaded metal clip mounted to the inside of the closet door. Hang them upside down by the fingertips. This allows any trapped water to drain out of the open cuff, ensuring they dry perfectly and smell fresh for your next deep cleaning session.
11. Integrate Smart, Motion-Activated Lighting
A trend in home design for 2026 is smart, illuminated storage spaces. Most builder-grade utility closets are dark, deep, and lack hardwired lighting. I spent years fumbling around in the dark, trying to read the tiny 10-point font on a 12 oz bottle of drain cleaner with my phone’s flashlight clamped between my teeth. It was ridiculous.
You don’t need to hire an electrician to fix this. Just install battery-operated, motion-activated LED strip lights. I grabbed a set of GE Battery-Operated LED Strip Lights for $19.99 at Target. They come with an adhesive backing. I stuck one strip along the inside door frame and another under the middle shelf. The moment I open the door, the bright LED glow illuminates the entire space. It eliminates the harsh, shadowy corners where small items get lost. The motion sensor is sensitive, so you don’t even have to fumble for a switch when your hands are full of dirty rags. This cheap upgrade makes the utility closet feel like a custom-built space rather than a dark, scary cavern. It’s a tiny investment with a huge daily payoff.
12. Choose Sustainable and Aesthetically Pleasing Materials
We’re moving away from flimsy, cracked plastic bins. The 2026 organization trends favor natural, durable materials that bring warmth into utility spaces. Your cleaning closet doesn’t have to look like a sterile hospital supply room. I used to buy the cheapest neon plastic dollar-store bins I could find. They always cracked under the weight of heavy 32 oz liquid bottles, and the sharp edges would scratch my wooden shelves.
Now, I prioritize materials like bamboo, thick rattan, seagrass, and solid wood. I recently swapped out my broken plastic paper towel bins for a set of gorgeous Threshold Seagrass Baskets, which cost $25.00 each at Target. The thick woven texture looks incredible, and they emit a faint, earthy smell of natural dried seagrass when you open the door. These natural materials offer durability and blend with the rest of your home’s decor. I use these open woven baskets for items that don’t require airtight storage, like extra rolls of paper towels, dry microfiber cloths, and spare dusters. Making the utility closet aesthetically pleasing motivates you to keep it clean. When a space looks beautiful and intentional, you’re far less likely to just throw junk into it.

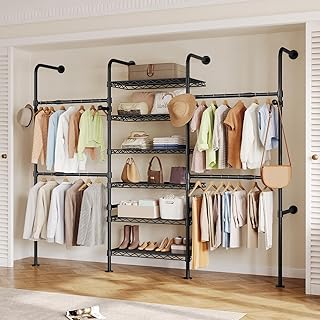
Timate P3 Closet Organizer System with 5 Hanging Rods
A dependable everyday pick — Timate P3 Closet Organizer System with 5 Hanging Rods pulls in 4 ratings at 4.5 stars. Not flashy, just solid.
13. Plan Your Organizers Based on Inventory, Not Impulse
The most expensive mistake you can make is buying organizers on impulse without a clear, measured plan. I’m guilty of this. Last year, I saw a stunning, thick acrylic bin on display and bought it for $35.00 at The Container Store without thinking. I brought it home, and it was half an inch too short to hold my massive 128 oz jug of laundry detergent. It’s a waste of money and space.
After you finish your initial decluttering phase, take a strict inventory of exactly what you need to store. Grab a metal tape measure and record the dimensions of your closet: the total width, the depth of the shelves, and the vertical height between each shelf. Then, measure your largest items. Sketch out a rough layout on paper before you purchase a single bin, shelf, or hook. Knowing that your vacuum is 14 inches wide dictates where your bottom shelf needs to start. This meticulous planning ensures every organizer you buy actually serves a purpose and fits your items perfectly. It stops you from forcing round pegs into square holes and prevents the pile-up of unused, empty bins sitting on the floor.
14. Keep a Collapsible Step Stool Handy

If you take my advice and maximize your vertical space all the way to the ceiling, you’re going to need a safe way to reach those top shelves. I used to drag a heavy wooden dining chair down the hallway every time I needed to grab a spare 4-pack of AC filters. Half the time, I’d just precariously balance on my tiptoes, blindly grabbing at boxes and hoping nothing heavy fell on my face.
You need a small, dedicated step stool that lives permanently inside the closet. I bought a Cosco 1-Step Folding Stool for $18.99 at Walmart. It has a loud, satisfying metal clack when you snap the legs into place, and it feels sturdy. Because it folds flat to about two inches thick, it takes up zero shelf space. I hung a heavy-duty metal hook on the inside side-wall of the closet and hang the folded stool right there. It stays out of the way but is accessible the second I need to reach my top-tier storage. Having a stool readily available stops you from putting off tasks, which keeps your whole house running smoother. Plus, it prevents you from lazily shoving items onto the bottom floor just because you don’t feel like fetching a chair.
15. Schedule Regular Maintenance and Micro-Declutters

Organization is an ongoing, daily process, not a magical one-time event. You can’t just buy expensive bins, set them up once, and expect the closet to stay pristine. Life happens. You’re going to hastily shove a 16 oz bottle of glass cleaner onto the wrong shelf when you’re in a hurry. If you don’t manage this, the closet will revert to chaos in a month.
You must schedule regular maintenance. I set an alarm on my phone for the first Sunday of every month to do a quick 15-minute micro-declutter. I pull out my rolling cart, put any stray items back into their correctly labeled zones, and re-evaluate if anything new needs to be purged. I also take this time to wipe down the empty shelf space. I use a damp microfiber cloth sprayed with Mrs. Meyer’s Lemon Verbena multi-surface cleaner (which costs $4.29 at Trader Joe’s). The fresh, bright citrus smell makes the small closet feel incredibly clean and inviting. This consistent, tiny amount of upkeep prevents clutter from accumulating. It ensures your utility closet remains a functional, tidy space rather than a dumping ground for household junk. Don’t skip the maintenance phase. It’s the only real secret to making these systems last for years instead of just a few weeks. No exaggeration.
I highly recommend tackling just one of these shelves this weekend. Don’t overwhelm yourself by trying to buy every single bin and hook today. Start with the empty-shelf purge, and let your actual inventory guide your purchases. If you found these tips helpful, save or pin this article so you can reference the exact product measurements and prices while you’re standing in the aisle at Target. You’ve got this!

SNSLXH 5 Pack Stackable Closet Storage Basket
SNSLXH 5 Pack Stackable Closet Storage Basket punches above its price — 39 buyers rated it 4.5 stars. I would buy it again.
Frequently Asked Questions
What is the first step in utility closet organization?
The absolute first step is a complete empty-shelf declutter. Remove every single item, sort them into keep, donate, or trash piles, and wipe down the bare shelves before buying any new bins or organizers.
How can I store brooms and mops so they won’t fall over?
Use a heavy-duty, wall-mounted spring-loaded grip system, like the Command Broom and Mop Gripper. Mount it 12 to 18 inches off the ground to keep bristles safe and completely free up your floor space.
Are clear bins or opaque bins better for a utility closet?
Opaque bins are generally better for utility spaces. They hide visually noisy, ugly items like messy cords, neon sponge wrappers, and stained rags, creating a much cleaner look. Just make sure you label them clearly.
What is the 20 percent breathing room rule?
Professional organizers recommend leaving at least 20 percent of your shelf and bin space completely empty. This prevents overstuffing, makes it easier to put items away, and stops you from accidentally knocking over surrounding bottles.