What’s Inside
- Declutter Ruthlessly Before You Buy Bins
- Maximize Vertical Space With Heavy-Duty Pegboards
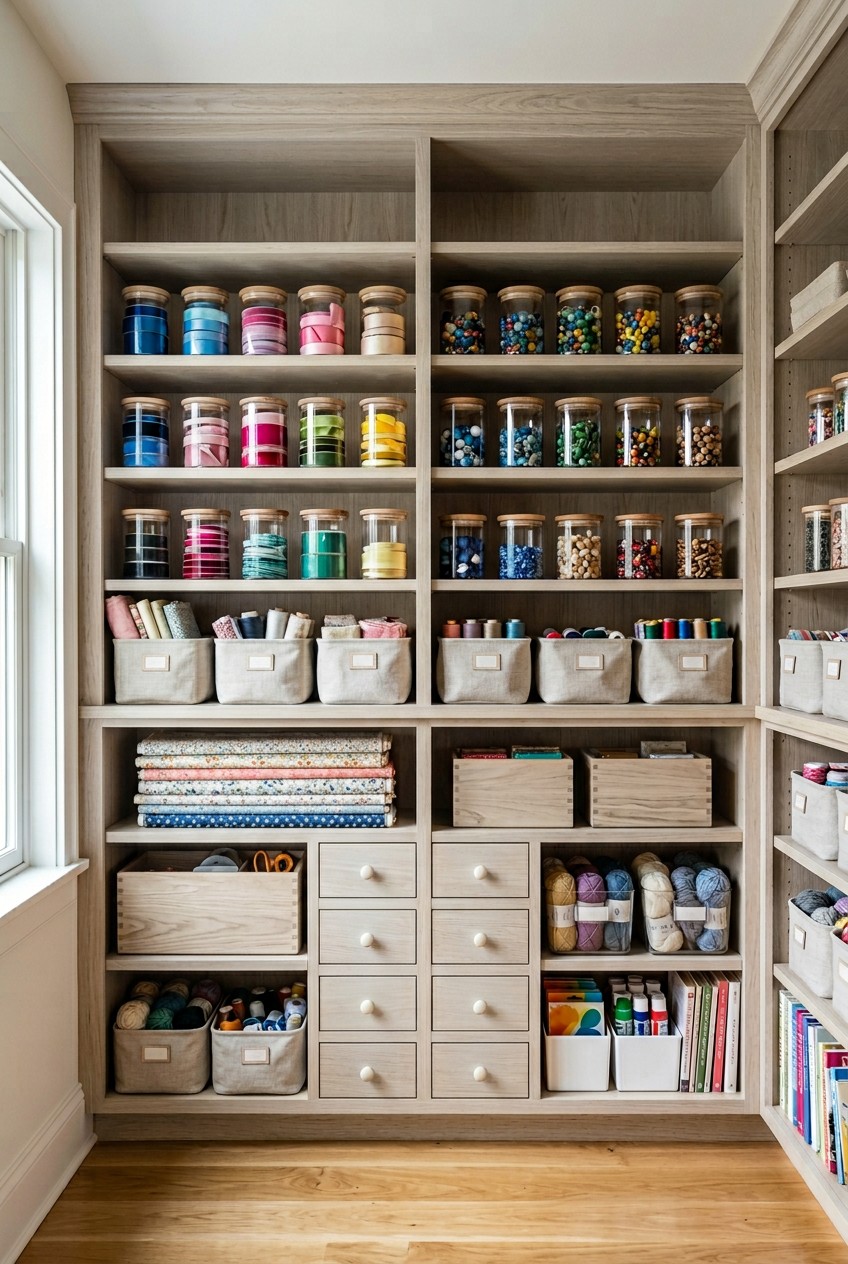
- Swap Opaque Totes For Clear Modular Bins
- Ditch Deep Drawers For Shallow Acrylic Dividers
- Group Supplies By Project Zones, Not Just Categories
- Rethink Your Fabric Storage With Dowels And Crates
- Protect Scrapbook Paper With Specialized 12×12 Holders
- Repurpose Grocery Jars For Tiny Notions
- Label Every Single Bin Clearly (And Consistently)
- Utilize Over-The-Door Storage For Bulky Rolls
- Roll Out A Mobile Craft Cart For Current Projects
- Store Pens Horizontally And Protect Your Tools
- The Best Craft Closet Organization Ideas Include Empty Space
Three weeks ago, I opened my storage door and a rogue 32-ounce bottle of Mod Podge fell off the top shelf. It cracked open and slowly oozed vanilla-scented glue all over my $45 vintage cutting mat. It was a sticky, expensive disaster. If you’re hunting for craft closet organization ideas that actually work, I get your pain. My space used to look like a glitter factory exploded inside a cardboard box. I tried organizing everything into cute woven baskets from Target, but that just created black holes where expensive supplies went to die. You don’t need a massive, perfectly aesthetic studio to keep your sanity. You just need smart, functional systems that fit the weirdly shaped things we crafters hoard. Let’s fix that messy space right now.
1. Declutter Ruthlessly Before You Buy Bins

Before we talk about my favorite organization ideas, we have to talk about the trash. I’m totally guilty of keeping half-dried tubes of acrylic paint because I think I’ll magically revive them. You can’t. They’re dead. A huge mistake most people make is buying expensive storage containers before they actually purge their stash. You’re just paying to house garbage. Expert organizer Marie Kondo talks about the spark joy method, and you really need to apply that to your supplies. Ask yourself if those 12 bins of random fabric fat quarters actually spark creative joy, or if they just make you feel guilty for not sewing enough. Aim to declutter quarterly. I personally drag a heavy-duty 30-gallon Hefty trash bag into my room every six months and ruthlessly toss dried-up markers, bent pins, and crusted glue bottles. I used to buy cheap plastic bins at Kroger just to shove the mess out of sight. Don’t do this. Empty your entire closet onto the floor. Touch every single 4 oz bottle of paint. If it’s chunky, it goes in the trash. If you haven’t used that specific $14.99 Fiskars border punch in two years, donate it to a local school. You need a blank slate before you can build a system that actually works.
2. Maximize Vertical Space With Heavy-Duty Pegboards

Once the junk is gone, look at your walls. Most closets feature massive amounts of wasted space above the top shelf. I tried using a flimsy particle-board pegboard from a hardware store for months before figuring it out. It absorbed moisture, warped, and eventually ripped right off the drywall under the weight of my scissors. It was a complete disaster. Now, I’m obsessed with metal pegboard systems. They’re a massive hit for 2026, and for good reason. I specifically recommend the Wall Control Craft & Hobby Pegboard Organizer Kit. It comes with two 16-inch by 32-inch panels that give you over 7 square feet of storage. The kit usually runs around $130 to $160 on Amazon, but it’s worth every penny. These powder-coated metal boards hold up to 50 pounds per square foot. You won’t ever worry about them crashing down. When you install them, remember to mount the pegboards about 1/2 inch from the wall so the metal hooks actually get clearance to slide in. I hang my heavy rotary cutters, my $35 Gingher fabric shears, and baskets of 2 oz acrylic paints right on the door or back wall. Having your most-used tools at eye level stops you from digging through dark drawers. It’s satisfying to hear the sharp clink of metal hooks snapping into place. Just make sure you anchor the screws directly into a stud, or use heavy-duty toggle bolts. I learned that the hard way when a shelf of heavy resin molds came crashing down on my foot.
3. Swap Opaque Totes For Clear Modular Bins

I used to hide all my bulky supplies in dark, opaque plastic totes I bought on clearance. I thought it looked cleaner. I was so wrong. Storing everything out of sight in deep bins is a massive mistake. It leads to forgotten supplies and accidentally buying duplicate items because you can’t remember what you already own. I can’t tell you how many times I bought a $6.99 spool of white thread because I couldn’t find the three I already owned buried in a dark box. You need clear, modular storage bins. I completely swear by the clear plastic containers from The Container Store. They stack perfectly and never wobble. For larger items like bulk yarn or heavy fabric yardage, I buy the Hefty Hi-Rise 32-quart clear bins. You can usually find a pack of six for around $30 to $40 at Lowe’s. The clear plastic feels smooth on the inside, which is crucial because rough plastic edges snag delicate silk or tulle. Plus, lidded plastic bins protect your expensive materials from dust, moisture, and those weird little closet moths. When you’re stacking these, put the heaviest items like 16 oz jars of casting resin on the bottom. Keep the lighter stuff like poly-fill stuffing on top. Being able to visually scan a stack of boxes and instantly spot your bright pink tulle or your chunky blue yarn saves so much frustration when you’re in the middle of a project. Don’t buy bins with tinted plastic. Even a slight blue tint makes it impossible to distinguish between navy and black fabric in dim closet lighting.

AMKUFO 6 Pack-Closet-Organizers-and-Storage
AMKUFO 6 Pack-Closet-Organizers-and-Storage has been one of the most consistently praised picks in this category. 52 reviewers averaged 4.5/5.
4. Ditch Deep Drawers For Shallow Acrylic Dividers

Deep, overstuffed drawers are the absolute worst. They turn into black holes where tiny items get lost forever. I used to throw all my loose buttons, safety pins, and measuring tapes into one massive drawer. Last year, I reached in blindly and stabbed my finger on an open needle. It throbbed for days. You really need to stop using deep drawers for tiny notions. Instead, implement shallow, purpose-built drawer dividers. I’m a huge fan of the clear acrylic drawer organizers from The Container Store. They sell individual pieces ranging from $3.74 to $7.49, so you can mix and match them like Tetris to perfectly fit your exact drawer dimensions. I use the tiny 3-inch by 3-inch squares for safety pins and the long 3-inch by 9-inch rectangles for my fabric marking pens. If you’re on a tight budget, you don’t need to spend fifty bucks on acrylic. You can make DIY dividers out of thick Kraft board or chipboard. Just measure your drawer, cut the board to size, and use a little hot glue to create custom compartments. It costs maybe three dollars per drawer. Keeping your items in a single, shallow layer means you can see everything at a glance. No more digging. No more bleeding fingers. I keep my 1/2 inch bias tape makers in one specific slot, and my metal bobbins in another. It completely stops the chaotic jumble that happens when you open and close a drawer too fast. You might also like: 20 Creative DIY Garage Organization Ideas That Changed Everything
5. Group Supplies By Project Zones, Not Just Categories

Most people organize their craft closets like a retail store. They put all the paper together, all the scissors together, and all the glue together. I tried this wrong for months before figuring it out. It sounds logical, but it actually ruins your workflow. If you’re sewing a quilt, you don’t want to walk to three different shelves to grab your fabric, your rotary cutter, and your thread. You’re constantly interrupting your creative flow. Instead, you need to organize your supplies into specific project zones. I built a dedicated sewing zone on my middle shelf. It holds my fabric swatches, my $12.99 Gutermann thread sets, metal bobbins, and fabric scissors all in one portable tray. When I want to sew, I just grab that one tray and take it to my desk. I also created a die-cutting zone for my paper crafts. I keep my Sizzix Big Shot machine, the heavy acrylic cutting plates, and all my metal dies in one specific 12-inch by 12-inch basket. If I’m making greeting cards, everything I need sits right there. This method is incredibly efficient. Think about how you actually craft. If you do resin pouring, keep your two-part epoxy, your silicone molds, your mixing cups, and your protective gloves in one specific plastic tub. Don’t separate the gloves just because they’re apparel. Keep the tools with the materials they manipulate. It completely changes how quickly you can start and clean up a project. You might also like: 20 Cozy Aesthetic Organizing Ideas to Inspire Your Next Project
6. Rethink Your Fabric Storage With Dowels And Crates

Fabric storage is notoriously difficult. If you fold it and stack it, the bottom pieces get crushed and permanently creased. I used to stack my cotton yardage in a towering pile. When I tried to pull a piece from the bottom, the whole stack collapsed onto the floor. It was infuriating. For larger fabric pieces, you should roll them around large wooden dowels. Go to a hardware store and buy wooden dowels that measure at least 2 inches in diameter. Cut them to the height of your shelf. Roll your two-yard cuts of cotton tightly around the wood and store them vertically in a tall basket. It prevents deep creases and looks like a beautiful candy store display. For smaller cuts, like standard 18-inch by 22-inch fat quarters, you need a different system. I roll my fat quarters into tight little burritos and store them in the Acrylic Crate for Fabric Storage from Best Craft Organizer. It’s exactly 8.1 inches wide, 11.3 inches deep, and 5.9 inches tall. It fits perfectly on standard closet shelves. I separate my fabrics by color. All the cool blues and greens go in one crate, and the warm reds and oranges go in another. One major rule. Avoid storing natural fabrics like silk or wool in airtight plastic bins for long periods. They need to breathe. I use breathable canvas bins for my expensive wool felt so moisture doesn’t build up and cause a musty smell. You might also like: 15 Inspiring Aesthetic DIY Home Decor You Can Try Today
Rubbermaid Configurations Deluxe Custom Closet Kit 4-8 Ft.
Rubbermaid Configurations Deluxe Custom Closet Kit 4-8 Ft. Adjustable has been one of the most consistently praised picks in this category. 81 reviewers averaged 4.5/5.
7. Protect Scrapbook Paper With Specialized 12×12 Holders

Scrapbook paper is incredibly fragile. If you bump the edges, they dog-ear and look terrible. I used to store my expensive cardstock in a standard office filing cabinet, which meant I had to fold or trim the 12-inch edges to make them fit. It completely ruined the paper. If you’re a paper crafter, you absolutely must invest in dedicated 12×12 paper holders. I personally swear by the Stamp-n-Storage 12×12 Paper Holder. It’s made of sturdy wood and offers 14 to 15 horizontal slots. Each slot holds approximately 50 sheets of heavy cardstock. They make standard versions, but they also make specific sizes that slide perfectly into IKEA Kallax shelving units. It keeps the paper perfectly flat and protects those delicate corners. If a heavy wooden unit isn’t in your budget, there are cheaper alternatives. I often use 12×12 plastic storage envelopes. You can find multi-packs at Michaels or on Amazon. A pack of 12 to 40 clear plastic folders usually costs between $20 and $30. I slide my patterned paper into these folders by brand or seasonal theme. Then, I stand the folders upright in a sturdy magazine file. The plastic protects the paper from accidental spills and dusty fingerprints. I once spilled a 16 oz coffee near my paper stash, and those plastic envelopes completely saved my $40 stack of vintage floral prints. Don’t ever leave your paper loose on a shelf. It won’t survive. Always store paper away from direct sunlight, or the vibrant colors fade into a sad, washed-out pastel within a few months.
8. Repurpose Grocery Jars For Tiny Notions

You really don’t need to buy brand new, expensive miniature containers for your tiny supplies. Don’t overlook budget-friendly repurposing. I’m slightly obsessed with glass jars. Last month at Trader Joe’s, I bought three of their seasonal candles just because I wanted the glass jars for my craft room. Once the candle burns down, I freeze the jar, pop out the remaining wax, and run it through the dishwasher. They make the most beautiful, heavy-bottomed containers for storing colorful buttons, safety pins, and metal eyelets. I also save the tall, skinny salsa jars from Whole Foods. I peel off the labels using a little bit of lemon essential oil to melt the sticky residue. These tall jars work perfectly for holding my 2 oz bottles of acrylic paint upside down, so the paint stays ready to squeeze. If you buy bulk spices at Sprouts, save those tiny glass bottles too. They represent the exact perfect size for storing loose glitter, seed beads, or tiny jump rings for jewelry making. I even took an old wall-mounted wooden spice rack and screwed it into the inside of my craft closet door. It perfectly holds all my 2 oz bottles of Liquid Sculpey and polymer clay glazes. The bottles fit exactly into the wooden rails. It costs literally nothing to reuse packaging you already bought. Plus, the heavy glass feels so much nicer in your hands than flimsy plastic baggies. Just make sure you wash them thoroughly with hot soapy water. You don’t want your delicate silk ribbons smelling like garlic and herb pasta sauce.
9. Label Every Single Bin Clearly (And Consistently)

I used to think my memory was good enough to remember what I put inside every single box. It isn’t. I’d spend twenty minutes opening six different shoeboxes just to find my hot glue sticks. Labeling is absolutely crucial for quick retrieval and making sure you actually put things away when you’re done. If a bin doesn’t have a label, it just becomes a dumping ground for random junk. I highly recommend buying a dedicated label maker. I use the Brother P-touch label maker. It prints crisp, black text on glossy white tape that sticks to almost anything. I label every single drawer, bin, and jar in my closet. I use a bold, easy-to-read font and keep the text uniform. It makes the messy closet look instantly cohesive and intentional. For my opaque containers, like the heavy wooden boxes where I keep my leather-working tools, a text label isn’t always enough. I use a really specific trick for these. I take a clear, well-lit photo of the contents with my phone, print it out on a 2-inch by 3-inch piece of photo paper, and tape it to the outside of the box. I instantly know that the heavy mallet, the $18 metal stamps, and the exacto knives sit inside without having to lift the heavy lid. If you’re sharing a craft space with kids or a partner, labeling is the only way you won’t lose your mind. They can’t claim they didn’t know where the scissors belong when the drawer literally says SCISSORS in bold letters.

5 Tier Closet Hanging Organizer
5 Tier Closet Hanging Organizer has been one of the most consistently praised picks in this category. 1 reviewers averaged 4.5/5.
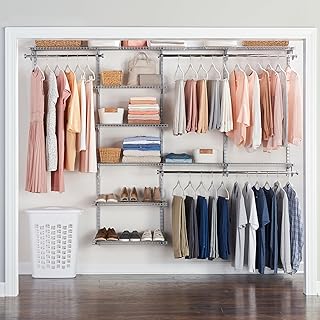
10. Utilize Over-The-Door Storage For Bulky Rolls

When you’re dealing with a tiny closet, you must use every single inch of real estate. The back of the closet door acts essentially like a blank wall just waiting to be used. I completely ignored my door for years, which was a huge waste of space. For small craft closets, over-the-door organizers are totally invaluable. I’m not talking about expensive custom shelving. I literally went to Walmart and bought a $12 clear plastic over-the-door shoe organizer. It features 24 deep, clear pockets. I don’t use it for shoes. I use it to hold all my awkwardly shaped items. The long pockets work absolutely perfectly for holding tubes of craft paint, bottles of Mod Podge, and heavy spools of satin ribbon. I even use the bottom row of pockets to hold my rolled-up sheets of adhesive vinyl for my Cricut machine. The vinyl rolls fit perfectly into the narrow slots and stay completely protected from dust. If you don’t like the look of plastic, you can find heavy-duty canvas organizers with structured pockets. Just make sure the organizer includes sturdy metal hooks that fit over your specific door width. I once bought a cheap mesh organizer from a dollar store, and the fabric ripped down the middle the second I loaded it with my heavy 8 oz bottles of resin hardener. Spend the extra few dollars for thick plastic or heavy canvas. Having 24 extra pockets of storage without taking up any shelf space feels like a massive relief.
11. Roll Out A Mobile Craft Cart For Current Projects

Sometimes the best organization ideas involve getting things out of the closet entirely. When I’m in the middle of a complex, three-day project, I don’t want to constantly walk back and forth to the closet to grab supplies. It ruins my focus. But I also hate leaving a massive pile of clutter on my dining room table. The solution involves a mobile craft cart. This represents a huge trending solution for 2026. I absolutely love the IKEA RÅSKOG utility cart. It usually costs around $30 to $50, and it’s made of heavy powder-coated steel. It features three deep tiers and rolls incredibly smoothly on four caster wheels. I use this cart as my active project station. When I’m building a miniature dollhouse, I load the top tier with my quick-dry tacky glue, my fine-tip tweezers, and my tiny wooden shingles. The middle tier holds my paints and brushes, and the bottom tier holds the bulky instruction manuals and extra wood sheets. I roll the cart right up to my desk while I’m working. When I’m done for the evening, I don’t need to put every single tiny piece away in the closet. I just roll the entire cart neatly into the corner of the room or tuck it into the bottom of the closet. It keeps my current works-in-progress completely accessible but beautifully contained. I even bought a cheap magnetic knife strip and stuck it to the side of the metal cart to hold my metal rulers and tiny scissors.
12. Store Pens Horizontally And Protect Your Tools

Tools usually represent the most expensive part of any craft hobby. If you don’t store them correctly, you’re literally throwing money in the trash. I learned this the hard way with a brand new set of $45 alcohol-based Copic markers. I stored them upright in a cute ceramic mug on my shelf. Three weeks later, the top nibs sat completely bone dry and ruined. The ink drained entirely to the bottom. For dual-tipped pens, markers, and gel pens, you must store them horizontally. It keeps the ink evenly distributed to both ends. I use a cheap acrylic lipstick organizer laid on its side to hold my markers flat. For your metal tools, you need to protect the cutting edges. Throwing loose wire cutters, jewelry pliers, and fabric scissors into a drawer dulls the blades and chips the metal. I utilize my pegboard hooks to hang my tools individually. If you own really specific or weirdly shaped tools, look on Etsy for custom 3D-printed accessories. I bought a 3D-printed plastic holder specifically designed to hold my heavy crop-a-dile eyelet punch. It snaps right into my pegboard and holds the heavy tool securely. I also wipe down the blades of my scissors with a tiny drop of sewing machine oil on a microfiber cloth before I hang them up. It prevents rust, especially if your closet sits in a slightly damp basement. Treat your tools with respect, and they won’t fail you when you’re in the middle of a crucial cut.

VIPEK V5 Heavy Duty Clothes Rack
VIPEK V5 Heavy Duty Clothes Rack punches above its price — 56 buyers rated it 4.5 stars. I would buy it again.
13. The Best Craft Closet Organization Ideas Include Empty Space

This remains the hardest rule for me to follow, but it’s the most important. A massive mistake almost every crafter makes involves filling every single available inch of storage. If you pack your shelves perfectly tight, you leave absolutely zero room for new supplies. Last year, I went to Costco and bought a massive bulk pack of double-sided tape on sale. I came home and realized I had absolutely zero room in my closet to put it. I had to leave the ugly cardboard box sitting on my floor for a month. Expert organizers suggest leaving at least 10 to 15 percent of your totes or shelves completely empty. This intentional breathing room proves crucial. It gives you space for projects-in-progress and new materials without causing immediate stress. To help manage what you own so you don’t overbuy, you should really look into craft inventory apps. This represents a massive 2026 trend. I started using an app called Craftybase, which developers tailored specifically for crafters. They offer a 14-day free trial. If you want something highly visual, Sortly works amazingly well. It uses photos and QR codes, though their paid plans start around $49 a month. You can also find an app called Krafts Inventory on the Apple App Store that includes a UPC scanner. You can literally scan a barcode while standing in Michaels to check if you already own that specific shade of blue yarn. Keeping a digital inventory and leaving physical empty space won’t just organize your closet. It’ll organize your mind.
Honestly, tackling a messy craft space feels completely overwhelming at first. I’ve sat on the floor of my closet surrounded by chaotic piles of yarn and literally cried out of frustration. But you don’t need to fix it all in one weekend. Start by throwing away the dried-up paint. Then, grab some clear bins and a label maker. Once you implement these smart systems, you’ll spend less time frantically searching for your favorite scissors and more time actually making beautiful things. Don’t forget to measure your shelves before you head to the store. I’ve bought too many beautiful baskets that measured exactly half an inch too deep to let the closet door close. Save yourself the return trip! If you found these craft closet organization ideas helpful, please pin this article to your favorite Pinterest board so you can easily find it later. Let’s get organizing!
Frequently Asked Questions
How do I start organizing a very messy craft closet?
Start by completely emptying the space and decluttering ruthlessly. Throw away dried paints, broken tools, and scraps you won’t use. You need a blank slate before buying any storage bins or implementing new craft closet organization ideas.
What is the best way to store scrapbook paper?
Store 12×12 cardstock flat in dedicated wooden paper holders with horizontal slots, or place them in clear plastic 12×12 envelopes stored upright in magazine files. Never leave paper loose, as the corners easily bend and ruin.
Should I use deep drawers for craft supplies?
No, deep drawers act like black holes where tiny items get lost. Instead, use shallow acrylic drawer dividers to keep small notions like safety pins, bobbins, and buttons in a single, visible layer.
How should I store markers and pens?
Always store dual-tipped pens, alcohol markers, and gel pens horizontally. If you store them upright, the ink drains to the bottom, causing the top nib to dry out and permanently ruining the expensive marker.