What’s Inside
- Start With A Ruthless Decluttering Session
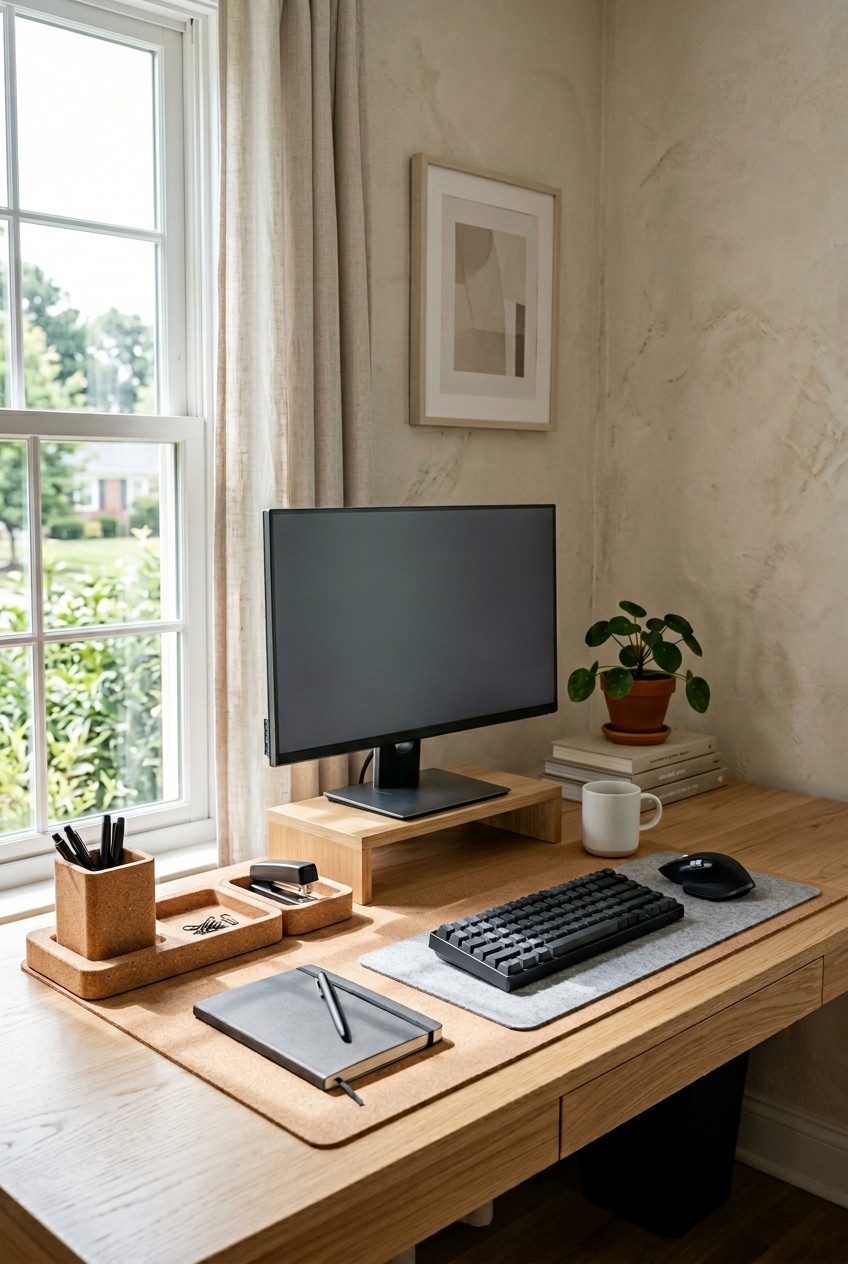
- Embrace Vertical Storage With Monitor Risers
- Implement Modular Drawer Organizers For Small Supplies
- Pegboards Are The Ultimate Desk Organization DIY
- Master Cable Management With Clips And Sleeves
- Adopt A Digital-First Documentation Mindset
- Utilize Multi-Functional Desk Lamps With Built-in Organizers
- Repurpose Household Items For Eco-Friendly Storage
- Create Zones For Your Desk Organization DIY
- Invest In Under-Desk Drawers Or Storage
- Label Everything Clearly With A Handheld Maker
- Consider A Rolling Cart For Flexible Storage
- Utilize Magnetic Strips For Metal Items
Last Tuesday at Target, I spilled a massive 16 oz iced coffee all over my 2023 tax documents because my home office was a total wreck. That sticky, brown puddle ruining my paperwork was the wake-up call I needed to finally tackle a real desk organization DIY project. My workspace had turned into a dumping ground for half-empty water bottles, tangled cords, and stacks of unopened mail that smelled like dusty cardboard. I did this wrong for months. I bought cute acrylic containers without measuring my desk. I shoved random trash into drawers hoping it would vanish. It was a mess. If you’re constantly losing your favorite pen or pushing aside paper just to set your laptop down, you’re not alone. We aren’t meant to work in chaos. A good setup isn’t about buying expensive bins. It’s about a functional system that works for your brain and your daily habits. Let’s fix your workspace. I’m going to walk you through exactly how I cleared my surfaces, maximized my storage, and finally built a home office that doesn’t make me want to pull my hair out.
1. Start With A Ruthless Decluttering Session

Before you even think about buying bins, clear the space completely. I mean everything. Take every single item off your desk, empty the drawers, and pile it on the floor. Clutter is a major predictor of procrastination and ruins your ability to focus. A common mistake is trying to organize existing junk instead of removing unnecessary items first. I’ve done this. I spent three hours last year color-coding dried-out highlighters that didn’t even work. Don’t do that. Grab a box of Hefty Strong 30-Gallon Trash Bags ($11.49 for a 40-count box) and start sorting. You need three piles: keep, toss, and relocate. Throw away the pens that skip. Toss the sticky notes that lost their adhesive. Recycle the junk mail. If an item belongs in the kitchen, put it in the relocate pile. I personally swear by holding each item and asking if I’ve used it in the last thirty days. If not, it’s gone. The physical act of wiping down the bare wood surface with a damp microfiber cloth and smelling that clean citrus spray is motivating. You won’t believe how much bigger your desk looks when it’s empty. Took me years to figure out that less is always more.
2. Embrace Vertical Storage With Monitor Risers

When you’re dealing with a tiny surface, build upward. Maximizing limited desk space with vertical solutions is a big trend for 2026. A monitor riser brings your screen to an ergonomic height and creates a pocket of storage underneath. I bought the Bambusi Bamboo Monitor Stand for $44.99 and it changed how my neck feels after a long day. The natural bamboo looks good, and it has carved slots on top for my phone and a coffee mug. Underneath, there is exactly 2.5 inches of clearance. I slide my bulky mechanical keyboard and a 5×8 inch spiral notebook right into that gap when I’m not typing. This frees up the desk for reading documents or eating lunch. Skip the cheap plastic risers. They bow under the weight of a heavy monitor and look terrible. Investing in solid wood or metal ensures your expensive electronics won’t crash down. Plus, the smell of real wood adds a nice element to an otherwise tech-heavy space. It’s great.
3. Implement Modular Drawer Organizers For Small Supplies

We all have a junk drawer. It’s that dark, scary place where paperclips go to tangle themselves into giant knots with rubber bands and old mints. Stop this by using modular drawer dividers. I bought a cheap, brittle plastic tray at Walmart a few years ago for five bucks. It cracked into sharp pieces within a week when I dropped a stapler on it. Huge mistake. Learned that the hard way. Now, I use the Amazon Basics Desk Drawer Organizer. It’s made of black metal mesh with anti-slip rubber pads on the bottom, and it costs $15.99. The mesh is durable and doesn’t collect dust like plastic bins. It has specific compartments that fit standard office supplies. I keep exactly 4 oz of silver paperclips in the smallest square, my sticky notes in the medium square, and my pens in the long rectangular slot. When you open the drawer, you don’t hear that annoying rattling sound because the rubber feet grip the bottom perfectly. Everything stays sorted and accessible. You won’t waste ten minutes searching for a thumbtack ever again.

AMKUFO 6 Pack-Closet-Organizers-and-Storage
AMKUFO 6 Pack-Closet-Organizers-and-Storage punches above its price — 52 buyers rated it 4.5 stars. I would buy it again.
4. Pegboards Are The Ultimate Desk Organization DIY

If you have bare walls behind your monitor, you’re wasting prime real estate. Installing a pegboard is my favorite desk organization DIY project. It allows for customizable storage of tools, scissors, and small shelves, freeing up surface area. I drove to IKEA last month and picked up the IKEA SKÅDIS pegboard in white for $22.99. The installation took about twenty minutes. The satisfying clacking sound of snapping the metal hooks into the fiberboard slots is fun. I hung my bulky noise-canceling headphones, a pair of 8-inch fabric scissors, and a tiny metal basket holding my spare charging cables. This is a trending approach for 2026 because you can maximize space without expanding your desk’s footprint. Honestly, this changed how I work. I used to knock my headphones off the desk twice a day. Now, they have a dedicated home on the wall. Just make sure you use proper drywall anchors. I tried using cheap sticky strips the first time, and the whole board crashed down in the middle of the night, scaring my dog half to death. No exaggeration. You might also like: 20 Stunning Tool Storage Organizing Ideas for a Fresh New Look
5. Master Cable Management With Clips And Sleeves

Taming tangled wires is essential for a clean look. Nothing ruins a workspace faster than a massive, dusty spiderweb of cords drooping off the back edge. A common mistake is letting cords create visual clutter and tripping hazards. I used to let my laptop charger drape across the floor, and I’d constantly roll over it with my office chair, crushing the wires inside. Don’t do this. You need to route cables neatly along desk edges. I use BlueLounge CableDrop clips. A pack of six costs $12.95. They have a sticky adhesive backing that you press firmly onto the edge of your desk. You just pop the cord into the little silicone groove, and it holds it in place. The silicone is soft, so it won’t damage your cables. I stuck three of them along the back edge of my desk for my phone charger, monitor power cable, and webcam USB cord. No more crawling on the floor on my hands and knees feeling around for a dropped cable. You might also like: 20 Lovely DIY Home Makeover That Make a Real Difference
6. Adopt A Digital-First Documentation Mindset

Paper pile-ups are the enemy of productivity. You have to reduce physical paper by scanning and digitizing documents whenever possible. This is a massive component of modern office setups in 2026. I used to buy massive 50-packs of thick manila folders at Costco for $14.99 and stuff them full of utility bills, receipts, and notes. My desk was buried under a mountain of paper. The constant paper cuts on my cuticles and the stale smell of old receipts were driving me crazy. I finally bought a Fujitsu ScanSnap iX1300 for $299.00. Yes, it’s an investment, but it’s tiny and fits behind my laptop. I scan every single piece of mail the second I open it, and then I shred the paper. If you can’t afford a scanner, use the free scanning feature in the Apple Notes app on your iPhone. It works perfectly. Going digital means my desk surface is visible, and I can find any tax document from three years ago in five seconds using a search bar. You might also like: 15 Brilliant Home Organization Ideas to Transform Your Space
Rubbermaid Configurations Deluxe Custom Closet Kit 4-8 Ft.
Honestly, Rubbermaid Configurations Deluxe Custom Closet Kit 4-8 Ft. Adjustable surprised me — sturdier than it looks in the photos, and over 81 buyers gave it 4.5 stars.
7. Utilize Multi-Functional Desk Lamps With Built-in Organizers

Good lighting is crucial, but standard desk lamps have heavy bases that eat up space. Choose lighting solutions that double as storage. I swapped my old, clunky lamp for the 19.5-inch Student Black Metal Task E26 Desk Lamp With Organizer. It cost me $19.98 on Amazon. This lamp combines task lighting with a hard plastic base that has built-in compartments. The base has an indented groove that props up my phone, plus a deep cup that holds exactly four thick Sharpie markers. It eliminates the need for a separate pen cup. The cold, matte black metal feels sturdy, and the flexible gooseneck lets me point the light where I need it. The harsh glare of bad overhead lighting gives me a headache by 2 PM, so having a warm 40-watt LED bulb right at my desk is a lifesaver. By combining my lighting and my pen storage into one footprint, I reclaimed six square inches of desk space. It sounds small, but on a tiny 36-inch desk, every inch matters.
8. Repurpose Household Items For Eco-Friendly Storage

You don’t have to spend a fortune on fancy acrylic organizers to have a beautiful desk. Embrace sustainability by upcycling things you already own. Last week, I was grocery shopping at Sprouts and bought a 13 oz jar of Bonne Maman Strawberry Preserves for $5.99. When I finished the jam, I didn’t throw the jar away. I spent ten minutes scrubbing the sticky fruit residue out with hot, soapy water until the glass was sparkling clean. The smell of the hot dish soap and the squeaky clean feel of the glass was satisfying. These jars have red-checkered metal lids and a nice, heavy weight. I peeled off the label and now use it to hold my collection of binder clips. Clean tin cans from soup or beans can also be turned into rustic pen holders. Just use a smooth-edge can opener so you don’t slice your fingers on sharp metal rims. This aligns perfectly with the 2026 trend of using sustainable materials in home decor. Plus, it gives your space a charming, personalized vibe that sterile plastic bins can’t match.
9. Create Zones For Your Desk Organization DIY

Think of your desk like a professional kitchen. A chef doesn’t keep the flour in the refrigerator. Divide your desk into primary, secondary, and tertiary zones. This is the secret sauce for any successful desk organization DIY setup. The primary zone is the 18 inches of desk space directly in front of you. Only keep items you touch multiple times a day in this zone to reduce cognitive load and improve focus. For me, that’s my laptop, mouse, and a glass of water. The secondary zone is an arm’s reach away. This is where I put my desk lamp and my physical planner. The tertiary zone is for things you rarely use, which should be stored away in drawers. Most people get this wrong. I used to keep my giant tape dispenser and a 3-hole punch sitting directly in front of my keyboard. I used them maybe once a month, but they were constantly in my way. I realized this mistake while I was eating a 2 oz bag of roasted almonds from Whole Foods at my desk. I had no room to set the bag down without moving the hole punch. Establish strict zones, and your workflow will feel smooth.
HomePekite Laundry Pods Storage Container
HomePekite Laundry Pods Storage Container punches above its price — 15 buyers rated it 4.5 stars. I would buy it again.
10. Invest In Under-Desk Drawers Or Storage

If you have a minimalist desk that didn’t come with built-in drawers, you’re missing out on hidden storage. For items you need frequently but don’t want cluttering the surface, under-desk storage is ideal. I bought the UPLIFT Desk mounted under-desk drawer for $39.00. It’s made of solid steel and mounts directly underneath the desktop. The installation was a hassle. I ended up with sawdust in my eyes from drilling the pilot holes into the particle board, and I originally mounted it three inches too far to the left. I kept banging my left knee against the cold metal edge every time I swiveled my chair. I had to unscrew it and move it over. Learn from my bruised knee: measure your leg clearance before you drill. Once I fixed it, it was amazing. It provides secure, hidden storage for my external hard drive, my lip balm, and a spare phone charger. This hidden storage trend helps reduce visual clutter, which experts agree is a major productivity killer. When I push the drawer closed, it clicks shut, and all my messy accessories disappear from view.
11. Label Everything Clearly With A Handheld Maker

A system only works if you can maintain it. If you don’t know where things belong, you’ll start tossing them anywhere. You need to use a handheld label maker to identify the contents of drawers, files, and bins. I bought the Brother P-Touch PTH110 for $34.99. I had to run to Kroger to buy a 6-pack of AAA Energizer batteries for $8.99 to power it, but it was worth it. I use the standard 12mm white tape with black ink. Typing out the labels, hearing that satisfying mechanical printing sound, and peeling the backing off the tape is my favorite part of organizing. I labeled the edge of my monitor riser, the inside lips of my drawer organizers, and the spines of my few remaining reference binders. This helps you and anyone else in your house return items to their proper place, building sustainable organization habits. If my husband borrows a charging cable, he knows exactly which slot to put it back in because there is a bright white label screaming “USB-C CORDS” staring right at him. Don’t skip the labeling step. It’s the glue that holds the system together.
12. Consider A Rolling Cart For Flexible Storage

Sometimes your desk is simply too small to hold everything you need, especially if you do craft projects or have a lot of bulky reference books. A rolling cart can provide extra storage for supplies you use often but don’t want living on your desk. I bought the famous IKEA RÅSKOG utility cart in dark grey for $39.99. I hauled the heavy, flat-pack box home in a large reusable canvas bag from Trader Joe’s. Putting it together took me about thirty minutes with an Allen wrench. At first, the caster wheels were a bit squeaky on my hardwood floors, but a quick spray of WD-40 fixed that instantly. Now it glides silently. I keep my heavy printer on the top tier, reams of fresh printer paper on the middle tier, and extra ink cartridges on the bottom tier. It can be rolled right next to my desk when I’m printing a large batch of documents, and then tucked away into the corner of the room when I’m done. It offers both deep storage and a flexible, temporary surface area that doesn’t crowd my main workspace.

Galasily 3 Pack Laundry Detergent Dispenser Container with
Galasily 3 Pack Laundry Detergent Dispenser Container with Tray has been one of the most consistently praised picks in this category. 114 reviewers averaged 4.5/5.
13. Utilize Magnetic Strips For Metal Items

This is a brilliant hack that most people never consider for a home office. A magnetic knife rack, the kind you usually find mounted over a kitchen stove, can be repurposed to hold metal desk items. I bought the Ouddy 16-Inch Magnetic Knife Bar on Amazon for $14.99. It has incredibly strong neodymium magnets hidden inside a sleek stainless steel bar. I mounted it on the wall just below my pegboard. The sharp, metallic snap of a pair of scissors hitting the magnet and locking into place is satisfying. I use it to hold my heavy metal shears, my metal ruler, binder clips, and even my spare charging cables (the metal ends stick right to it). It keeps all these awkward, sharp items completely off the desk surface but easily accessible at eye level. To maintain this new setup, you have to implement a “five-minute tidy” daily. Dedicate five minutes at the end of each workday to return your scissors to the magnet, put your pens in the drawer, and wipe down your desk. This small, consistent effort prevents clutter from accumulating and maintains a clean, focused workspace. Experts say this daily reset enhances productivity and reduces stress for the next morning. Try these tips, and I promise you’ll love sitting down to work again. Pin this article for your next weekend project!
Frequently Asked Questions
What is the best way to start a desk organization diy project?
Start with a ruthless decluttering session. Remove every single item from your desk and drawers, wipe down the surfaces, and sort everything into keep, toss, and relocate piles before buying any new bins.
How can I maximize storage on a very small desk?
Embrace vertical storage. Use a sturdy bamboo or metal monitor riser to create space underneath for keyboards and notebooks, and install a wall-mounted pegboard behind your desk to hold headphones and small tools.
What is the best way to manage tangled computer cords?
Use adhesive cable management clips along the back edge of your desk. Route your chargers and power cords through the silicone grooves to keep them from falling on the floor and creating visual clutter.
How do I stop my desk drawers from becoming a junk drawer?
Invest in modular metal mesh drawer organizers with anti-slip rubber feet. Assign a specific, labeled compartment for every type of item, like paperclips and pens, to keep them separated and easily accessible.