What’s Inside
- Start With A Ruthless Purge (The Viral Hanger Trick)
- Maximize Vertical Space With These DIY Closet Organization Ideas
- Ditch Plastic For Slim Velvet Hangers
- Hack The IKEA PAX System For A Custom Look
- Tame The Junk With Expandable Drawer Dividers
- Use The Back Of The Door For Accessories
- Create Lifestyle Zones For Faster Mornings
- Build Custom Plywood Shelving On A Budget
- Protect Footwear With Clear Drop-Front Shoe Boxes
- Embrace The 40-Piece Capsule Wardrobe
- Reclaim Dead Space With Under-Shelf Baskets
- Label Literally Everything (Even The Obvious Stuff)
- The Weird Shower Cap Trick For Shoe Storage
- Stop Overcrowding Your Hanging Rods
- Affordable DIY Closet Organization Ideas Better Than Elfa
Last Tuesday, I found myself sitting on the bare floor of my master bedroom, crying into a pile of tangled wire hangers and a moth-eaten cashmere sweater. If you need legitimate DIY closet organization ideas, you’re looking at someone who literally had her entire wardrobe collapse on her head because of a cheap, flimsy tension rod. I’m not exaggerating. The metal rod snapped at 2 AM. It sounded like a home invasion. It dumped sixty pounds of denim and heavy winter coats directly onto my sleeping dog’s bed. It was a complete disaster. The smell of stale cedar and dusty fabric filled the room while I frantically dug through the wreckage. I realized right then that my storage situation wasn’t just messy. It was entirely dysfunctional.
I spent the next three months testing every single storage hack, building custom shelves, and completely rethinking how I store my clothes. I made so many mistakes. I bought cheap plastic bins that cracked within a week. I tried using fancy velvet boxes that just collected dog hair. Learned that the hard way. But eventually, I figured out exactly what works and what doesn’t. If your wardrobe looks like a fabric explosion and you’re tired of digging through dark corners just to find a matching pair of socks, I’ve got you covered. Skip the expensive custom designers. You can do this yourself on a budget. Grab a cup of coffee, roll up your sleeves, and let’s fix that messy space right now with these proven methods.
1. Start With A Ruthless Purge (The Viral Hanger Trick)

Before you buy a single bin or shelf, you must empty the space completely. I mean every single item. When I did this last month, I found three empty boxes of organic white cheddar popcorn from Whole Foods shoved behind my winter boots. It was embarrassing. Once the space is empty, you need to clean it. I mix 1/2 cup of white vinegar, 2 tablespoons of rubbing alcohol, and 4 oz of distilled water in a glass spray bottle. It cuts through that weird dusty residue perfectly. Spray down the bare walls and baseboards.
Now, for the clothes. A massive trend for 2026, highly endorsed by organization experts like Wendy Trunz, is the hanger trick. Turn all your hangers so the hooks face you. It looks completely backward and feels wrong, but trust me. After wearing an item, wash it and return it to the rod with the hook facing the normal direction. After six months, grab some heavy-duty Hefty Ultra Strong trash bags (they’re $11.49 for a box of 40 at Kroger) and donate anything still on a backward-facing hanger. I use my old canvas Sprouts grocery totes to haul the donation piles to the thrift store. This visual cue stops you from organizing clutter you literally never wear.
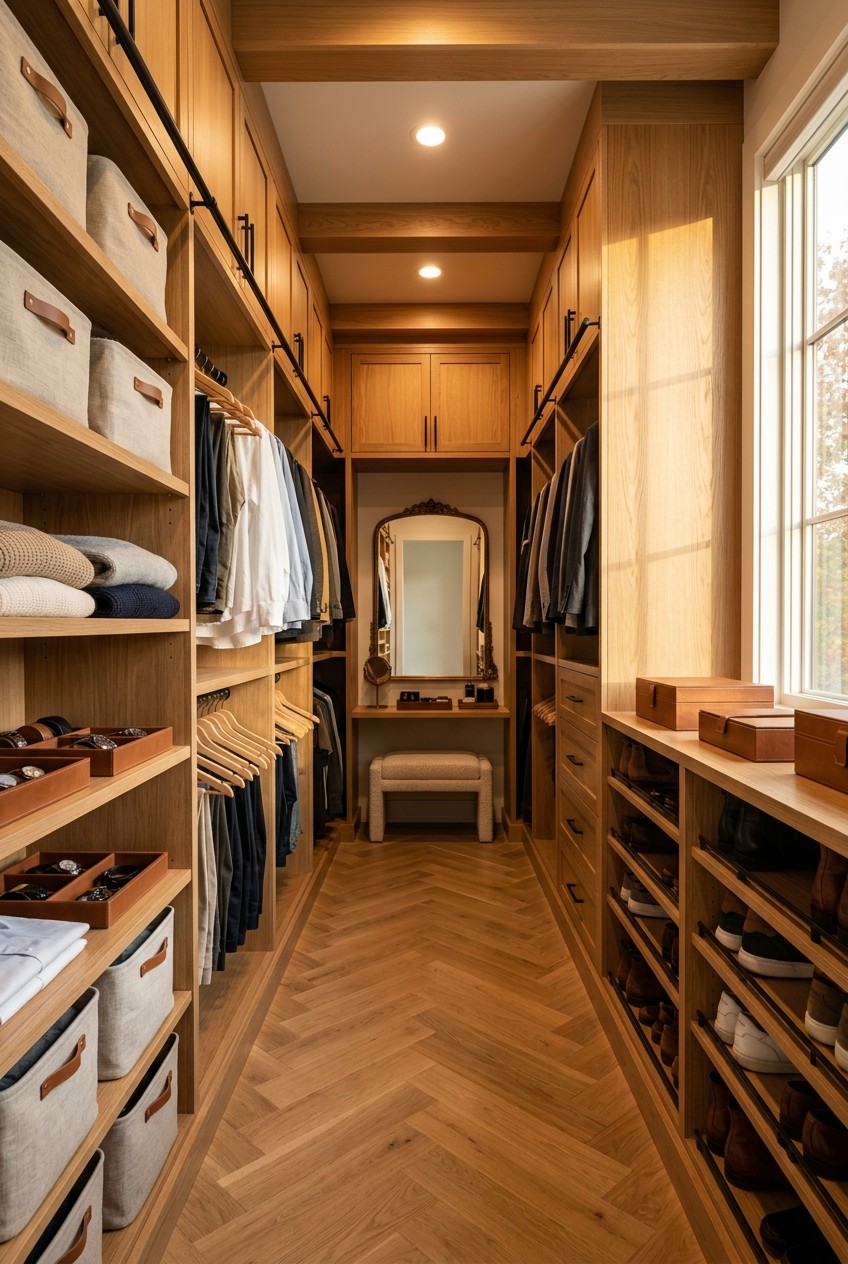
2. Maximize Vertical Space With These DIY Closet Organization Ideas

One of the absolute biggest mistakes people make, especially in standard reach-in spaces, is ignoring vertical space. I tried this wrong for months before figuring it out. I kept stacking shoes on the floor while three feet of empty air sat uselessly above my shirts. You need to install double hanging rods. This instantly doubles your capacity for shorter garments like blouses, blazers, and folded pants.
For a sturdy DIY solution, don’t use weak tension rods. I learned that the hard way. Instead, head to the hardware store and buy 1-inch x 3-inch pine boards (usually around $4.98 each). Locate your wall studs and screw the boards directly into the drywall to act as heavy-duty supports for standard wooden closet rods. You want to ensure the top rod is high enough for your shirts to clear the bottom rod. I keep mine exactly 40 to 42 inches apart. This gives my longest cardigans plenty of room to breathe without dragging on the lower bar. It’s a weekend project that completely changes how much clothing you can store.
3. Ditch Plastic For Slim Velvet Hangers

If you’re still using those thick, tubular plastic hangers from college, we need to talk. They waste so much precious rod space and cause silky blouses to slip off and fall into the dusty abyss of the floor. I hated finding my favorite silk shirts wrinkled in a corner. Switch immediately to slim, non-slip velvet hangers. This simple swap can increase your hanging capacity by up to 50 percent.
I specifically buy the Up&Up brand from Target. A pack of 50 velvet hangers costs exactly $22.99. The velvet texture grips the fabric tightly, so wide-neck sweaters and delicate camisoles stay securely in place. Plus, the uniform look of matching hangers makes your wardrobe look like a high-end boutique instead of a messy thrift shop rack. Just be warned, putting clothes onto velvet hangers takes a tiny bit more effort because the fabric catches on the velvet, but it’s totally worth it to stop picking clothes off the dirty floor.

AMKUFO 6 Pack-Closet-Organizers-and-Storage
Honestly, AMKUFO 6 Pack-Closet-Organizers-and-Storage surprised me — sturdier than it looks in the photos, and over 52 buyers gave it 4.5 stars.
4. Hack The IKEA PAX System For A Custom Look

The 2026 trend heavily favors modular systems that adapt to your exact needs over time. If you want that expensive, built-in custom look without paying a contractor five thousand dollars, you need to hack the IKEA PAX wardrobe system. It’s incredibly popular for a reason. They offer frames in various widths, specifically 100cm and 50cm, and multiple depths. You can customize them with flat shelves, pull-out drawers, and metal rails.
Depending on your layout, a full PAX system typically ranges from $100 to over $600. I installed three 50cm frames in my master bedroom. To make it look genuinely custom, I pushed the units together, secured them to the wall studs, and added baseboards across the bottom to hide the feet. Then, I painted the entire thing a soft, creamy white. It took me a full weekend of sweating and swearing at Swedish instruction manuals, but the result looks like a luxury dressing room. Just remember to measure your ceiling height carefully. I almost bought frames that were two inches too tall for my room. You might also like: 15 Clever DIY Easy Home Decor to Inspire Your Next Project
5. Tame The Junk With Expandable Drawer Dividers

Drawers without dividers quickly devolve into chaotic junk pits. I used to dig through a tangled nest of sports bras and mismatched socks every single morning, getting increasingly frustrated while my coffee got cold. You absolutely need adjustable drawer dividers for your folded clothes, undergarments, and accessories. You might also like: 15 Inspiring Aesthetic DIY Home Decor You Can Try Today
I highly recommend the Everything Organizer Expandable Drawer Divider from The Container Store. They cost between $19.99 and $21.99 per package and snap firmly into place. If you want a slightly different style, the Cambridge Drawer Organizers run about $17.99 to $24.99 and look very clean. If you’re on a tighter budget, grab a multi-pack of SIMPLIFY fabric drawer organizers. I found a massive pack of them at Costco last month for just $19.99. They range from $10 to $30 depending on the size. I use the small square fabric bins for rolled socks and the long rectangular ones for folded workout leggings. It makes putting away laundry so much faster when every single item has a strict boundary. You might also like: 15 Gorgeous Organizing Bathroom Home Hacks Ideas Worth Trying This Year
6. Use The Back Of The Door For Accessories

Don’t overlook the back of your door. It’s prime real estate that most people leave completely blank. I used to throw my belts and scarves into a random basket on the top shelf, which meant I never wore them because I couldn’t see them. Now, I use the back of the door to display everything.
Buy a pack of Command Medium Wire Hooks. A pack of 4 costs around $11.49 at most hardware stores. Stick them at eye level on the inside of the door to hang belts, lightweight jackets, or silk scarves. If you own a lot of footwear, skip the hooks and buy a heavy-duty over-the-door shoe organizer with clear plastic pockets. The Mainstays version at Walmart costs exactly $14.88 and holds up to 24 pairs of shoes. It frees up an incredible amount of floor space. Just make sure you buy the kind with metal hooks that go over the top of the door, not the cheap velcro straps that eventually tear under the weight of heavy sneakers.
Rubbermaid Configurations Deluxe Custom Closet Kit 4-8 Ft.
A dependable everyday pick — Rubbermaid Configurations Deluxe Custom Closet Kit 4-8 Ft. Adjustable pulls in 81 ratings at 4.5 stars. Not flashy, just solid.
7. Create Lifestyle Zones For Faster Mornings

A major design trend emerging for 2026 is creating dedicated lifestyle zones. Instead of organizing purely by clothing type, you organize by your daily routine. Last Tuesday at Whole Foods, I realized I was wearing stained pajama pants and a nice blouse because I couldn’t find my actual jeans in the dark morning hours. That was my wake-up call to reorganize.
I set up a specific getting ready zone right at the front of my space. It holds my pressed work trousers, clean blouses, and professional blazers. I put my lounge wear zone in the back corner, featuring my cozy sweatpants, oversized t-shirts, and hoodies. When I wake up at 6 AM, I don’t have to sift through weekend clothes to find my office attire. Everything I need for a specific activity is grouped together. I even created a small workout zone with my sports bras, leggings, and running shoes all in one vertical stack. It streamlines my mornings and completely eliminates decision fatigue.
8. Build Custom Plywood Shelving On A Budget

If wire shelving makes you cringe, you can build custom wooden shelves on a very tight budget. I despise wire shelves because they leave weird grid marks on my folded sweaters, and small items constantly fall through the gaps. For a truly custom solution, build your own shelves using 3/4-inch sanded pine plywood.
You need to measure your space precisely. For instance, if your back wall is exactly 60 inches wide, you must cut your plywood shelves to 58.5 inches to account for the thickness of your side wall supports. I attach 1-inch x 3-inch wooden boards directly into the wall studs using heavy-duty wood screws to act as cleats. Then, the plywood shelf just rests right on top. The rough edges of the plywood can snag delicate fabrics, so I always iron on a strip of white edge banding (it costs about $7.99 for a 25-foot roll) to make it look like solid, expensive wood. It smells amazing while you’re building it, and it easily holds heavy stacks of denim without sagging.
9. Protect Footwear With Clear Drop-Front Shoe Boxes

If you’re a shoe enthusiast, leaving your expensive sneakers or leather heels out in the open is a terrible idea. They collect dust, lose their shape, and make the floor look incredibly messy. I used to keep my shoes in their original cardboard boxes, but I could never remember what was inside them. I’d have to open six boxes just to find my black ankle boots.
Clear stackable shoe boxes fix this instantly. I strictly use The Container Store’s Clearline Stackable Shoe Drawers. They cost $14.99 per box. Yes, it’s an investment if you own thirty pairs of shoes, but they keep your footwear completely dust-free and visible. The drop-front style is absolutely crucial. It allows you to open the front flap and pull out a pair of heavy boots from the bottom of the stack without unstacking the five boxes sitting on top of it. The satisfying click of the magnetic plastic door closing is the best part of putting my shoes away.

VIPEK V5 Portable Closet Wardrobe Heavy Duty Clothes Rack
A dependable everyday pick — VIPEK V5 Portable Closet Wardrobe Heavy Duty Clothes Rack pulls in 56 ratings at 4.5 stars. Not flashy, just solid.
10. Embrace The 40-Piece Capsule Wardrobe

Sometimes the best storage solution isn’t buying more bins. It’s owning less stuff. The capsule wardrobe is a massive 2026 trend that involves curating a tight collection of 30 to 40 versatile pieces that all coordinate with each other. I used to own over two hundred items of clothing, yet I constantly complained that I had nothing to wear. My rod was so stuffed I couldn’t even slide the hangers back and forth.
I pared down my wardrobe to exactly 38 high-quality pieces. I organize my capsule strictly by color, moving from light whites and creams on the left to dark navy and black on the right. Within those color blocks, I sort by category: pants, dresses, then blouses. It looks incredibly soothing, almost like a minimalist art gallery. Getting dressed takes me less than three minutes now because literally every shirt matches every pair of pants I own. It vastly reduces physical clutter and mental decision fatigue.
11. Reclaim Dead Space With Under-Shelf Baskets

Look at the solid shelves in your wardrobe right now. I bet there is at least eight inches of empty, unused air sitting directly below the shelf board and above the clothes hanging underneath it. That is dead space, and it’s a massive waste in a small home. I used to ignore this gap until I ran out of room for my winter beanies.
You need to maximize this gap with under-shelf baskets. These brilliant little wire contraptions feature two flat arms that simply slide right over your existing wooden or wire shelf. The basket hangs down underneath, creating an instant floating drawer. I buy the heavy-duty coated metal ones that are at least 10 to 12 inches deep. You can find a 2-pack of them on Amazon for about $16.99. They are absolutely perfect for storing smaller, awkward items that don’t fold well, like thick wool socks, winter gloves, or small evening clutches. I own four of them, and they instantly gave me back an entire drawer’s worth of storage.
12. Label Literally Everything (Even The Obvious Stuff)

You might think you’ll remember that the gray fabric bin holds your winter scarves, but you won’t. Six months from now, you’ll be tearing through every bin looking for your favorite red scarf while running late for a holiday party. As expert Wendy Trunz always advises, the simplest and most effective system is labeling. I thought labeling was just for obsessive Pinterest moms, but I was so wrong. Took me years to figure out.
I bought a Brother P-Touch label maker for $34.99, and I use it on everything. I print clear, legible labels with black text on white tape. I stick them on the front of my opaque fabric bins, the edges of my wooden shelves, and even the inside lips of my drawers. When you label the physical shelf section ‘Denim’, it creates a psychological barrier. You won’t randomly shove a folded sweater into the denim pile because the label tells you it doesn’t belong there. It ensures my husband knows exactly where his workout shirts go, which makes maintaining the clean space so much easier.

SNSLXH 5 Pack Stackable Closet Storage Basket
A dependable everyday pick — SNSLXH 5 Pack Stackable Closet Storage Basket pulls in 39 ratings at 4.5 stars. Not flashy, just solid.
13. The Weird Shower Cap Trick For Shoe Storage

This sounds completely crazy, but it’s one of my favorite hacks for seasonal storage and travel. I used to throw my dirty sneakers directly into my large plastic storage bins at the end of summer. The next spring, I’d open the bin to find dried mud and dirt rubbed all over my clean canvas tote bags that were stored in the same box. It was infuriating.
Now, I use disposable plastic shower caps. I buy them at Dollar Tree, where a 6-pack costs exactly $1.25. You simply take one shower cap and stretch the elastic band over the sole of an individual shoe. It perfectly encases the dirty bottom, catching any loose dirt, dried grass, or city grime. Then, you can safely pack the shoes into your luggage or toss them into your seasonal storage bins without worrying about cross-contamination. It’s incredibly cheap, the elastic fits almost any shoe size up to a men’s 12, and it saves you from having to scrub dirt out of your delicate fabrics.
14. Stop Overcrowding Your Hanging Rods

While maximizing your space is a great goal, overcrowding your hanging rods is a massive mistake. I used to jam so many clothes onto my single rod that I had to physically wrestle my heavy winter coats just to pull out a thin cotton t-shirt. When clothes are packed that tightly, they can’t breathe. They get terribly wrinkled, and worse, they start to develop a faint, musty smell from lack of air circulation.
Professional organizers suggest leaving exactly one inch of space between each hanger. I know it sounds like a waste of space, but it’s crucial. When I finally thinned out my wardrobe and spaced my velvet hangers one inch apart, the difference was shocking. The fabric stopped crushing against itself. I didn’t have to iron my work blouses every single morning anymore. Plus, you can actually see the sleeves and colors of your garments, making it infinitely easier to pick an outfit. If you can’t easily slide a hanger back and forth, your rod is too full. Go back to step one and purge again.
15. Affordable DIY Closet Organization Ideas Better Than Elfa

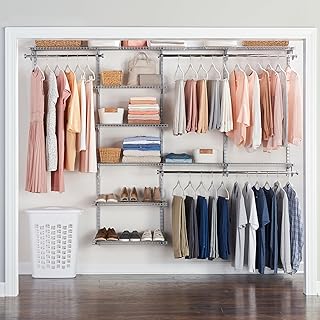
If you’ve ever walked into The Container Store and designed a custom Elfa system, you know the sticker shock is real. The Elfa kits easily start around $300 and can quickly jump to $614.00 or more for a standard reach-in space. I simply couldn’t justify spending that much money on wire shelves. But I still wanted an adjustable, track-based system that I could install myself.
I highly recommend looking at alternatives like ClosetMaid or the Rubbermaid Configurations kits. I purchased the Rubbermaid Configurations Deluxe Custom kit for exactly $169.99. It features a heavy-duty steel track that you screw directly into your top wall studs. Then, the vertical uprights just hang from that top track. You don’t have to drill a million holes in your drywall. You can snap the wire shelves and hanging rods into the brackets at any height you want. It offers the exact same adjustable, modular functionality as the expensive brands but at a fraction of the cost. I installed the entire thing by myself in about two hours.
Honestly, tackling this project feels overwhelming at first, but the daily peace of mind is worth every drop of sweat. I absolutely swear by these methods. Start small, maybe just swapping out your hangers this weekend, and build from there. You won’t regret it. If you found these tips helpful, please pin this article to your home project boards so you can find these exact measurements and prices when you’re standing in the middle of the hardware store!

Timate P3 Closet Organizer System with 5 Hanging Rods
A dependable everyday pick — Timate P3 Closet Organizer System with 5 Hanging Rods pulls in 4 ratings at 4.5 stars. Not flashy, just solid.
Frequently Asked Questions
How much does it cost to build custom plywood shelves?
Building custom shelves with 3/4-inch sanded pine plywood and 1×3 support boards is very budget-friendly. A single 4×8 sheet of plywood costs around $40-$50, and the support boards are about $5 each, making it much cheaper than custom built-ins.
What are the best hangers to save space?
Slim, non-slip velvet hangers are the best option. They grip delicate fabrics so clothes don’t fall off, and their ultra-thin profile can increase your hanging capacity by up to 50 percent compared to bulky tubular plastic hangers.
How do you organize deep, hard-to-reach shelves?
Use clear or labeled bins that act like pull-out drawers. Also, maximize the dead space underneath the shelf by sliding on coated wire under-shelf baskets, which are perfect for storing smaller items like socks or winter accessories.
What is the hanger trick for decluttering?
Turn all your hangers backward on the rod. After wearing and washing an item, hang it back up facing the normal direction. After six months, donate any clothes still on backward-facing hangers because you clearly aren’t wearing them.