What’s Inside
- Adopt a Digital-First Mindset for Work Desk Organization
- Measure Your Ergonomics Exactly
- Hide Cable Clutter Like a Pro
- Use Monitor Arms to Free Up Surface Space
- Compartmentalize With Smart Drawer Dividers
- Layer Your Lighting to Prevent Eye Fatigue
- Mount a Pegboard for Micro-Supplies
- Enforce the One In, One Out Rule for Pens
- Hide Your Work Snacks Strategically
- Use a Desktop Tray for Immediate Action Items
- Implement a Five-Minute Daily Reset Routine
- Add Low-Maintenance Plants for Aesthetic Appeal
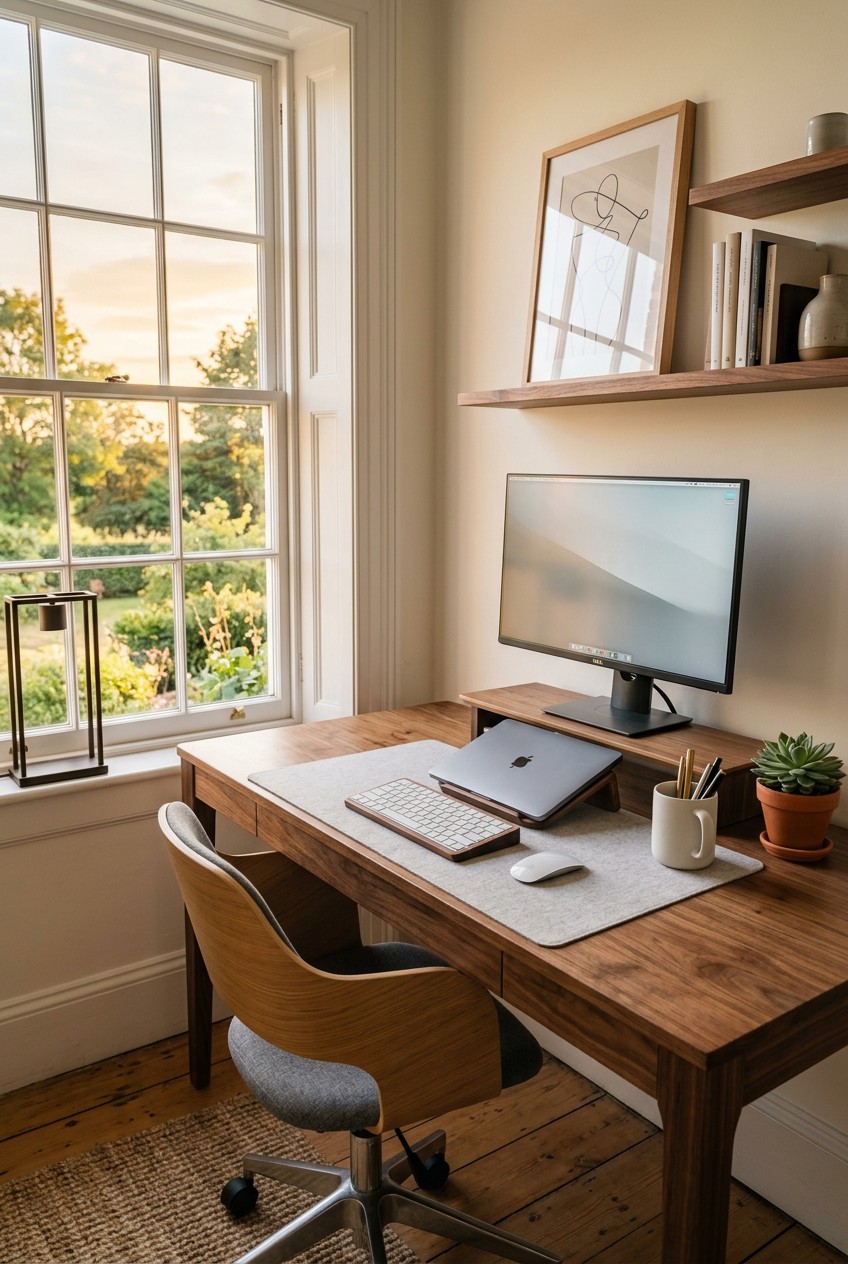
Last Tuesday at Whole Foods, I pulled out my laptop at the cafe to answer a quick email, and a crumpled, coffee-stained sticky note with my WiFi password fluttered right into a stranger’s $6.99 iced matcha latte. That humiliating moment forced me to finally fix my chaotic work desk organization system. My home office looked like a paper recycling bin exploded over a tech graveyard, and it’s honestly embarrassing how long I let it ruin my focus. Let’s fix your workspace before you drop your own trash into someone else’s expensive drink.
I’m going to walk you through exactly how I overhauled my space. I tried a lot of things wrong for months before figuring it out. Now, my desk is a place where I can actually think clearly. I’ve got a system that works, and I’m sharing every single step with you.
1. Adopt a Digital-First Mindset for Work Desk Organization

I used to be the queen of piling instead of filing. I’d stack 8.5×11 inch printer paper on the corner of my desk until it tipped over onto the floor. I’m telling you, keeping physical copies of everything is a massive mistake. To really master work desk organization, you need a digital-first mindset. Productivity experts like Tiago Forte talk about this constantly. I finally listened to the advice. Now, I use an app called Receipts by Wave to scan things immediately. The Receipts by Wave app is totally free and the interface is incredibly simple. You just snap a photo, and it extracts the merchant and total automatically. It’s brilliant. Last month, I bought a 12-pack of Sharpie S-Gel pens for $14.28 at Target. Instead of keeping the paper receipt for my tax write-offs, I scanned it in the parking lot and threw the paper away. It felt incredibly illegal but so freeing. You need cloud storage like Google Drive or Dropbox. I’ve got a main folder called “2026 Taxes” and drop everything in there. Stop hoarding 4 oz stacks of junk mail. If you’re keeping paper utility bills on your desk, you’re doing it wrong. Just scan them. I tried keeping a physical inbox tray wrong for months before figuring it out. It just became a dusty graveyard for credit card offers. Go digital immediately. Your brain will thank you when you aren’t staring at a mountain of dead trees while trying to finish a report. I hate the dusty smell of old paper sitting in a tray anyway. It literally makes my nose itch. It frees up so much mental bandwidth when you aren’t constantly shuffling papers around just to find your mousepad. Plus, searching for a digital file takes two seconds. Searching for a lost paper receipt takes three days and a lot of crying.
2. Measure Your Ergonomics Exactly

Most people just buy a pretty chair and call it a day. I did this exactly. I bought a gorgeous green velvet chair from HomeGoods for $129 that looked amazing but gave me lower back pain so bad I couldn’t sleep. Ergonomics isn’t just a corporate buzzword for HR departments. You need precise physical measurements. Adjust your chair height so your thighs and feet are totally parallel to the floor. They need to form a 90 to 110-degree angle. If your feet dangle even a little bit, get a footrest. I bought a memory foam teardrop footrest on Amazon for $24.99. It features a soft velour cover that feels amazing on bare feet. When your arms are relaxed at your sides, your elbows should form that exact same 90 to 110-degree angle with your forearms resting straight on the desk. Position your monitor so the top third of the screen is right at eye level. If you’re looking down all day, you’re going to get horrible neck strain. I bought a generic wooden riser at Walmart for $12.98 to lift my laptop up. It’s cheap but it works perfectly. A common mistake is thinking ergonomics is one-size-fits-all. It’s really not. You’ve got to tweak it for your specific body proportions. I spent an hour last Sunday adjusting my husband’s desk setup because he was slouching like a gargoyle over his keyboard. Take out a metal tape measure if you’ve got to. Your joints are worth the ten minutes of annoying adjustments. I finally bought a refurbished Herman Miller Aeron chair for $450 on Facebook Marketplace. It’s ugly, but my spine feels amazing. Your body isn’t meant to sit in a C-shape for eight hours a day. Taking the time to measure everything feels silly in the moment, but it’s the ultimate form of self-care. It completely cured my mid-afternoon slumps.
3. Hide Cable Clutter Like a Pro

Tangled cables are the ugliest part of any workspace. They collect thick grey dust, they look messy, and they’re honestly a tripping hazard. For a long time, I just let my laptop charger and phone cord hang off the back of my desk like a sad plastic waterfall. The sticky, dusty rubber coating on old power cords grosses me out. Then I discovered proper cable management. You need the Anker 7-Port USB 3.0 Hub. It costs about $39.99 on Amazon and centralizes all your device charging. No more plugging five different bulky blocks into your wall outlet. For the cords that have to stay on your desk surface, get Cable Blocks Magnetic and Weighted Cord Organizers for $19.99. They keep your cords from sliding off the back edge. I also really like CableDrops by Blue Lounge. They’re these little adhesive rubber clips that cost around $1.36 per clamp. You stick them right to the edge of your desk. If you’ve got a massive bundle of wires underneath, you definitely need a tray. Pamo Cable Trays run about $35 for a set of two metal racks. You screw them into the underside of your desk and just shove the power strip and thick cables up there. Out of sight, out of mind. I also use a 50-pack of black Velcro brand cable ties that cost $6.48 at Walmart. I wrap them around my monitor cords every six inches so they stay in one tight, neat tube instead of sprawling everywhere. It completely cleans up the visual noise. I can actually stretch my legs under my desk now without kicking a power strip. When your feet aren’t constantly kicking a tangled mess of wires, you feel so much more relaxed. It’s like a deep breath for your workspace. I used to dread looking under my desk, but now it’s completely clear. You might also like: 15 Inspiring Home Makeover Ideas You Haven’t Thought Of

Galasily 3 Pack Laundry Detergent Dispenser Container with
A dependable everyday pick — Galasily 3 Pack Laundry Detergent Dispenser Container with Tray pulls in 114 ratings at 4.5 stars. Not flashy, just solid.
4. Use Monitor Arms to Free Up Surface Space

If you’ve got a small desk, you can’t afford to waste 30 percent of your surface area on a giant plastic monitor stand. You need to maximize your vertical space. I used to keep my 27-inch Dell monitor sitting on its heavy factory base, and it took up so much room I couldn’t even lay a standard spiral notebook flat. Getting a monitor arm is the smartest thing I’ve done for my setup. If you’ve got the budget, the Ergotron LX is incredible. It’s around $200 and moves like absolute butter. But if you’re on a tight budget like I was when I started my business, the North Bayou Single Spring monitor arm is fantastic. It’s only $30 on Amazon. It holds monitors sized 17 to 30 inches with a weight capacity just under 20 lbs. I clamped it to the back of my desk in ten minutes. Suddenly, I had a whole empty space underneath my screen to slide my keyboard when I wasn’t typing. It looks like my screen is hovering in mid-air. It makes wiping down the desk surface so incredibly easy. Being able to push my screen back an extra five inches completely cured my habit of leaning forward. I used to squint and hunch my shoulders up to my ears. A massive pro tip: make sure your desk is thick enough and sturdy enough to handle the metal C-clamp. I tried to attach one to a flimsy glass desk once and nearly shattered the whole thing. Learn from my panic attack. Stick to solid wood or thick MDF boards. You’ll be shocked by how much bigger your desk feels. It’s like adding an entire extra square foot of usable space. I can finally spread out my planner and my notebook at the same time without knocking my coffee over. You might also like: 15 Creative Hacks Organizing Ideas You Need to See
5. Compartmentalize With Smart Drawer Dividers

Desk drawers are notorious for becoming a dark supply black hole. You throw a pen in there, and it vanishes into a tangled mess of paper clips, old receipts, and dried-out highlighters. You need rigid dividers. I personally swear by clear acrylic organizers because you can actually see what’s hiding in the bottom corners. I hate the rattling sound of loose paper clips every time I pull open a drawer. The iDesign Linus Shallow Drawer Organizers are great and range from $5 to $14.99 depending on the size. If you’ve got narrow drawers, The Home Edit Narrow Drawer bins are $19.99 at The Container Store. But my absolute favorite budget find is the STORi SimpleSort Drawer Organizer Bins. You get a set of six for around $15. I use the 3×3 inch squares for binder clips and the 9×3 inch rectangles for my pens. I keep exactly one pad of 3×3 inch Post-it notes in neon pink. The rest stay in a closet. Having too many colors in your drawer just looks chaotic. Before I bought these, I spent twenty minutes frantically looking for a specific silver 16GB flash drive right before a crucial Zoom call. I was sweating through my shirt. Now, everything has a designated little plastic box. It’s so visually satisfying. Just make sure you measure the exact inside height of your drawer before you buy anything. I bought bins that were 3 inches tall for a 2.5-inch drawer and couldn’t close it. I had to return the whole batch. When everything has a specific home, you stop making messes. It’s that simple. You aren’t just tossing things into a drawer anymore. You’re intentionally placing them in their designated spot. You might also like: 15 Gorgeous Organizing Bathroom Home Hacks Ideas Worth Trying This Year
6. Layer Your Lighting to Prevent Eye Fatigue

Poor lighting will ruin your productivity faster than a slow internet connection. I used to work in a dark corner of my living room with just the overhead ceiling fan light. By 3 PM, my eyes felt like they were filled with dry sand, and I had a throbbing headache right behind my temples. You need layered lighting. This means you’ve got ambient light for the whole room, and specific task lighting for your desk surface. I bought a fantastic brass desk lamp at Target for $35.99. It features a heavy white marble base and an adjustable neck. I put a 40-watt soft white LED bulb in it. Here’s a huge mistake people make: don’t use harsh daylight bulbs for your desk lamp. They’re way too blue and make white paper glare terribly. I also added a BenQ ScreenBar Monitor Light. It costs about $109. It clips to the top of my monitor and shines light straight down onto my keyboard without hitting the screen. It casts a warm, soft glow over my keys. I use a 27-inch LG monitor, and the light bar fits perfectly. It completely eliminates screen glare. I plugged my ambient room lamp into a Kasa Smart Plug for $9.99. I’ve got it set on a timer so it automatically turns on at 4:30 PM when the sun starts setting. If you’re relying on a single window for light, you’re going to suffer when it rains or gets dark at 4 PM in the winter. Good lighting keeps you awake and stops you from squinting at your spreadsheets all afternoon. You won’t believe how much your mood improves when you aren’t working in a dark cave. It makes early morning work sessions so much cozier. I actually look forward to turning on my desk lamp now. Took me years to figure out that lighting is everything.
4 Pack Laundry Pods Container
If you want something that just works, 4 Pack Laundry Pods Container is a safe bet (473 reviews, 4.5 stars).
7. Mount a Pegboard for Micro-Supplies

When your desk surface is tiny, you’ve got to build up. I’m completely obsessed with pegboards. They aren’t just for dusty garages and tool sheds anymore. I installed the IKEA SKADIS pegboard right above my monitors on the wall. The white 30×22 inch board is only $24.99, and the little attachments are just a few bucks each. I use the tiny white metal cups (they cost $3) to hold my scissors, a 6-inch metal ruler, and my favorite dry erase markers. I also use the little bungee cords to pin up important reminders or a nice printed 4×6 photo. Before the pegboard, all these micro-supplies were scattered across my desk, getting pushed around every time I moved my heavy coffee mug. I used a power drill with a 3/16 inch bit and heavy-duty drywall anchors to make sure it wouldn’t crash down on my screens. I even looped a 3-foot braided iPhone charging cable through one of the pegboard holes. Now my phone sits on a little shelf while charging, completely off my desk surface. A common mistake people make with pegboards is buying flimsy plastic hooks that fall out every time you grab a pen. Get the metal hooks that lock tightly in place. Last Wednesday, I was at Sprouts buying groceries and saw they had these cute little air plants for $4.99. I bought one and stuck it in a shallow pegboard tray. It adds a pop of green without taking up an inch of my actual desk. It’s like functional wall art. You can swap out the layout whenever you get bored. It keeps all those tiny, annoying items off your desk but still completely visible.
8. Enforce the One In, One Out Rule for Pens

I’ve got a confession to make. I’m a recovering pen hoarder. At one point, I kept three ceramic coffee mugs stuffed with random ballpoint pens, promotional highlighters from local banks, and dried-out permanent markers. It was absolutely ridiculous. You can’t write with fifty pens at once. You need to enforce a strict one in, one out rule. I dumped every single pen I owned onto my kitchen counter and tested them on a scrap piece of paper. If it skipped even a little bit, it went straight in the trash. Now, I only keep exactly four pens on my desk. I use the Pilot G2 Premium Gel Roller pens in 0.7mm fine point. A 5-pack costs $6.48 at Walmart. They glide over the paper. It’s so smooth. I keep one black, one blue, one red, and one green. That’s it. The same rule applies to highlighters. I keep exactly one yellow Sharpie tank highlighter that costs $1.99. Skip the fancy pastel highlighters. They fade too fast and you can’t read your notes. If I buy a new fancy pen, one of the old ones has to go into a storage box in the hallway closet. You don’t need a massive cup of cheap plastic sticks cluttering your workspace. It just creates unnecessary visual noise. When you limit your supplies to only the things you actually love using, your desk feels so much lighter. Stop keeping the cheap bank pens. They write terribly anyway and always leave ink blobs on your hands. You really only need a few great tools to do your best work. Throwing away the junk pens felt like a massive weight lifted off my shoulders. It’s a tiny change that makes a huge psychological difference.
9. Hide Your Work Snacks Strategically

We all eat at our desks. I’m not going to pretend I don’t snack on crackers while typing emails. But keeping half-open bags of chips next to your keyboard is a disaster waiting to happen. Last month, I knocked over an open bag of Trader Joe’s Peanut Butter Filled Pretzel Nuggets (they’re $2.99 for a 16 oz bag and highly addictive). Coarse salt and greasy crumbs got completely wedged under my laptop keys. It took me thirty minutes with a can of compressed air and a toothpick to fix it. You need a dedicated, hidden snack stash. I bought a small, opaque acrylic bin with a tight lid from The Container Store for $14.99. The acrylic is thick and makes a satisfying clack when I shut the lid. It sits on the bottom shelf of my bookcase, completely out of sight. I fill it with individually wrapped snacks. Right now, I’ve got a 24-count box of Kirkland Signature Soft and Chewy Granola Bars that I bought at Costco for $11.49. If you’re eating yogurt or cottage cheese at your desk, skip the fat-free stuff. It tastes like wet cardboard. Get the full-fat Fage Greek yogurt in a 32 oz tub for $6.99. It keeps you full so you aren’t digging through your snack bin every twenty minutes. Keeping snacks in a closed bin prevents bugs, stops you from mindless grazing because you actually have to get up and open a lid, and keeps your desk free of ugly crinkly packaging. Never leave open food out overnight. I learned that the hard way when I lived in an old apartment with a horrible sugar ant problem. You’ll save your keyboard from a crumb-related death. Plus, it forces you to take a real break when you want a snack. You actually have to stop typing, open the bin, and enjoy your food.

AMKUFO 6 Pack-Closet-Organizers-and-Storage
AMKUFO 6 Pack-Closet-Organizers-and-Storage punches above its price — 52 buyers rated it 4.5 stars. I would buy it again.
10. Use a Desktop Tray for Immediate Action Items

Even with a strict digital-first mindset, some physical paper is unavoidable. You might get a permission slip for your kid, a physical check you need to deposit, or a notebook you’re currently writing in. You need one single, beautifully designed desktop tray for immediate action items. I bought a gorgeous faux leather letter tray from Target’s Threshold line for $18. It features a soft felt bottom so it won’t scratch my wooden desk. It sits on the far left corner of my workspace. Here’s the catch: this tray is only for things that require action within the next 48 hours. It’s not a long-term storage bin. It’s a temporary waiting room. If a piece of paper sits in that tray for more than two days, I either scan it, file it in a cabinet, or throw it away. I don’t keep a pen cup next to this tray. Pen cups just encourage you to drop random debris into them. The tray is strictly for 8.5×11 inch paper and standard envelopes. Before I instituted this strict rule, my tray would just pile up until it was four inches thick. I’d have to dig through it frantically to find my car registration renewal. It was so stressful. Keep it shallow. I specifically chose a tray that is only 2 inches deep so I literally can’t stack too much stuff in it. It forces me to process my physical inbox regularly instead of ignoring it. It creates a physical boundary for your tasks. You can’t ignore the tray when it’s sitting right there. It forces you to be proactive instead of reactive with your paperwork.
11. Implement a Five-Minute Daily Reset Routine

You can buy all the clear acrylic bins and expensive monitor arms in the world, but if you don’t maintain your space, it will fall apart in a week. You need a daily reset routine for optimal work desk organization. I do this every single day at 5:00 PM. It takes exactly five minutes. I put my favorite Pilot G2 pens back in their drawer organizer. I wipe down my desk surface with a microfiber cloth and a spray of Mrs. Meyer’s Multi-Surface Everyday Cleaner in the Basil scent. A 16 oz spray bottle costs $4.88 at Kroger, and it smells incredibly fresh. The basil scent is sharp and herbal. It signals to my brain that the workday is officially over. I take my dirty coffee mugs straight to the kitchen sink. I close all my unnecessary internet browser tabs. I also take a tiny microfiber duster and run it over my mechanical keyboard. The clicking sound of my keyboard is so much better when the keys aren’t sticky. Doing this means that when I sit down the next morning at 8:00 AM, my workspace is pristine and welcoming. I used to just slam my laptop shut and walk away. The next morning, I’d come back to a sticky desk, three dirty water glasses, and a crumpled napkin. It immediately put me in a bad mood and killed my morning motivation. Your future self deserves a clean desk. Set an alarm on your phone for five minutes before you finish working. It changes everything. It’s a tiny gift to your future self. Waking up to a clean desk sets the tone for your entire day. You start your morning feeling capable and organized instead of defeated and overwhelmed.
12. Add Low-Maintenance Plants for Aesthetic Appeal

A completely sterile desk is a boring desk. You need a little bit of life in your workspace to keep you happy and inspired. But you can’t clutter your desk with massive, messy potted plants that drop dead leaves onto your keyboard. I love adding low-maintenance greenery. My absolute favorite is the Golden Pothos. I bought a small 4-inch potted Pothos at a local nursery for $8. I used a specific indoor potting soil mix with perlite so it drains well. I keep it in a simple white ceramic planter from Target ($10) on the back corner of my desk. It only needs about 1/2 cup of tap water once a week. I use a tiny indoor watering can with a long, thin spout. It prevents water from splashing onto my expensive electronics. I bought a sleek matte black one on Amazon for $14.99. Pothos plants are almost impossible to kill, no exaggeration. I tried keeping a fussy maidenhair fern on my desk once, and it completely dried up and shed brown crispy bits all over my black mousepad. It was disgusting and impossible to clean up. If your office lacks good natural light, just get a high-quality fake plant. I found a really realistic faux succulent at HomeGoods for $12.99. It adds that necessary pop of green texture without any of the watering hassle. Keep your decorations minimal. One small plant and maybe one framed 4×6 photo is plenty. Anything more than that is just dust-collecting clutter that distracts you from your actual work. It brings a little bit of the outdoors inside. Staring at a screen all day is draining, but looking at a vibrant green plant is incredibly refreshing. It’s the perfect finishing touch for a productive space.
I promise you, taking a Saturday afternoon to implement these systems will completely change how you feel about sitting down to work. My desk used to be a source of massive anxiety, and now it’s my favorite spot in the house. Start with the cable management and the drawer dividers. Those two things alone will make a massive visual difference. If you found these tips helpful, please save this post and pin it to your favorite home organization board on Pinterest. You’re going to want to reference these exact product names when you finally head to the store.

iDesign Laundry Detergent Holder
iDesign Laundry Detergent Holder has been one of the most consistently praised picks in this category. 13 reviewers averaged 4.5/5.
Frequently Asked Questions
How do I start organizing a messy work desk?
Start by completely clearing your desk surface. Throw away obvious trash, then group remaining items into categories like electronics, pens, and paper. Only put back the essentials you use daily. Stash the rest in drawer dividers or a dedicated closet box.
What’s the best way to hide desk cables?
The best method is mounting a metal cable tray under your desk. You can shove power strips and thick bundles up there. For surface cords, use weighted magnetic blocks or adhesive rubber clips to keep them from slipping off the back edge.
How many pens should I keep on my desk?
You only need three to four high-quality pens on your desk. Enforce a strict one-in, one-out rule. Keep one black, one blue, and maybe a red or green for editing. Store any extras in a hidden box to reduce visual clutter.
Do monitor arms actually save desk space?
Yes, they make a massive difference. By clamping a monitor arm to the back of your desk, you completely eliminate the bulky plastic base. This frees up the entire area underneath your screen for your keyboard, notebooks, or a clean aesthetic.