What’s Inside
- Start Your Makeup Vanity Organization With A Ruthless Purge
- Embrace Clear Acrylic Organizers For Total Visibility
- Maximize Drawer Space With Adjustable Dividers
- Utilize Vertical Space With A 360-Degree Rotating Organizer
- Repurpose A Tiered Spice Rack For Your Foundation
- Build A DIY Magnetic Makeup Board For Wall Storage
- Get A Skincare Mini-Fridge For Temperature-Sensitive Items
- Streamline Makeup Vanity Organization With A Left-To-Right Flow
- Designate A Portable Caddy For On-The-Go Essentials
- Maximize Storage With IKEA’s Affordable Solutions
- Stop Storing Makeup In High-Humidity Bathrooms
- Separate Your Clean And Dirty Makeup Brushes
- Label Everything To Maintain Your System Long-Term
Last Tuesday at Whole Foods, I caught a glimpse of myself in the harsh floral department mirror and genuinely gasped. I had a crusty brown smudge of three-year-old bronzer streaked across my left cheek because my vanity organization was a complete disaster. I’m talking about a chaotic pile of sticky glosses, broken powder lids, and brushes smelling like wet dog. It’s a sad reality when your mornings start with frantic digging through a sticky, disorganized drawer. That embarrassing Whole Foods incident was my breaking point. I went home, dumped every single 1 oz bottle and 0.28 oz compact onto my beige bedroom floor, and realized I couldn’t live like a raccoon hoarding shiny garbage. If you’re tired of losing your favorite 0.1 oz MAC Ruby Woo lipstick ($24.00) in a sea of expired mascaras, I’ve got you covered. Let’s fix this mess together. I’m sharing the exact steps I used to fix my setup for good. Took me years to figure out.
1. Start Your Makeup Vanity Organization With A Ruthless Purge

I tried organizing without throwing anything away for months. It’s a massive mistake. You can’t organize garbage. I’m guilty of hoarding a 1 oz bottle of NARS Sheer Glow foundation for four years because it cost $47.00. When I finally opened it last month at Target to shade-match a concealer, it smelled like rancid oil and had separated into chunky yellow water. Gross. The first step is checking the tiny jar symbol on the back of your products. If it says “12M,” it’s toxic sludge 12 months after opening. Liquid eyeliners and mascaras? Toss them after 3 to 6 months. I don’t care if your 0.3 oz Benefit Roller Lash mascara ($28.00) still has product left. Toss it. Once you’re down to the safe stuff, implement a strict one-in, one-out rule. Buy a new 0.3 oz Fenty Beauty Gloss Bomb ($21.00), and an old gloss goes in the trash. I bought a 13-gallon Hefty trash bag ($11.99 for a box of 40) and filled half of it during my first purge. You’ll feel a bit of guilt tossing expensive things, but the visual relief is worth it. Don’t skip this. You aren’t doing yourself any favors by keeping expired bacteria traps on your desk. Learned that the hard way.
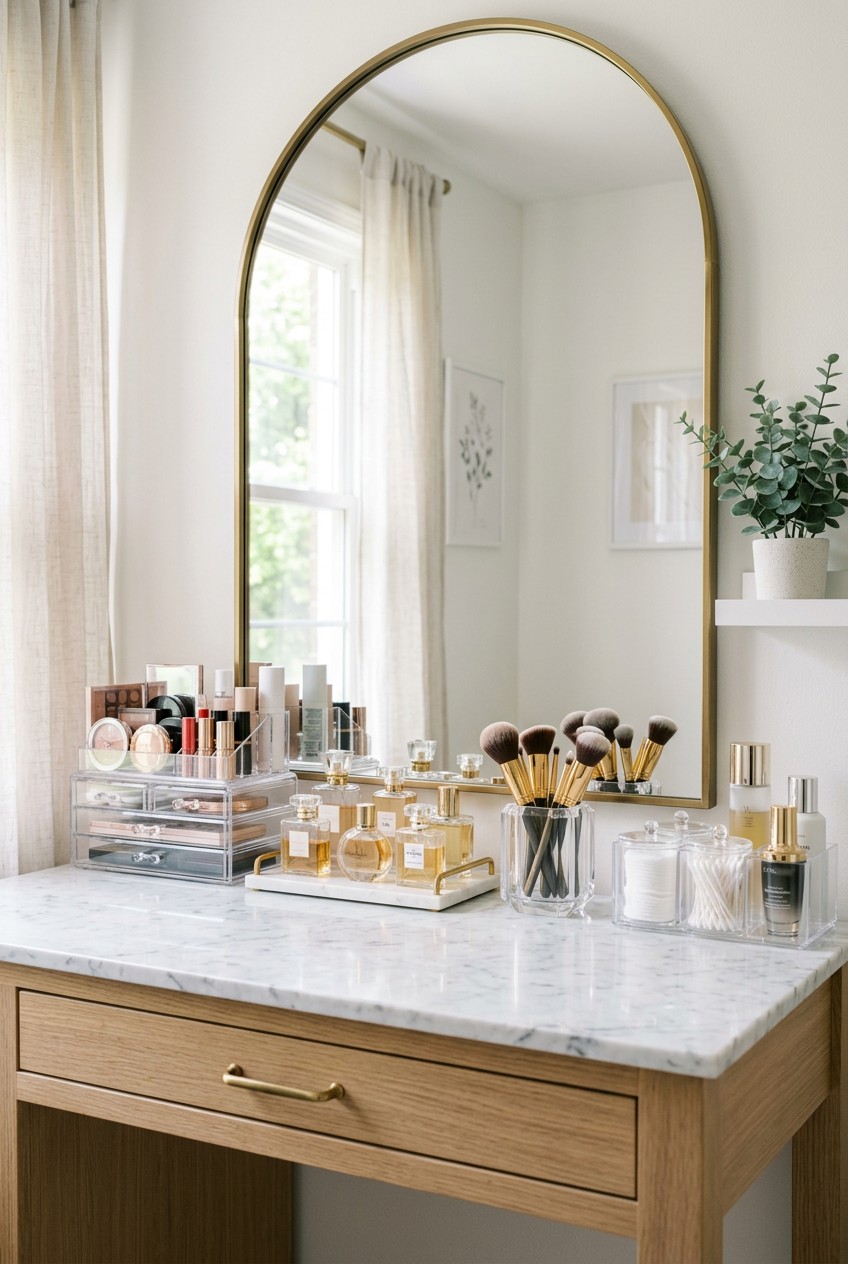
2. Embrace Clear Acrylic Organizers For Total Visibility

I’m obsessed with clear acrylic. Skip the opaque plastic bins. They look cheap and hide your expensive products. Last Friday at The Container Store, I stood in the aisle tapping on different plastics. The cheap stuff sounds hollow and scratches if you look at it wrong. You want thick, heavy acrylic. I personally swear by the Muji 3-Drawer Stackable Acrylic Case. It costs $49.00 CAD ($36.00 USD), and it’s heavy enough that it won’t slide when you yank a drawer open. It measures 10.2 by 6.9 by 3.9 inches. I use the top drawer for my 0.15 oz MAC lipsticks, lining them up so the shade names face outward. I tried using a cute woven basket from Target for my lipsticks once. Big mistake. I spent ten minutes every morning digging through a dark pit just to find my everyday nude shade. The Container Store also makes a fantastic Acrylic Makeup Organizer With Drawer for $39.99. It has 12 specific 1-inch slots on top that fit standard lipsticks and 0.24 oz concealers. When you can see everything at a glance, you actually use your products. It’s that simple. Plus, wiping down acrylic with a damp microfiber cloth takes two seconds. You aren’t going back to opaque bins once you try this.
3. Maximize Drawer Space With Adjustable Dividers

Most people get this wrong. They dump all their compacts into a wooden vanity drawer and call it a day. Every time you open the drawer, everything slams to the back. It sounds like a car crash. I ruined a 0.28 oz Charlotte Tilbury Airbrush Flawless Finish powder ($48.00) this way. It shattered because I opened my drawer too fast. To fix this, you need tension dividers. I bought an 8-pack of adjustable bamboo drawer dividers from Amazon for $24.99. They expand from 12.2 to 21.4 inches, so they fit almost any drawer. I wedged them horizontally across my vanity, creating tight rows. Now, my palettes stand vertically, and my 1 oz foundation bottles sit neatly in a row. If you’re not into the bamboo look, the OXO Good Grips 4-Piece Adjustable Drawer Bin set is $29.95. They are 3-inch deep plastic bins with gray silicone feet so they won’t slide. I use the 6-inch by 12-inch bin for my bulky 4 oz setting sprays and 1.7 oz primers. I’m telling you, segmenting your drawers changes everything. You aren’t digging through a chaotic soup of plastics anymore. Every item has a secure boundary, and nothing shatters when you pull the handle.
Rubbermaid Configurations Deluxe Custom Closet Kit 4-8 Ft.
Honestly, Rubbermaid Configurations Deluxe Custom Closet Kit 4-8 Ft. Adjustable surprised me — sturdier than it looks in the photos, and over 81 buyers gave it 4.5 stars.
4. Utilize Vertical Space With A 360-Degree Rotating Organizer

If you’re working with a tiny countertop, horizontal space is a luxury you don’t have. I used to keep all my 1 oz skincare serums scattered across my bathroom counter. It looked cluttered, and I’d constantly knock my 1.7 oz Estée Lauder Advanced Night Repair serum ($125.00) into the porcelain sink. I practically cried the day I chipped the glass dropper. That’s when I bought the Cq acrylic 360 Degree Rotating Makeup Organizer. It’s $12.99 on Amazon. It’s a tall, cylindrical tower with adjustable shelves. You snap the plastic trays into different slots depending on the height of your bottles. I set the bottom shelf to a 5-inch clearance so it fits my 16 oz CeraVe hydrating cleanser ($15.99) and my 4 oz Paula’s Choice BHA liquid ($34.00). The top section has tiny 1-inch compartments where I shove my 0.05 oz eyebrow pencils and 0.24 oz concealers. It spins quietly, and I can reach my entire morning routine without moving my feet. The Masirs 360 Rotating Makeup Organizer is another solid option for $18.99, featuring a slightly thicker base. Don’t buy the ones with cheap ball bearings. They squeak and get stuck. I’ve tested a few, and the Cq acrylic version spins like butter. It’s the best $13 I’ve ever spent.
5. Repurpose A Tiered Spice Rack For Your Foundation

I love a good repurposing hack. Last month at Walmart, I was wandering the kitchen aisle and spotted the Copco 3-Tier Non-Skid Pantry Cabinet Organizer. It’s a spice rack for $9.98. It measures 3.5 inches high and expands up to 22 inches wide. I bought it on a whim, brought it home, and set it on my vanity. It’s brilliant. I lined up all my 1 oz foundation bottles on the top tier, my 1.5 oz primers on the middle tier, and my 0.5 oz cream blushes on the bottom tier. Because it’s stepped, I can read every label without moving bottles. Before this, I kept my foundations in a flat acrylic tray. The taller bottles in the front always blocked the shorter ones in the back. I’d forget I even owned my 1 oz Armani Luminous Silk foundation ($69.00) because it was hiding behind a 4 oz bottle of Mario Badescu facial spray ($7.00). The non-skid rubber lining on the spice rack is a crucial detail. It grips the glass bottles so they won’t topple over if you bump the table. I’m never going back to flat trays for my liquid face products. It’s the cheapest, smartest fix I’ve found. You might also like: 15 Inspiring Home Makeover Ideas You Haven’t Thought Of
6. Build A DIY Magnetic Makeup Board For Wall Storage

If your vanity has zero drawer space, you have to look at your walls. I tried this DIY project last Sunday and I’m obsessed. I went to Target and bought a basic 14×16 inch black poster frame for $6.00. Then I drove to Home Depot and bought a 10-foot roll of aluminum metal flashing for $8.48. I cut a 14×16 inch piece of the metal using heavy-duty tin snips—wear thick leather gloves, the edges are sharp and I definitely gave myself a nasty slice on my thumb. I popped the metal sheet into the frame behind the glass. Next, I took small, 0.75-inch ceramic circle magnets (a pack of 50 is $6.99 at Michaels) and hot-glued them to the back of my favorite 0.28 oz powder compacts and single 0.05 oz eyeshadows. Do not use those flimsy peel-and-stick magnet strips. They are too weak. I watched my 0.16 oz NARS Orgasm blush ($32.00) slide slowly down the board and shatter on my tile floor because I used a cheap magnet strip. Ceramic magnets are strong. Now, my daily powders are displayed on the wall like modern art. It frees up my entire desk surface, and I grab exactly what I need instantly. You might also like: 15 Stunning Organizing Kitchen Home Hacks Ideas You Haven’t Thought Of

Galasily 3 Pack Laundry Detergent Dispenser Container with
If you want something that just works, Galasily 3 Pack Laundry Detergent Dispenser Container with Tray is a safe bet (114 reviews, 4.5 stars).
7. Get A Skincare Mini-Fridge For Temperature-Sensitive Items

I thought beauty fridges were a gimmick until I tried one. I keep my apartment warm, and last summer, my 1 oz SkinCeuticals Vitamin C serum ($182.00) turned dark orange and smelled like hot dog water after just two months. Heat destroys active ingredients. I finally caved and bought the Cooluli 4L Mini Fridge for $79.99 from Best Buy. It measures 10.2 by 7.7 by 10.5 inches. I plugged it in right next to my vanity. I keep my 0.5 oz eye creams, my 1 oz Vitamin C serums, and my heavy stone jade roller inside. Applying a 40-degree eye cream at 6:00 AM is the most refreshing feeling in the world. It depuffs my under-eyes in minutes. If you’re going to buy a fridge, make sure you get one with a removable middle shelf. I had to take the shelf out of my Cooluli so my tall 4 oz Mario Badescu facial spray ($7.00) would stand upright. I won’t lie, the fridge has a constant, quiet humming sound. It’s like a soft computer fan. If you’re a wildly light sleeper and your vanity is in your bedroom, you might find it annoying. But for the sake of preserving my expensive liquids, I’m happy with a little white noise. You might also like: 20 Beautiful Aesthetic Home Makeover You Can Try Today
8. Streamline Makeup Vanity Organization With A Left-To-Right Flow

Your vanity setup should physically mimic your morning routine. I used to organize purely by packaging size. I’d put all the tall things on the right and all the short things on the left. It looked nice, but it was functionally stupid. I was constantly crossing my arms, grabbing a 1.7 oz primer from the left, then reaching across to the right for a 0.24 oz concealer, then back to the left for a 0.28 oz setting powder. It was an exhausting dance. Now, I organize strictly from left to right based on the order I apply things. On the far left, I keep my 1.7 oz Bobbi Brown Face Base ($66.00) and 1 oz foundations. Moving right, I have my 0.28 oz setting powders and 0.15 oz blushes. Next are the 0.04 oz eyeliners and 0.27 oz mascaras. On the far right, I keep my 0.1 oz lipsticks and my 4 oz setting sprays. I’m telling you, this left-to-right flow shaves five minutes off my morning routine. You aren’t thinking about where things are. Your hand just naturally moves down the line. I tried explaining this to my sister in Kroger last week while we were buying groceries, and she thought I was crazy. But she texted me two days later saying it fixed her chaotic mornings.
9. Designate A Portable Caddy For On-The-Go Essentials

Sometimes I don’t want to sit at my vanity. Sometimes I want to sit on the floor in front of my living room window because the natural lighting is better than my bedroom lamps. If I’m doing my makeup somewhere else, I need a portable solution. I used to just grab handfuls of products and drop half of them in the hallway. I broke a 0.33 oz Glossier Cloud Paint tube ($20.00) because I dropped it and stepped on it. It squirted bright pink cream blush all over my beige carpet. Tragic. To stop being a walking disaster, I bought the mDesign Plastic Portable Craft Caddy Tote from Amazon for $16.99. It measures 6 by 9.6 by 6.7 inches and has a sturdy handle. It has four deep compartments. I keep a duplicate set of my absolute bare minimums in here: one 0.24 oz concealer, one 0.27 oz mascara, a 0.1 oz lip balm, and three essential brushes. When I want to do my makeup on the couch, I just grab the handle and go. You won’t leave a trail of expensive cosmetics across your house anymore. It’s also perfect if you share a bathroom and need to quickly evacuate when your roommate needs the shower.

AMKUFO 6 Pack-Closet-Organizers-and-Storage
If you want something that just works, AMKUFO 6 Pack-Closet-Organizers-and-Storage is a safe bet (52 reviews, 4.5 stars).
10. Maximize Storage With IKEA’s Affordable Solutions

You can’t talk about vanity setups without mentioning IKEA. It’s the holy grail for a reason. I bought two of the white IKEA ALEX drawer units for $90.00 each. They are 14 1/8 inches wide and 27 1/2 inches tall. I rested a 47-inch white LINNMON tabletop across them, and boom, a custom vanity for under $250.00. The ALEX drawers are deep, which is great, but they become bottomless pits if you aren’t careful. I highly recommend adding the KOMPLEMENT glass shelves. I bought the 29 1/2 by 22 7/8 inch size for $30.00 to put over a separate storage unit, and the heavy glass makes it feel like a boutique. For the wall above my desk, I installed the white SKÅDIS pegboard. It costs $22.00 and measures 30 by 22 inches. I bought the matching white SKÅDIS containers ($3.00 each) and hooked them onto the board. I store my bulky 4 oz bottles of brush cleaner and my weirdly shaped metal eyelash curlers in those cups. I tried using a cheap knockoff pegboard from a dollar store once, and the pegs constantly fell out every time I grabbed a tool. The IKEA SKÅDIS system locks the hooks in place. It’s sturdy, cheap, and looks incredibly clean.
11. Stop Storing Makeup In High-Humidity Bathrooms

This is my biggest pet peeve. I have friends who keep their entire $500 makeup collection sitting on a shelf right next to their shower. It’s a terrible idea. I used to do this in my college dorm. I kept a beautiful 0.24 oz Anastasia Beverly Hills Modern Renaissance eyeshadow palette ($45.00) on my bathroom counter. After three months of absorbing hot, steamy shower moisture every single day, the velvety powders turned into a hard, unblendable crust. Worse, I noticed tiny white fuzzy mold spots growing in the pink shades. I had to throw the whole thing away. Heat and humidity break down active ingredients, melt your 0.15 oz lipsticks, and create the perfect breeding ground for bacteria. You’re rubbing toilet-plume bacteria onto your eyelids. Disgusting. You must store your makeup in a cool, dry place. A bedroom vanity is ideal. Keep your setup away from direct sunlight, too. I once left a 0.2 oz stick of Milk Makeup bronzer ($24.00) on a windowsill, and the afternoon sun melted it into a messy, oily puddle that ruined my white desk. Keep your products in the dark, in a dry room. Your skin will thank you, and your products will last until their expiration date.
12. Separate Your Clean And Dirty Makeup Brushes

We need to talk about brush hygiene. Most people jam 45 different brushes into a single glass jar. When you use a brush to apply liquid foundation, it gets damp and sticky. If you shove that dirty brush back into the jar, it rubs against your freshly washed fluffy powder brushes, transferring wet foundation and bacteria everywhere. I dealt with terrible cystic acne on my chin for a year before I realized my dirty brushes were the culprit. Now, I use a strict two-cup system. I bought the Watpot Acrylic Makeup Brush Organizer from Amazon for $14.99. It measures 7.1 inches long, 2.7 inches deep, and 3.1 inches tall, and features three separate square slots. I labeled the left slot “Clean” and the right slot “Dirty.” (The middle slot holds my blending sponges). When I pull a clean brush and use it, I don’t put it back in the clean slot. It goes straight into the dirty side. Once the dirty side is full, I know it’s time to wash them. I use 1 tablespoon of Dawn dish soap ($3.99 for 16 oz) mixed with 1 tablespoon of olive oil ($6.99 for 16 oz) to deep clean my bristles. This simple separation trick cleared up my chin breakouts. You aren’t cross-contaminating your tools anymore.
HomePekite Laundry Pods Storage Container
HomePekite Laundry Pods Storage Container punches above its price — 15 buyers rated it 4.5 stars. I would buy it again.
13. Label Everything To Maintain Your System Long-Term

You can buy all the expensive acrylic bins in the world, but if you don’t label them, your system will fall apart in two weeks. I’m speaking from experience. I spent four hours organizing my drawers last January. I was so proud. By February, I was tired after a long day at work and started throwing my 0.24 oz concealers into the lipstick bin. Once one thing is out of place, the whole system crumbles. I finally bought a Brother P-Touch PTH110 label maker from Staples for $34.99. I printed out crisp, white adhesive labels with black text for every single compartment. I labeled my OXO bins: “Daily Face,” “Lip Gloss,” “Powders,” and “Eye Palettes.” I stuck the labels right on the inside lip of the drawers. It sounds neurotic, but it works. When a bin is explicitly labeled “Lip Gloss,” you feel a tiny jolt of guilt if you try to drop a chunky 1 oz foundation bottle in there. The label holds you accountable. It also makes putting things away brainless. I don’t have to think about where my 0.28 oz Fenty Beauty Killawatt highlighter ($40.00) goes. I just look for the “Powders” label. It’s the final, crucial step to making your organization permanent.
Getting your vanity in order isn’t just about making things look pretty. It’s about taking the stress out of your mornings. When you aren’t frantically digging for a dried-out mascara while running ten minutes late for work, your whole day starts better. I’ve wasted so much money replacing products I already owned simply because they were buried at the back of a dark drawer. Don’t make my mistakes. Start with that ruthless garbage bag purge, grab some heavy-duty acrylic, and separate those dirty brushes. No exaggeration. I promise you’ll feel a massive weight lifted off your shoulders. I’m so glad I finally tackled my own chaotic pile of compacts. If you try any of these systems, I’d love to know which one worked best for your space. Make sure you pin this guide for your next weekend organizing project, and save it so you have all the exact measurements when you head to the store!
Frequently Asked Questions
How do I start my makeup vanity organization?
Start with a ruthless purge. Check the expiration symbols on your products and throw away anything past its prime. Toss liquid eyeliners and mascaras after 3 to 6 months. Implement a strict one-in, one-out rule to prevent future clutter.
What is the best way to store lipsticks?
Clear heavy-duty acrylic organizers are the best choice. They allow you to see every shade instantly without digging. Store them upside down so the shade name is visible, and keep them away from direct sunlight to prevent melting.
How can I maximize deep vanity drawers?
Use adjustable tension dividers or silicone-gripped plastic bins to create tight compartments. This stops your compacts and bottles from violently sliding to the back of the drawer and shattering when you pull the handle open.
Why shouldn’t I store makeup in the bathroom?
Bathrooms have high heat and humidity from showers, which breaks down active ingredients and creates the perfect environment for mold and bacteria to grow in your powders. Always store your makeup in a cool, dry room.